Most of the roasting I’ve done over the last decade has been spent fussing over tiny increments of coffee, applying whispers of heat and air as precisely as possible to achieve an acceptable roast to use for defect detection in and quality assessment of green coffee.
I’ve measured my life in 50 gram batches; the weight of a soul, it turns out, is 50 grams.
When I first started as a coffee buyer, the company I worked for didn’t have a sample roaster, and so the first “coffee roaster” I’d ever used—a Poppery II popcorn popper I found buried in my parents’ basement in some box older than I was—found a home in my makeshift lab. It seemed like a suitable tool for the job. After all, the sample roaster sold by Michael Sivetz, the ostensible inventor of fluid bed roasting, was functionally equal—a heat gun with a glass tube and funnel attached to the top as a roast chamber. No control over loft or voltage—just a simple switch for on and off.
0 or 1; green or brown.
Before then, I’d been buying coffee the way I see many other young buyers buying coffee today: based on the recommendation of the trader on the phone from the import house or the cupping notes on the offer sheet. In other words: buying a coffee blind, and hoping for the best. Sometimes, I could receive a roasted sample of coffee from an importer to cup it myself, but that required sufficient availability of sample material and time to make that happen, and even then, I’d be subject to whatever roasting practices were in place in that lab as well as delays from the postal service. Often, by the time I’d received the roasted sample, the lot had already sold.
It was an imperfect system—and in those early years, I got lucky less often than unlucky with my selections. I started seeking out a way to roast samples myself to approach my buying with a greater level of intentionality. Enter: the Poppery II and my obsession with sample roasting.
Having the ability to roast your own samples gives you control over your coffee program. It allows you to roast and taste a coffee before you commit to purchasing it, and helps you understand a coffee in context by empowering you to cup it against other offers; it allows you to gain insight into how a coffee might perform during a production roast and assess how it’s holding up over time; and it gives you direct influence over the sample roast outcome itself and, thus, how you score a coffee.
This last point cannot be overstated: while a good sample roast will showcase a coffee’s potential quality and deficits transparently, a faulty sample roast can impact or impair final scoring by rendering a coffee: overly sour or otherwise out of balance; savory and brothy; grainy or peanut-like; astringent or bitter; papery and flat; lifeless and hollow; roasty; or simply mute the characteristics and distinctive attributes of the cup. Of all the issues I’ve encountered as a cupper and consultant, issues in sample roasting are by far one of the most common, preventable and damaging problems I come across. Faulty sample roasts result in misinformed purchasing, the rejection of suitable coffees, attenuation of defects from coffees that should be rejected or sent for re-milling, and both the masking and exacerbation of calibration issues between cuppers.
All of these can be resolved once coffees are roasted well and in a manner designed to showcase—clinically—quality potential.
And while you can use a popcorn popper as a sample roaster, I don’t recommend it; it’s perhaps only marginally more effective than never tasting a coffee and buying blind off a spot list. To best illuminate a coffee’s potential quality or deficits it takes a machine capable of greater control, precision, repeatability, workflow and observation. Every coffee is different—and anyone who has gone through the Q course or tasted one of the roast defect kits from Scott Rao or Iterations from Rob Hoos understands that how you roast a coffee will change its expression in the cup, its vibrancy and its quality. Consistency is key. But sample roasters are expensive—and it can be difficult to find reliable information or an understanding of the quirks and quibbles of a machine before you buy unless you’re willing to spend eons panning for gold on online forums.
But: I collect sample roasters the way that Lance Hedrick collects grinders.
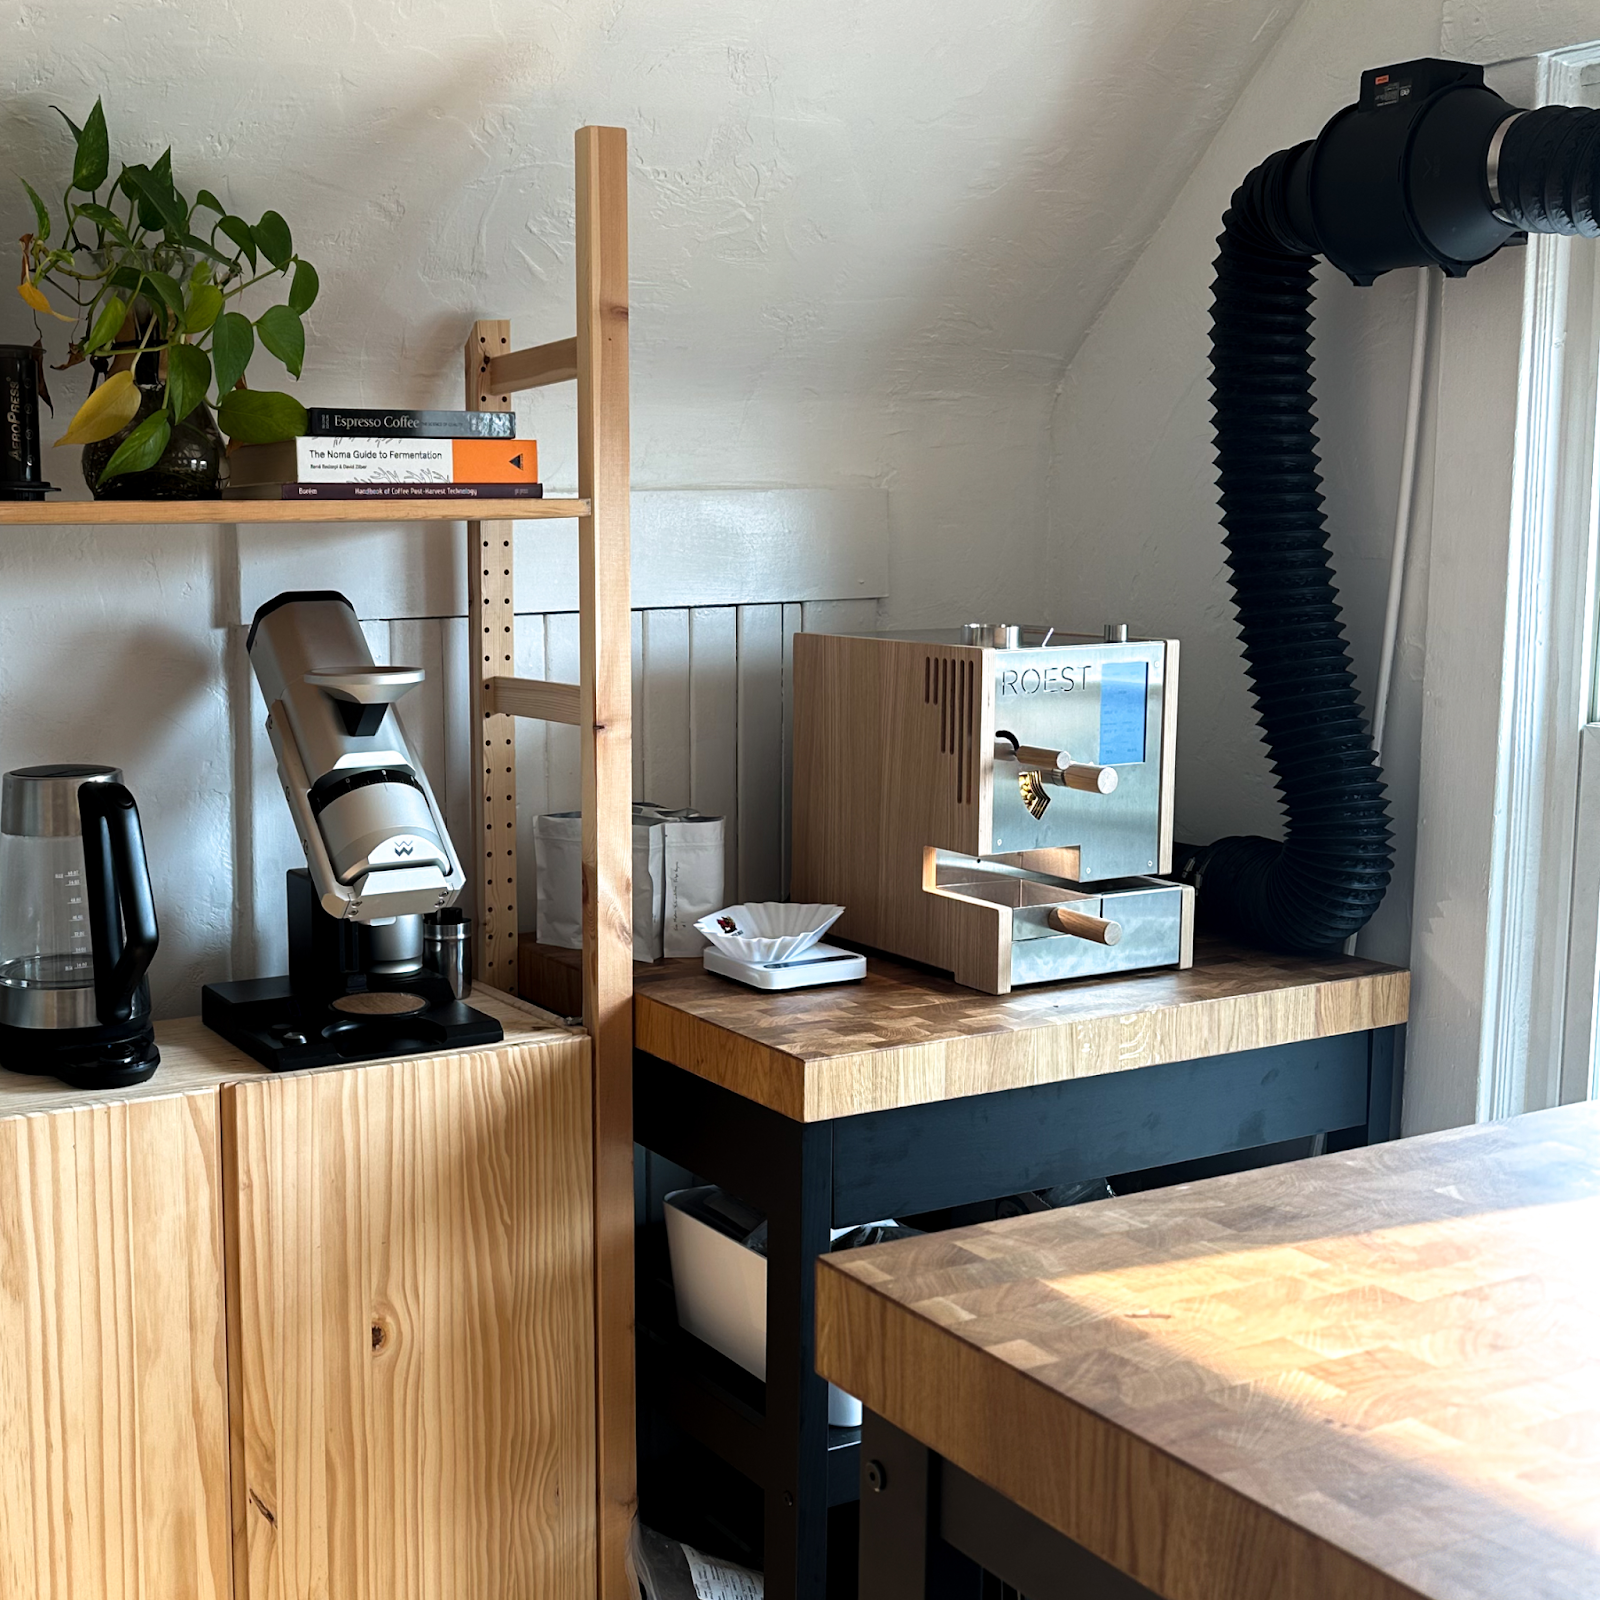
I hope that by providing a nuanced look at each of the four roasters on my bench—an Ikawa Pro, Kaffelogic Nano 7, Arc S, and Roest L100 Plus—you’ll have sufficient context and insight about each of these roasters and how I approach them to guide your own selection toward a machine that best suits your needs.
At the bottom of the section about each roaster, I’d hoped to provide my most recent sample roast profile for that machine. However, after extensive testing of my Swiss Army knife sample roasting profiles on different machines scattered across the known universe, I cannot. In none of the machines I evaluated are profiles genuinely plug-and-play. They all require extensive modification to perform as intended in your workspace and environment.
In the end of the piece, I’ve provided a table comparing all four roasters as a quick-reference guide.
Sections
Introduction
Ikawa Pro 50
Kaffelogic Nano 7
Arc S
Roest L100 Plus
Wrapping up
Ikawa Pro 50
I purchased an IKAWA in 2017 during its first year of international availability after months of deliberation and demoing the machine at SCA Expo in Seattle. I carried it home in the passenger cabin of a 737 in its Pelican travel case, demoting my clothes and samples and other luggage to cargo space in the plane’s underbelly.

Before the Ikawa, I’d been using a Buckeye Coffee BC-300 as a makeshift sample roaster. I didn’t love it; even after moving the bean probe into the door and swapping it for a 3mm thermocouple, the BC required at least 200g of sample material to log or roast consistently. Plus, it was a fully manual machine that required me to attend to it at all times, and had some quirks related to burner firing, coffee getting stuck behind agitation fins and a faulty airflow dial.
The Ikawa seemed to offer a lot of promise; its advertised features could help me solve my sample backlog problems and desire for consistency. I liked the look and feel of the machine (industrial design and build quality matter to me aesthetically and make objects and devices more enjoyable for me to use and interact with them) and its app, while barebones, was the first of its kind—and could theoretically be continuously updated to allow for future functionality. The roaster’s small footprint meant I could keep my desk clear—and since it’s electric, I wouldn’t have to run out for propane to complete a sample roast day and wasn’t exposing myself to carbon monoxide resulting from burning fossil fuels inside (let alone the risk of storing propane tanks inside).
I liked that, using the IKAWA, I could roast and do other work at the same time: write emails, or cup coffee, or do whatever else I needed to do. Because the roaster separated chaff using a cyclone that I was forced to empty between batches to make way for the next, I wasn’t worried about a fire—and so the Ikawa really seemed to be an automatic, hands-free and care-free roasting system.
Producing roasted coffee was as simple as push, twist, turn brown.
Short warm up (~2 min or less depending on your profile) and fast cool down times (ditto) meant that instead of a 30- or 45-minute warmup cycle at the start and 40-minute cooldown at the end of a roast day typical of drum roasters, I could turn on the machine and turn out samples every 7-8 minutes, almost immediately. If samples arrived by post at 1pm, I could have them roasted by 1:30.
Additionally, the roaster’s capacity—50 grams—was virtually ideal for me, allowing for 3 cups of a coffee on a cupping table and preserving precious sample material for later, as well as allowing me to sample roast coffees with limited sample material like pre-ship samples or experimental lots.
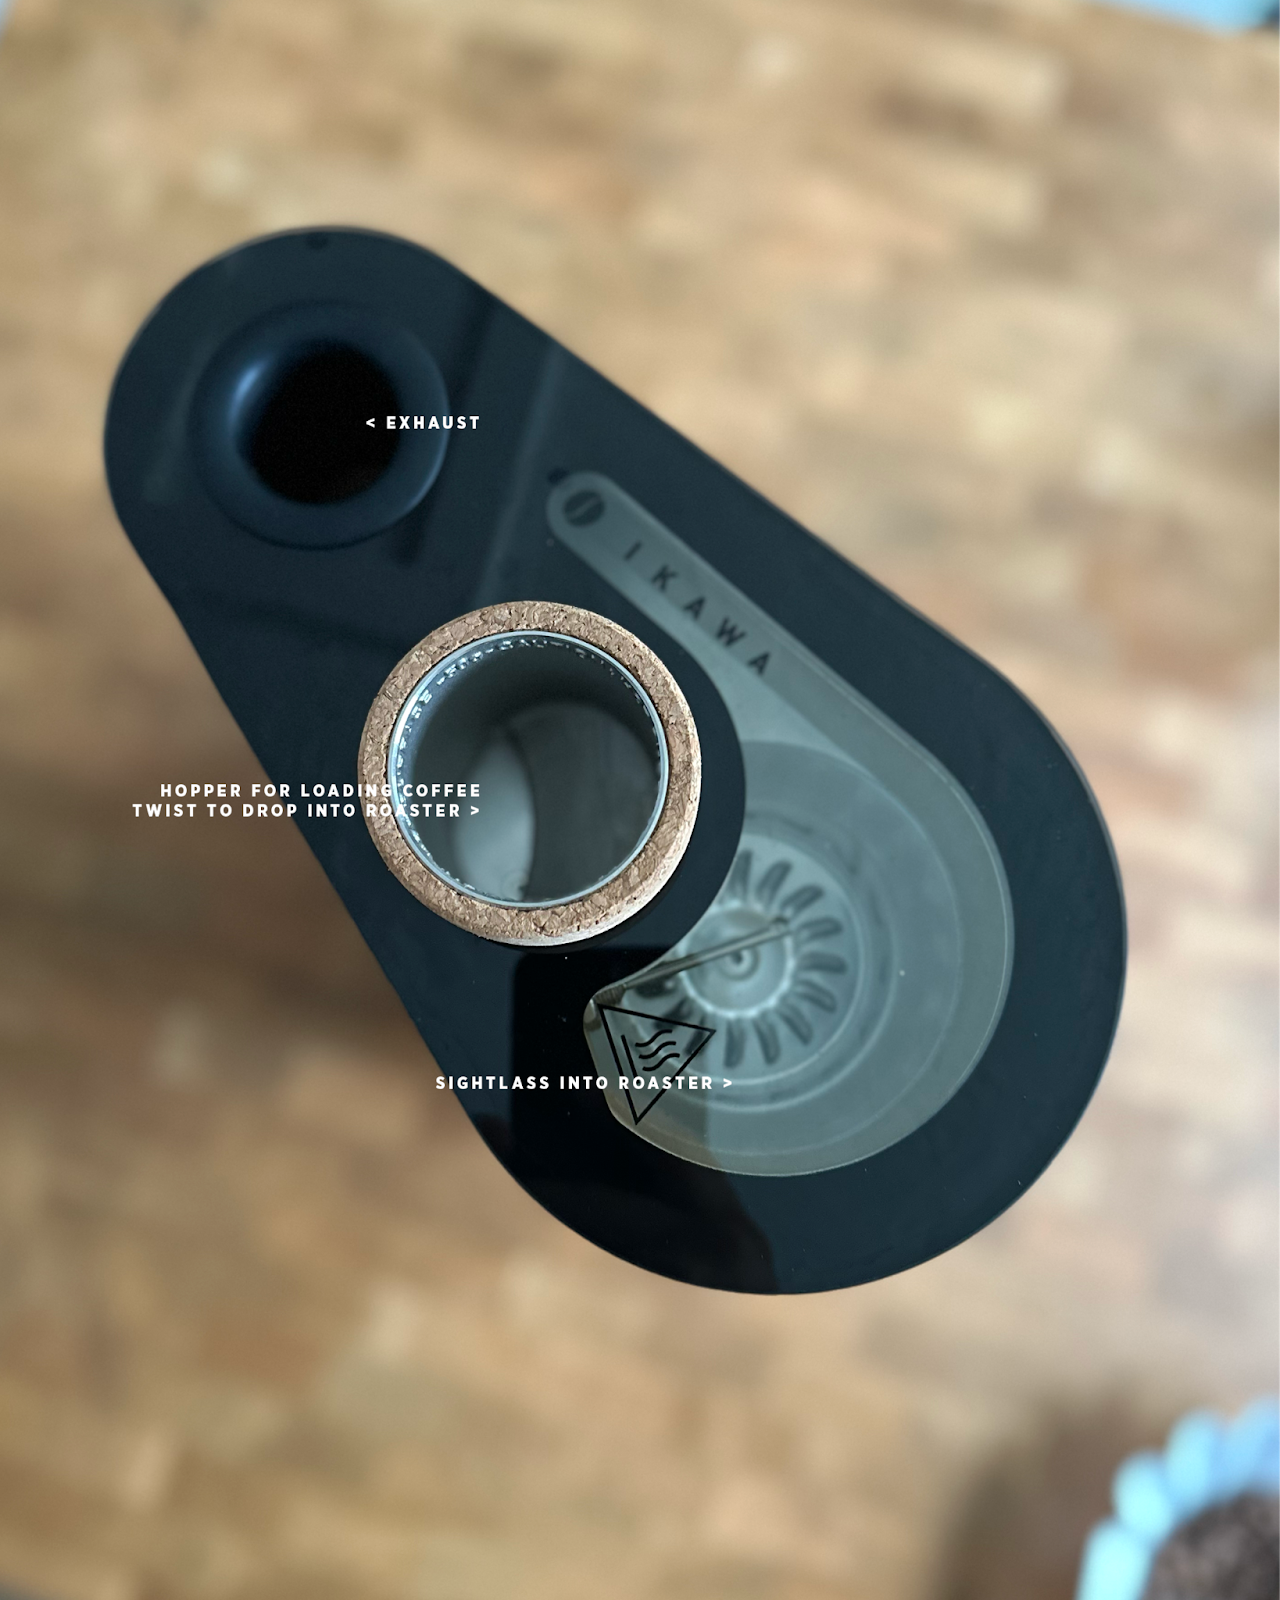
The Ikawa functions and is designed much like a tricked-out popcorn popper; you load coffee through a twisting hopper mechanism in the top, pulling it by gravity into a cylinder lined with 1.5cm vertical slits along the sides. When the roaster is on, air blows through these vertical slits through the pile of coffee and out. An electric heating element sits above the fan, cycling on and off depending on whether the programmed roast and PID called for it at any point based on the target profile and the differential read by the probe. The Ikawa app allows for programming a roast ahead of time which runs completely automatically, allowing a user to record hallmarks of the roast such as color change or first crack at which point the software would indicate development time and ratio as the roast progressed. With one button press, the operator can interrupt the roast before the programmed endpoint based on their desired development time or temperature and send both the roaster and coffee into auto-cooldown.
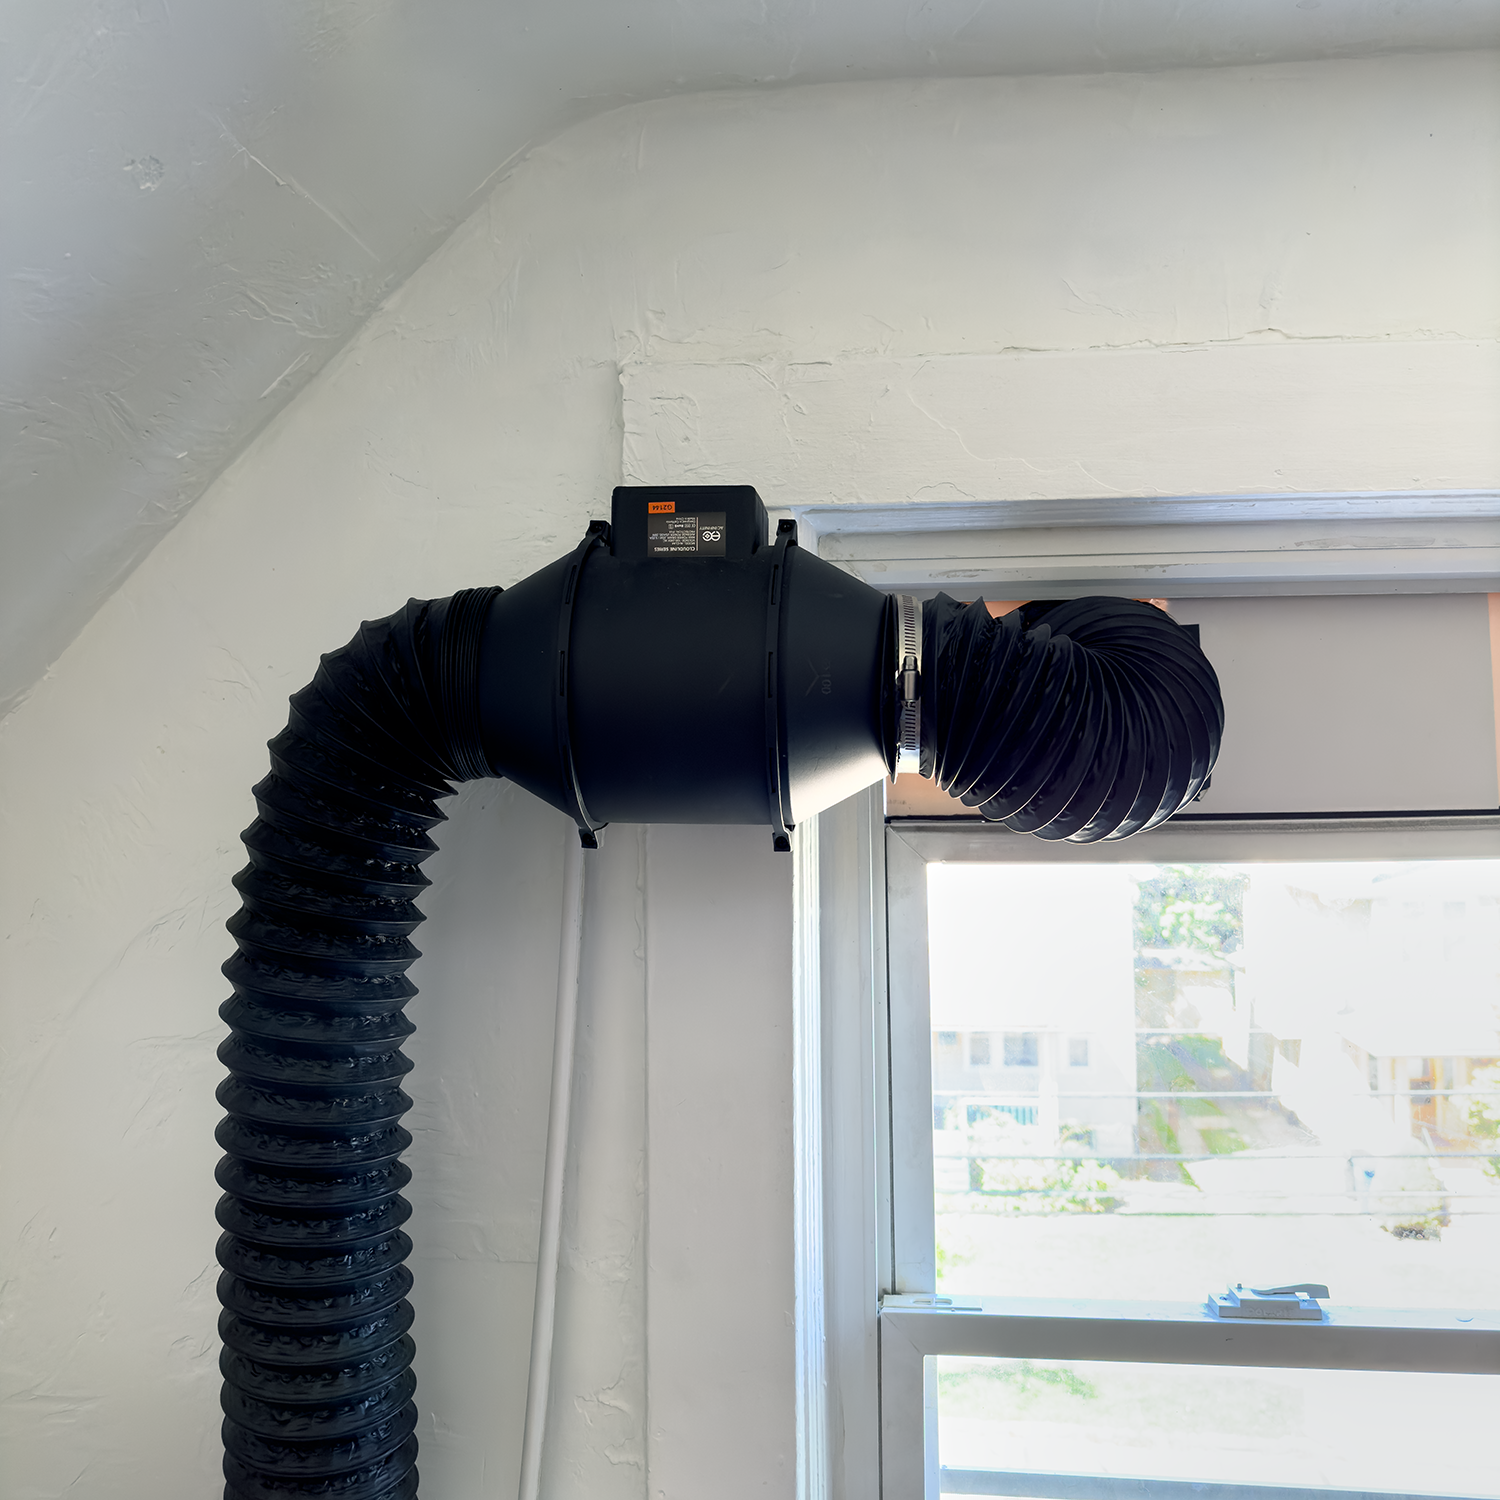
The machine vents into the room in which you’re roasting and does not include any way to attach the roaster to ducting. While the amount of smoke produced during a 50g light roast is relatively small, the aroma of roasting can be suffocating; the heat produced can build up over time; and any coffee roasting produces carcinogenic VOCs. For years, armed with my rescue inhaler, I dealt with this as a fact of life—but now, I use an AC Infinity Cloudline duct booster with a 4” silicone duct hanging over the exhaust port of the roaster to expel gasses from the roaster to the outside (you’ll need to ensure that the fan is set high enough to draw exhaust air out of the room but not so high as to overrun the roaster’s fan).
On my 2017 model roaster, there is just one probe which sits just above the bean pile and measures exhaust temperatures; all of the profiles I could build or run were based on the reading of that exhaust probe. Originally, it was a bare probe; but in refurbished and later models this was changed to a sheathed probe for the sake of durability and allowing a user to clean the inside of the roaster. Newer models of the Ikawa contain a second probe—an inlet sensor—which allows for creating inlet profiles in addition to exhaust profiles (an even newer model released at SCA Expo in 2023 contains a humidity sensor which enables automatic first crack detection).

During the roast, chaff is ejected from the top of the roasting chamber and passes into a cyclone, dropping into a collection jar which also serves as a sample jar. This means that before a roasted coffee can be removed from the roaster, the jar full of chaff must first be emptied—or else your coffee will contain both chaff and less-dense coffee that was ejected during the roasting process.
When a roast is completed—either automatically or by user intervention—the heating element switches off and the fan runs at a programmed speed, drawing cool air from the bottom of the roaster through the coffee until it has cooled. A toggle switch (on earlier models) or button (on later models) then transfers the roasted coffee through the cyclone down to the (hopefully now empty and chaff-free) sample collection jar.
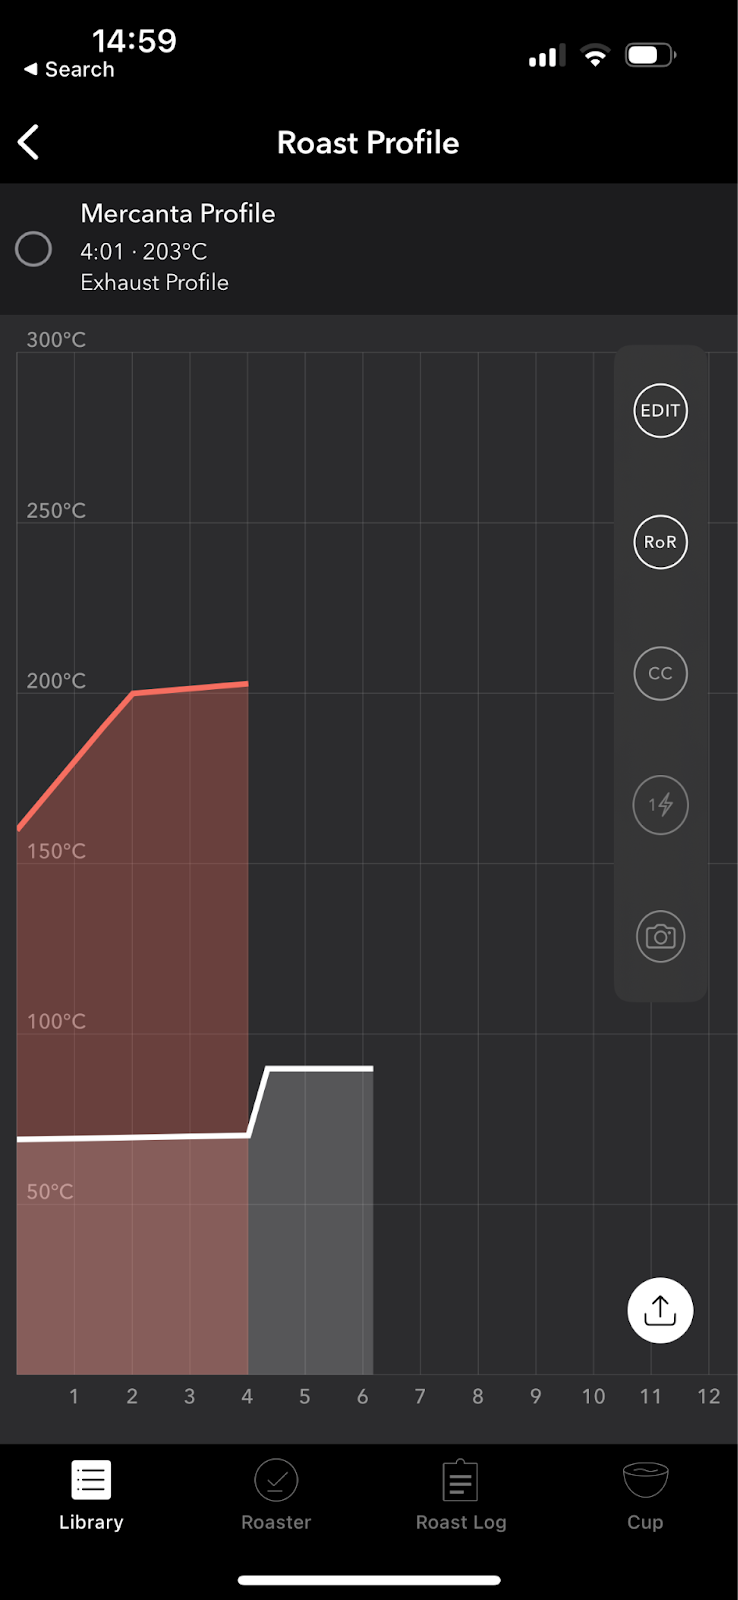
Profiles run with time on the X axis and temperature on the Y axis; the voltage to the fan adjusts according to the set points, and the machine fires the heating element on and off in an attempt to trace the line created by exhaust temperature setpoints set according to time targets.
If you understand the dynamics of the machine (that lower airflow creates a hotter roasting environment and more rapid development, but at the expense of evenness; or that higher airflow will increase evenness only until the point that the heating element can’t keep up and adequately replace heat in the air displaced by the fan) you can get reliable roasts. It took me about 3 months of roasting with the machine routinely to feel confident switching exclusively to sample roasting on the Ikawa; but once I had a profile that I had tested across a broad range of cultivars, processes, elevations and moisture contents, I felt confident enough to use the same profile—at least as a first look—for every coffee that came across my desk.
It wasn’t perfect; but more often than not, it worked. It was far more consistent and far more reliable than the Probat barrel roasters I’d used before, and I was getting far better sample roasts than those I tasted at importer labs or on my old Buckeye roaster and found that I was calibrated with other buyers I trusted.
But that success depends entirely upon your programming. When it works, it works; but the Ikawa doesn’t really deliver good results unless you have a good profile to begin with. I know of many importers and buyers who use them, but I know of just as many who detest the machine, believing that it doesn’t show coffees as well as it could, or should—and I know of many importers who complain that roasters will reject good coffees because of how the coffee tastes after roasting in the Ikawa. Because you can’t really make adjustments on the fly, if a roast is off-course or a profile isn’t well planned, it can ruin a coffee or lead to a poor showing on the cupping table. Because you only have visibility of the inlet and exhaust temps in fairly low resolution, roasts run quickly and there’s no chance to intervene, the best we can do is plan and hope for the best; roast and then verify later—provided you have the skill as a cupper to know the difference between a bad sample roast and faults with the green.
Roasters who don’t understand the way the machine operates—with the heat operating on a binary on/off system rather than adjusting voltage, and with the variable speed playing a huge role in the evenness of roast as well as the temperature of the roasting environment—could program roasts that will never result in a reliable sample roast.
At that point, it’s like roasting on a popcorn popper—one that leaves your wallet much lighter.
And because it doesn’t allow for changes on the fly or during the roast process, it’s not a roaster that will ever really teach you to roast. On drum roasters, you control the flame, air and drum settings in the moment, which impacts the Exhaust temperature, bean temperature, drum temperature, and every other thing we can measure in a roast. In an Ikawa, you program the outcome of these actions and allow them to run their course. In that sense—it’s a bad roaster for beginners, and a good sample roaster for someone who already knows how to roast and evaluate roast quality on the cupping table.
While it does connect with Cropster natively, the Ikawa is a poor roaster for profile exploration—in spite of what some might believe—because it only uses exhaust and inlet temperatures, is a small machine with very little thermal mass, and is difficult to observe directly during a roast. The greatest value of Cropster connectivity is integrating roasting into the green samples, inventory, and production queue portions of the platform.
These days, a host of user- and community-generated profiles litter the Internet, which in theory can make it easier than ever for a novice to get acceptable roasts, but idiosyncrasies between voltage delivery to the machine, probe readings, and firmware versions can impact how well a profile developed for one machine will work on another. And because it’s an air roaster, it is purely convective; this means that in places at higher elevations, the lower density of air and lower convective heat transfer requires some adjustments (higher set points or lower airflow). This phenomenon is difficult for many experienced roasters to control for—let alone a new one.
Back when I bought my Ikawa, the machine was available in just one size (50g) and with one probe (a bare exhaust probe) upon which all of the data was recorded and profiles were set. If given the choice between a 50g or 100g Ikawa, I’d choose the 50g again—especially if Ikawa decides to implement first crack detection into the smaller batch size. Importers that cup with 5 cups consistently might want to use the machine with larger capacity, but it’s overkill for most roasters (and frankly, most importers) if other data collection techniques are sound, the sample procurement funnel is working effectively, and supply chain auditing and vetting is implemented well. I don’t believe purchasing decisions should be based on a cup alone—and reliance on a 5-bowl cupping rather than doing the hard work before the sample arrives is not a robust purchasing procedure. A 50g roaster allows for greater flexibility in sampling, re-cupping over many sessions weeks apart, and spreading limited sample material to more prospective buyers.
The probe in my 2017 model is fairly well placed, serving as an adequate proxy to understand what was happening inside the roaster, but the inlet probe that Ikawa added a couple years later came as a welcome addition, allowing for more granular control over what the coffee actually experiences over the course of a roast. The original, bare exhaust probe lasted for 6 years and thousands of roasts; when the tip finally broke, because the machine is in no way user-serviceable, I had to send it to the UK for repair at a cost of $750 round trip (a far cry from the $3,500 I paid back for the machine in the first place. Today, the landed price of an Ikawa Pro100X with moisture release detection is almost double that). The machine was returned refurbished, cleaned, and with a new probe within 5 business days. While I’d of course prefer next-day local service, I must commend Ikawa for the customer service experience I received as well as the efficiency of the repair. With the new, more durable, and slower-to-respond probe in place, I expect the roaster will operate for thousands if not tens of thousands of batches more without issue.
When I received the new probe, I did have to readjust my profile—changing the set points by anywhere from 4-7ºC higher to achieve the same results. Dialing this in took me a frustrating amount of time as I explored alternate applications of heat—but in the end, the profile worked reliably. I do prefer the original, bare probe due to its speed of readings and accuracy, but given the target audience for the machine and the demands of commercial roasteries, the updated probe choice makes sense.
The simple design of the machine, I believe, aids in its overall reliability. Because the heating element and fan sit below the roasting chamber, they stay clean and functional and don’t require disassembly or cleaning. The cleanability of the machine has been improved with the new probe as well, allowing an operator to remove the oil and tar that inevitably builds up over hundreds or thousands of roasts—even 50g roasts. Short of keeping the machine clean inside and out—and ensuring there isn’t chaff building up on the inlet fans on the bottom—the Ikawa is essentially maintenance-free. The sample jars—of which Ikawa generously includes an extra in case you happen to break one (I, miraculously, have yet to do so)—are also easily cleaned.
Kaffelogic Nano 7
The probe on my Ikawa broke the week before Expo, a week before my Kaffelogic Nano 7 arrived. I’d preordered the unit on Indiegogo what felt like decades earlier based on recommendations from friends who had used the unit and boasted of its superior software and faster probe versus the Ikawa. The target retail price for the machine, about $1200, was a fifth of the price of the Ikawa. I’m always in search of more economical and effective solutions to common needs in the hopes of sharing them with professionals on the other side of the value stream, so I purchased one.
I didn’t have much time to learn the machine before I needed to put it into service—I was teaching a class at KW Collective in Ontario with Scott Rao a couple weeks after Expo and had hoped to prepare a set of triangulations for the class. With my Ikawa on repair, I set to work learning the Kaffelogic Studio profiling software, roasting and cupping nearly 50 batches.
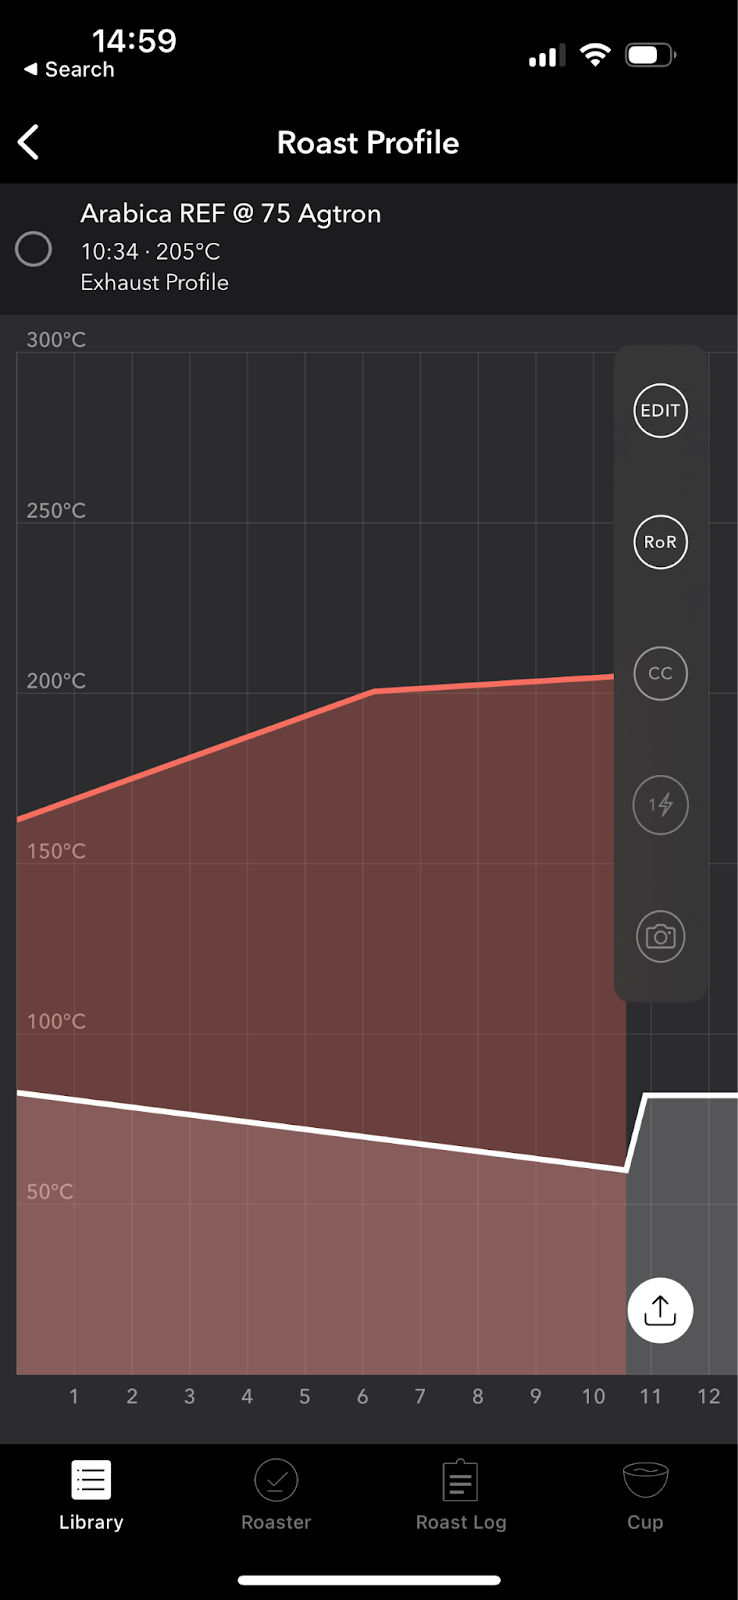
The machine, without the boost kit, accommodates a batch size of 90-120g, so I worked with 100g batches, hoping to preserve sample material while still getting accurate readings on the machine’s bare exhaust probe. The operation is simple: you load green coffee directly into the roaster (I used one of the green coffee trays that litter my lab space and seem to multiply like clover), place the glass roasting chamber on top of the unit, and hit the “play” button on the front. The machine does not have any warmup type, starting each batch from room temperature. This is an unusual feature—but means that because the probe and coffee are both starting from the same temperature, you are immediately gathering useful information about the roast. The manufacturer claims this lack of preheat “preserves CO2” in the coffee—but I can’t find any validation for that statement and categorize it as marketing. Other than data integrity, in my estimation, the greatest benefit of skipping preheat is time saved. Once the roast runs its course to your desired end point (adjustable during the roast), the roaster automatically cools down, once again to room temperature, in around 2 minutes.
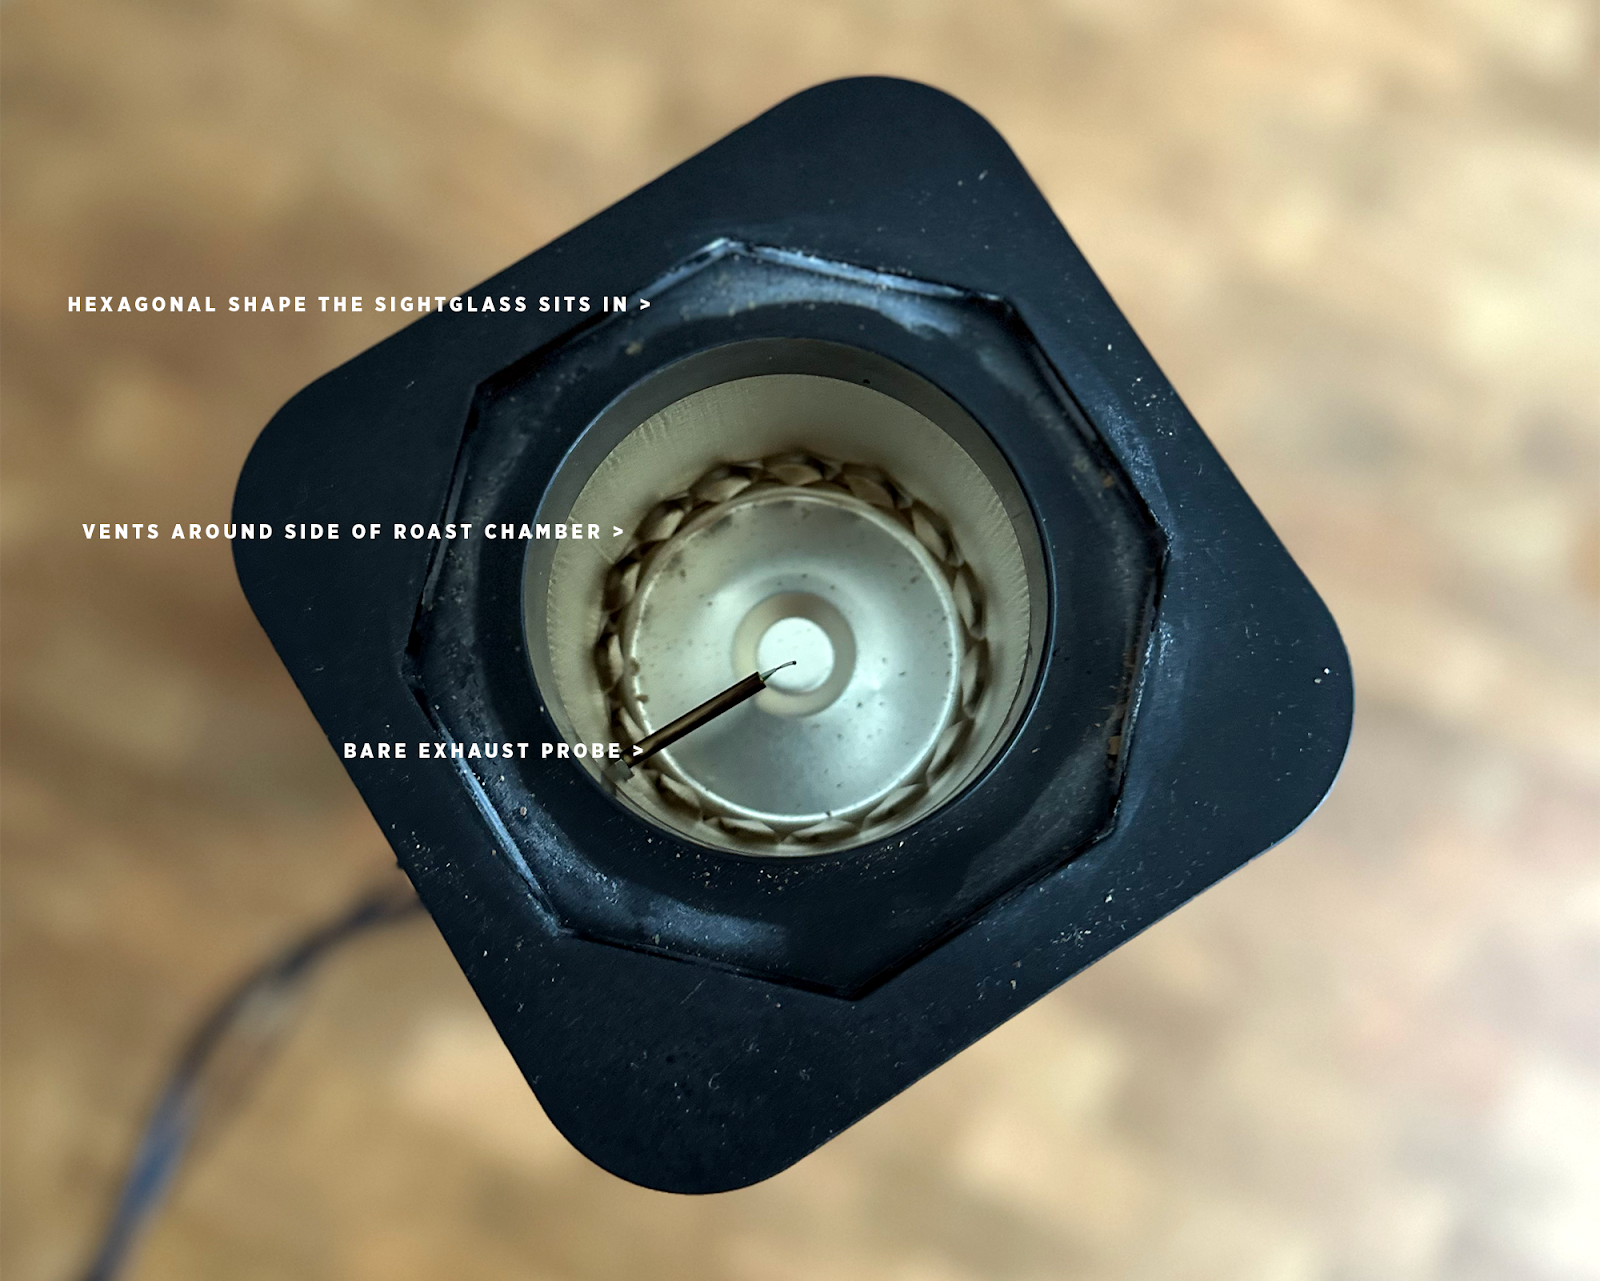
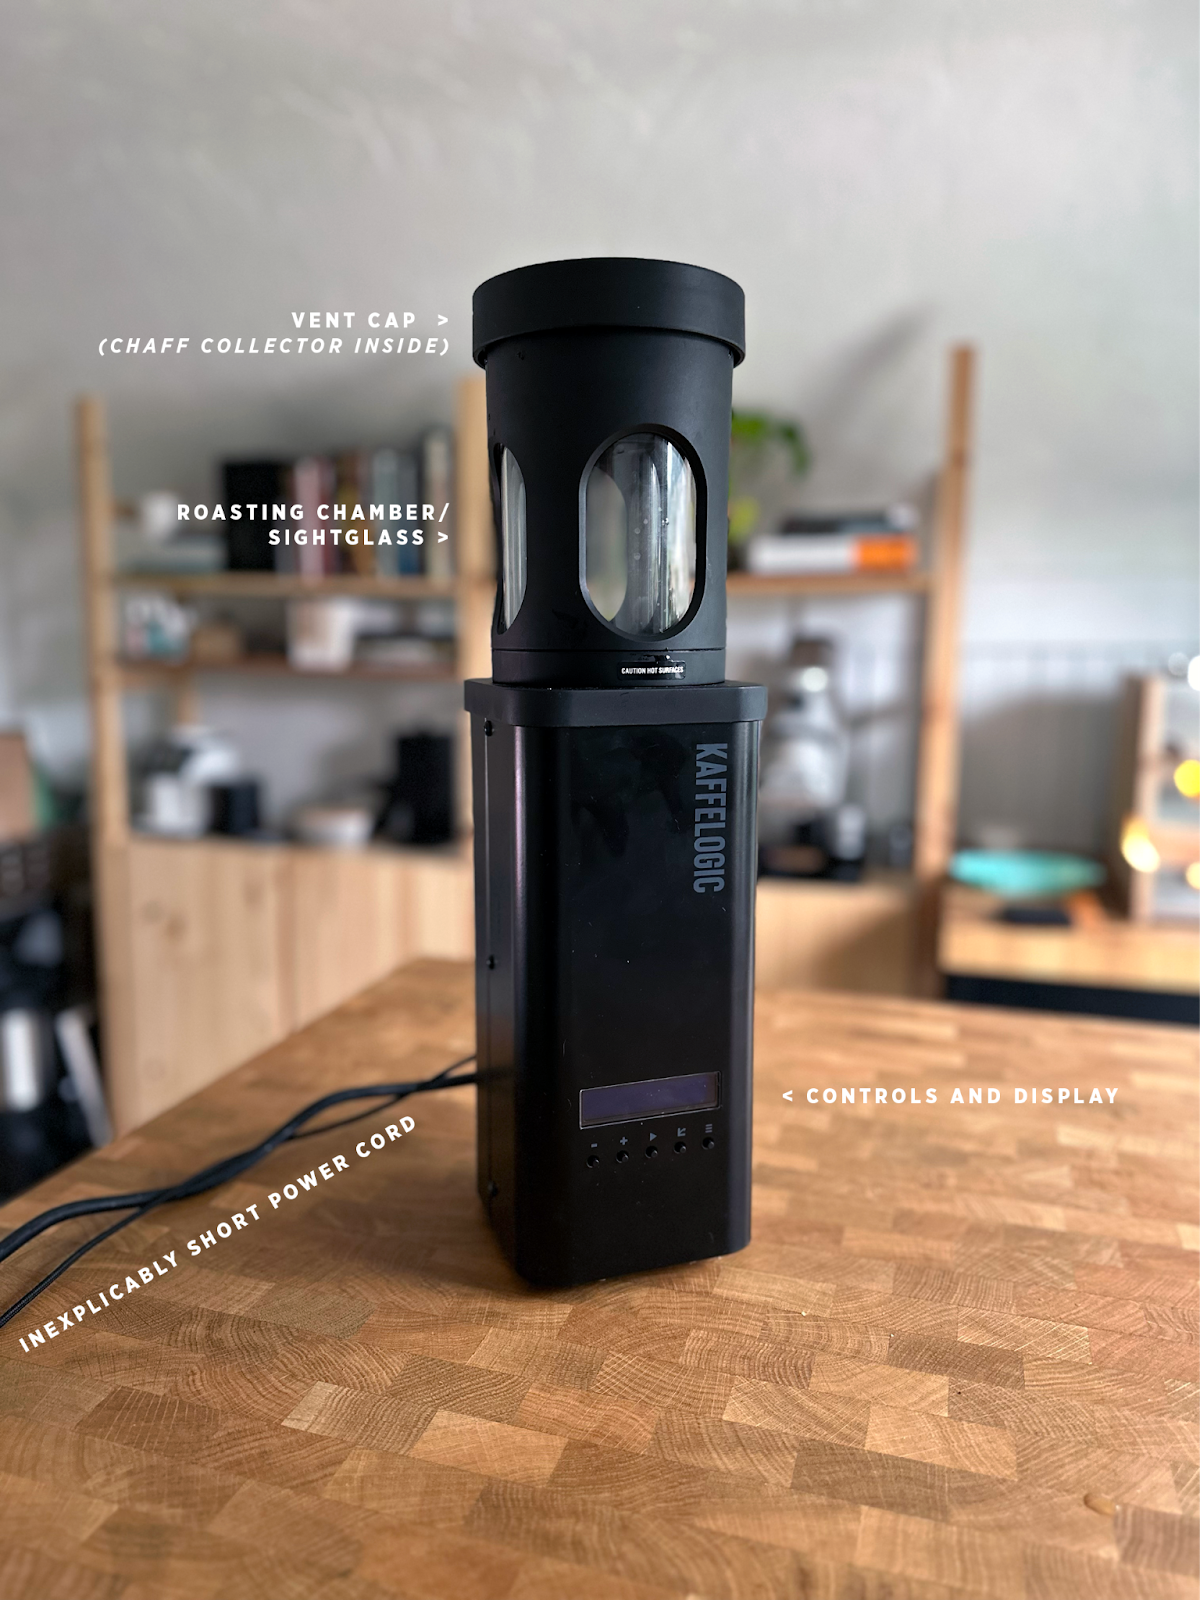
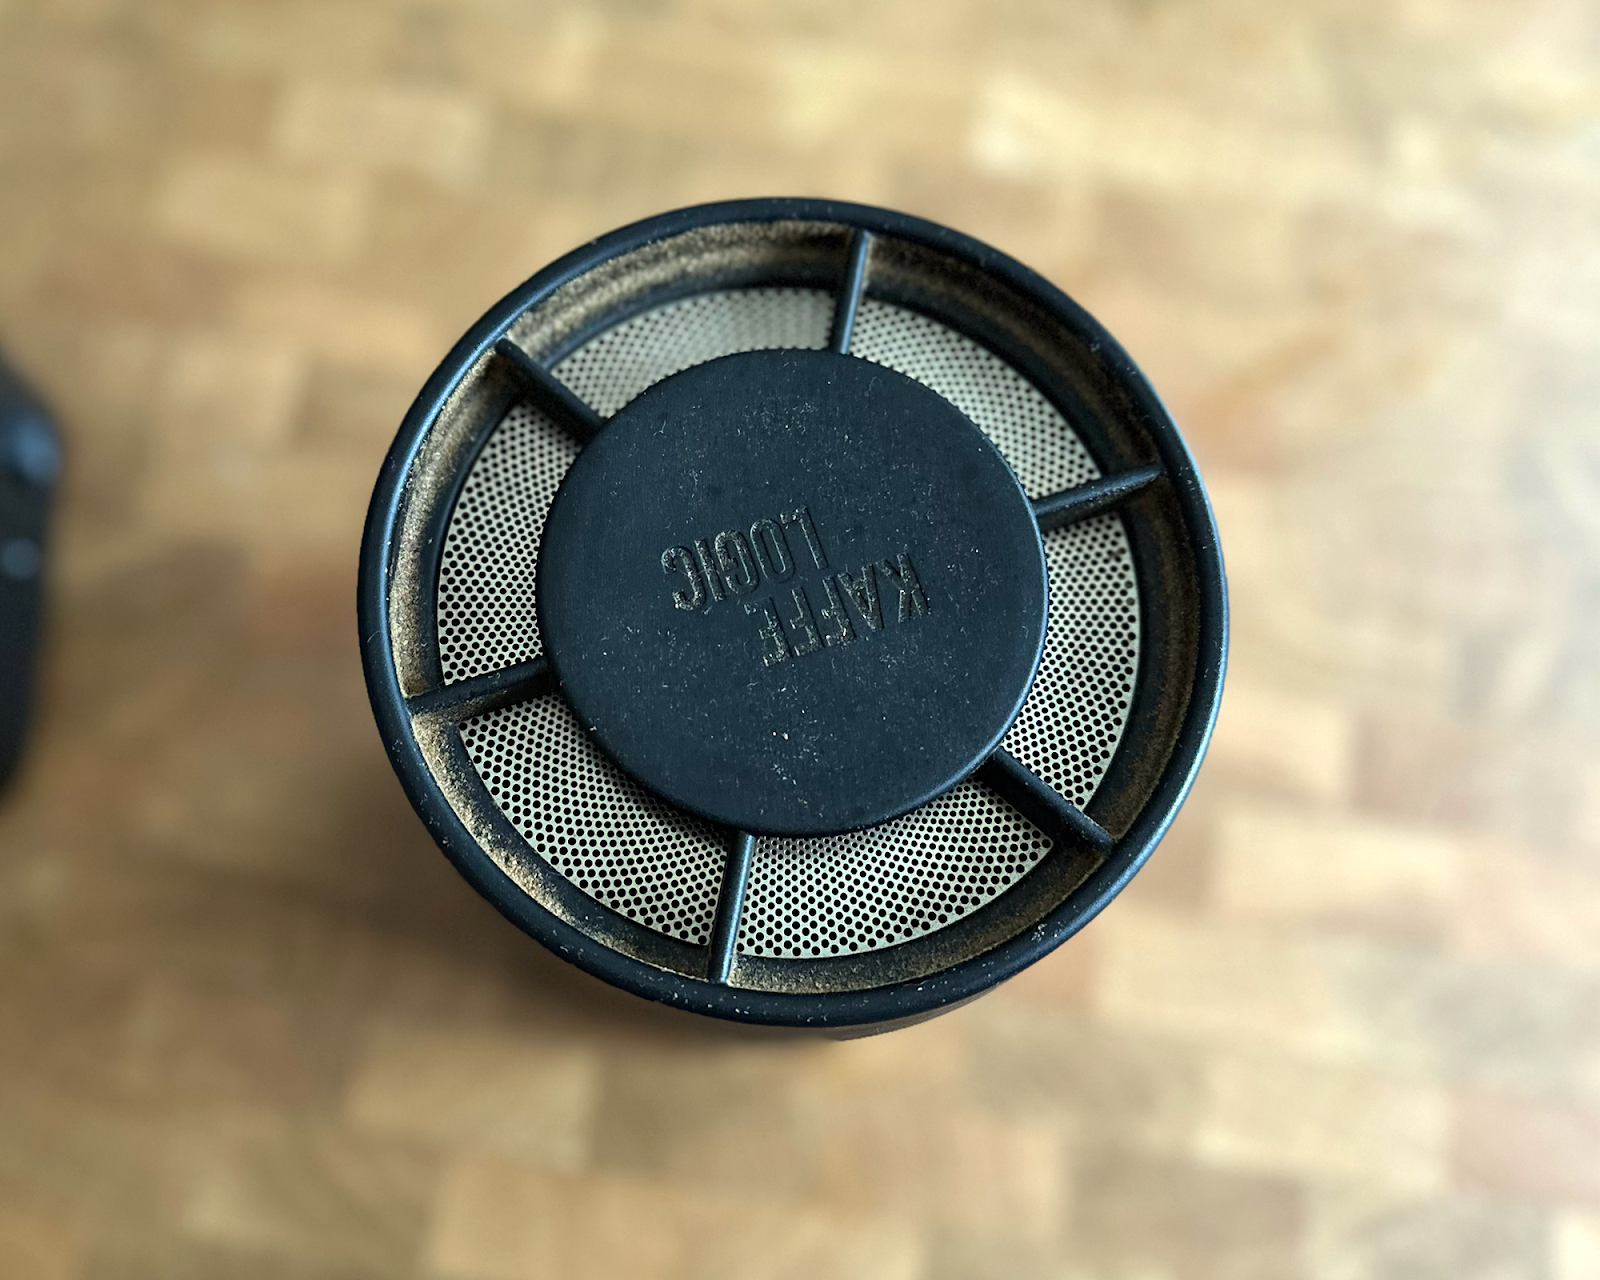
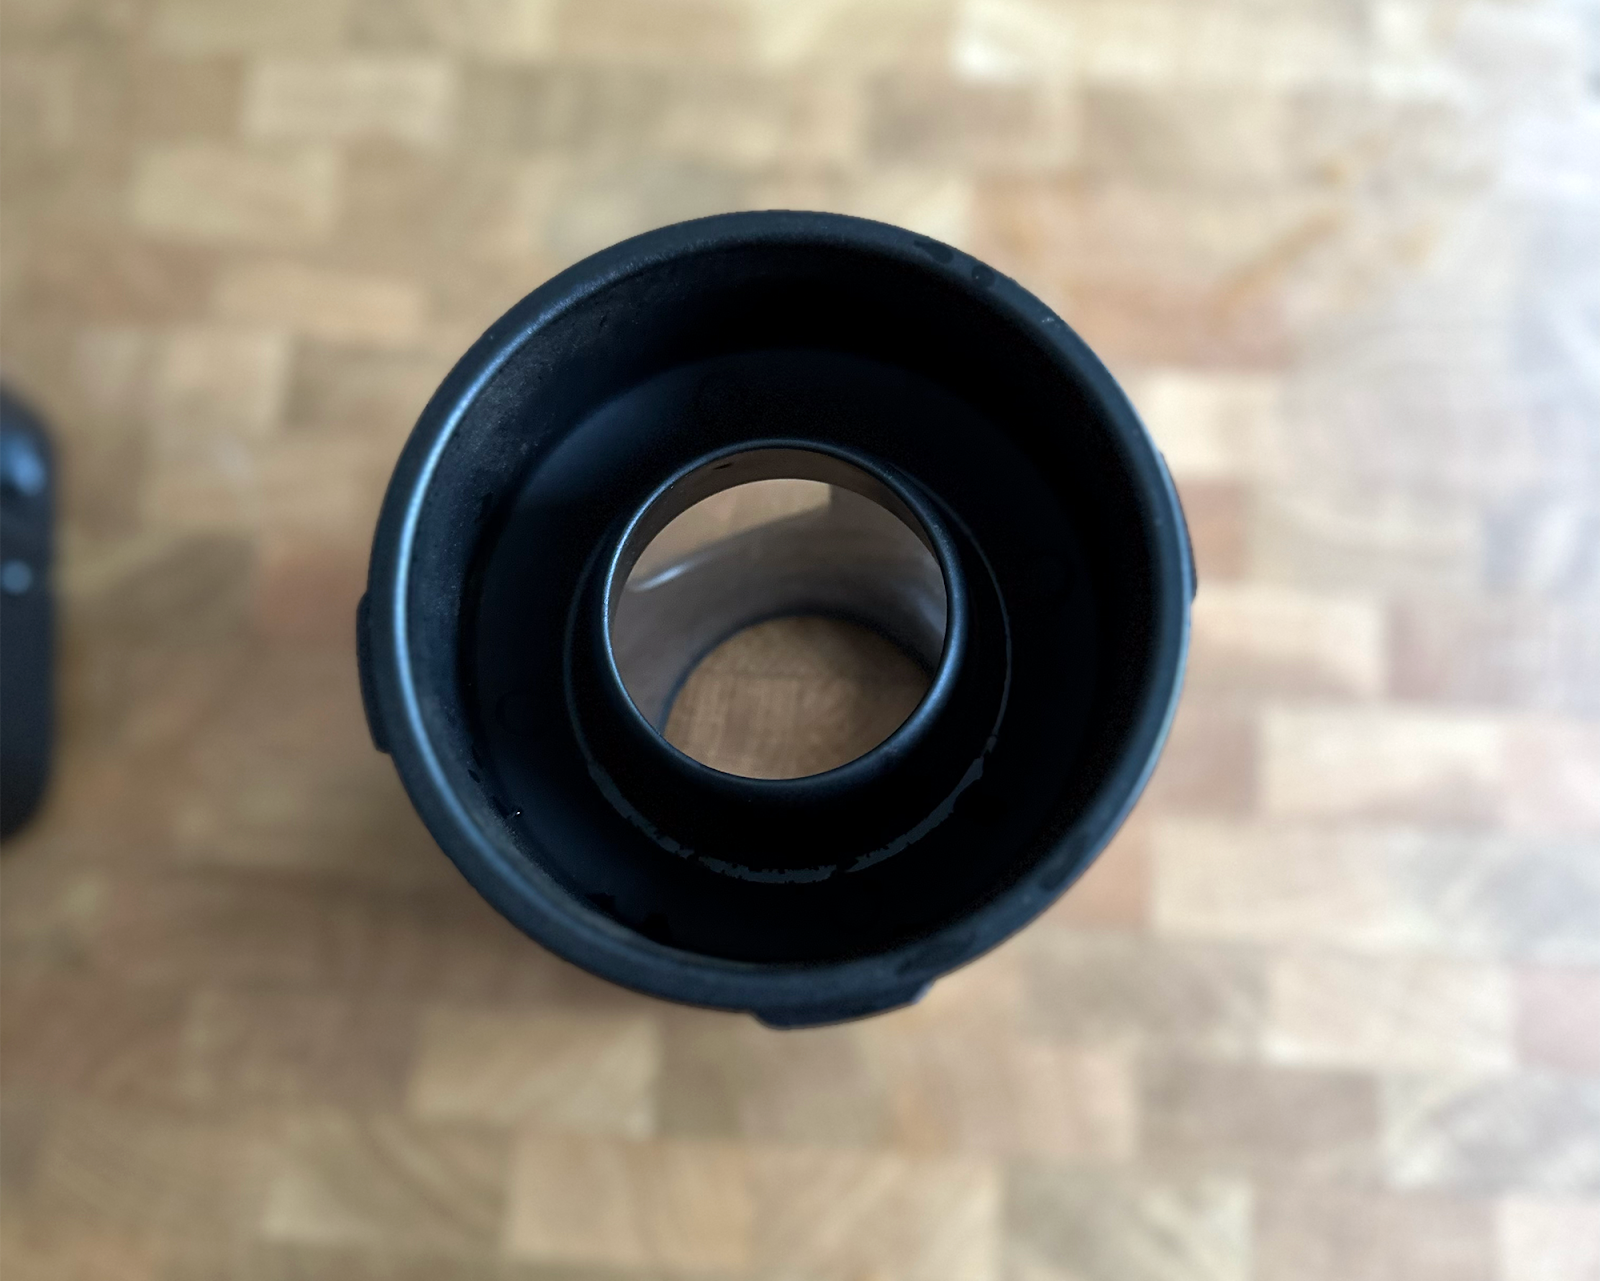
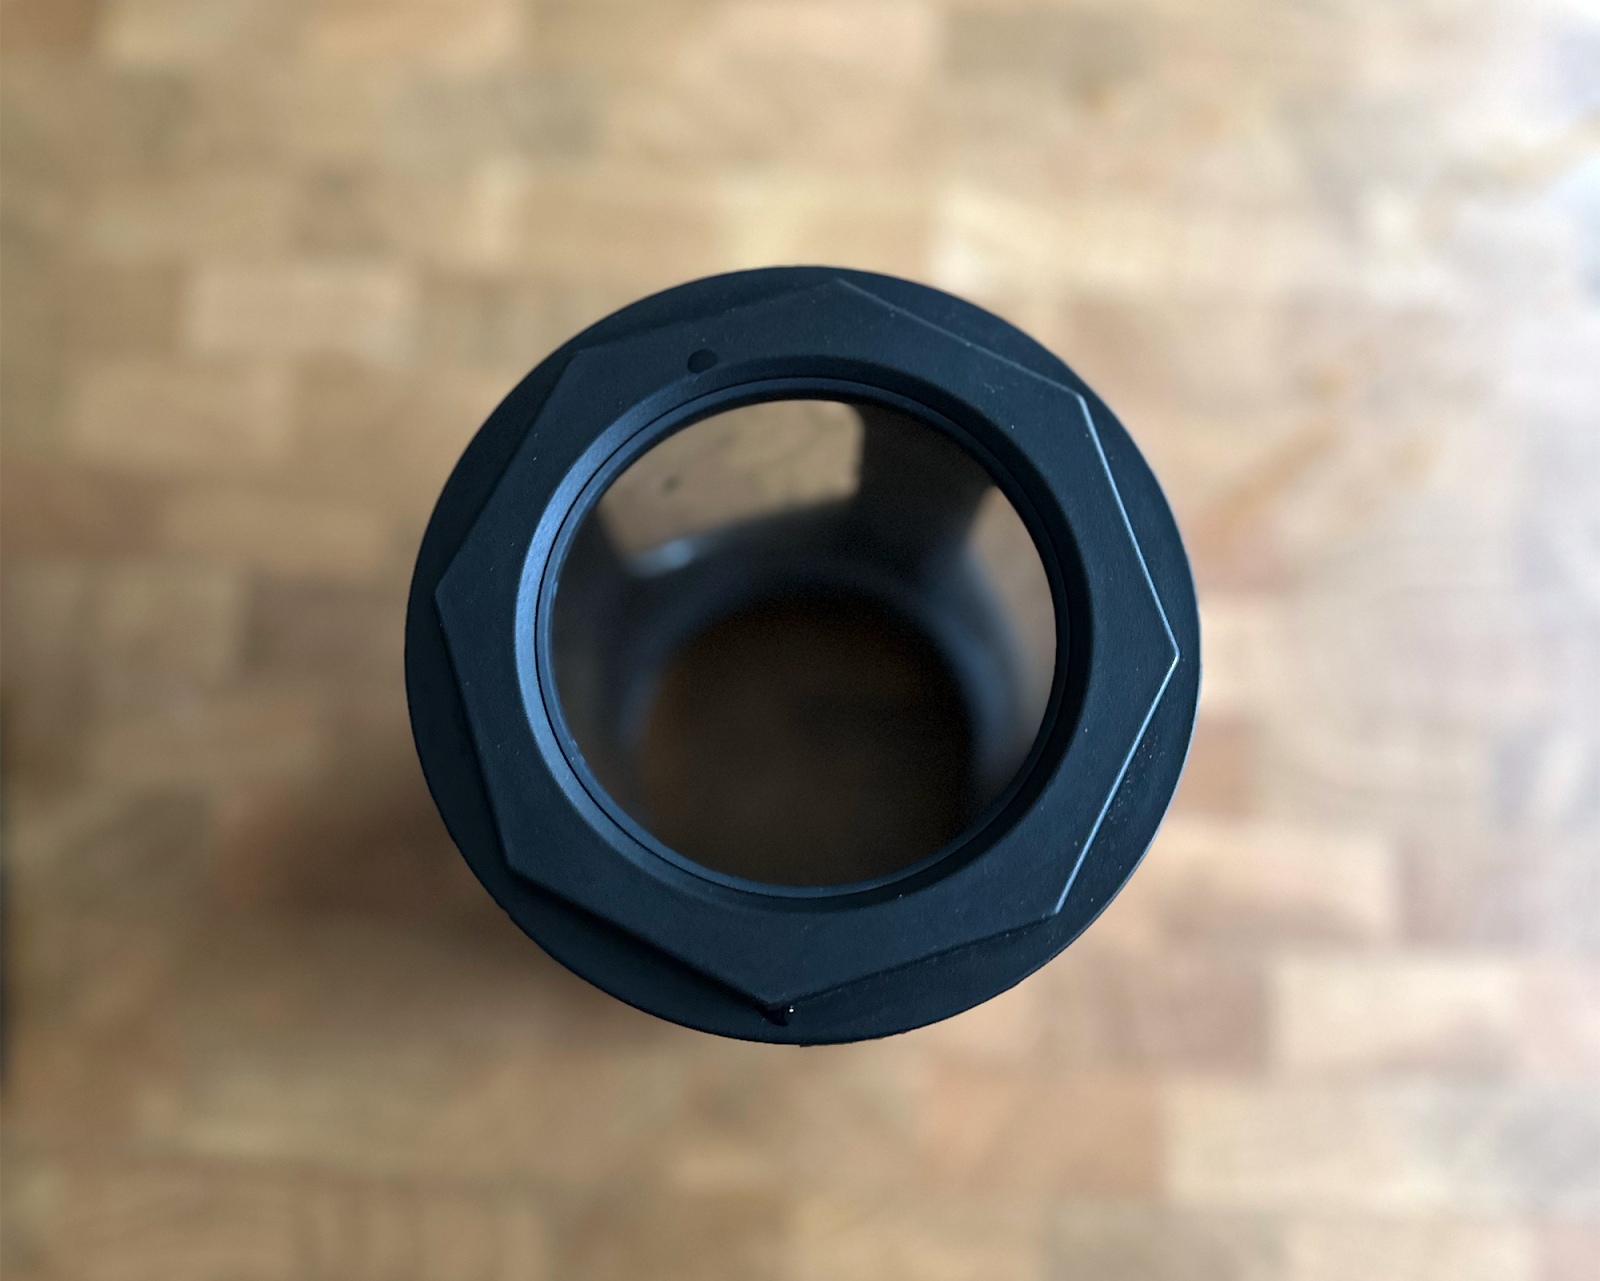
In some ways, the machine looks and feels like a DIY Ikawa, from its basic function, to its construction, to its probe placement (the first-gen Raspberry Pi chipset that controls the unit certainly contributes to that sense) and after speaking with one of the two founders of the company, it seems that was not far from the machine’s origins. The Kaffelogic lacks the fit and finish of the Ikawa: the buttons on the front of the machine feel plasticky and somewhat “loose,” the sightglass rests on the roaster in a hexagonal grid, without a friction fit or thread and thus is liable to be accidentally knocked off; and the chaff collection system—a sort of cup sits around the top of the roasting chamber like a donut and screws on with the vent cap—is finicky and lacks a visual reminder to empty it between batches (and it must be emptied before every roast or risks being a fire hazard—seriously. Don’t mess around with this).
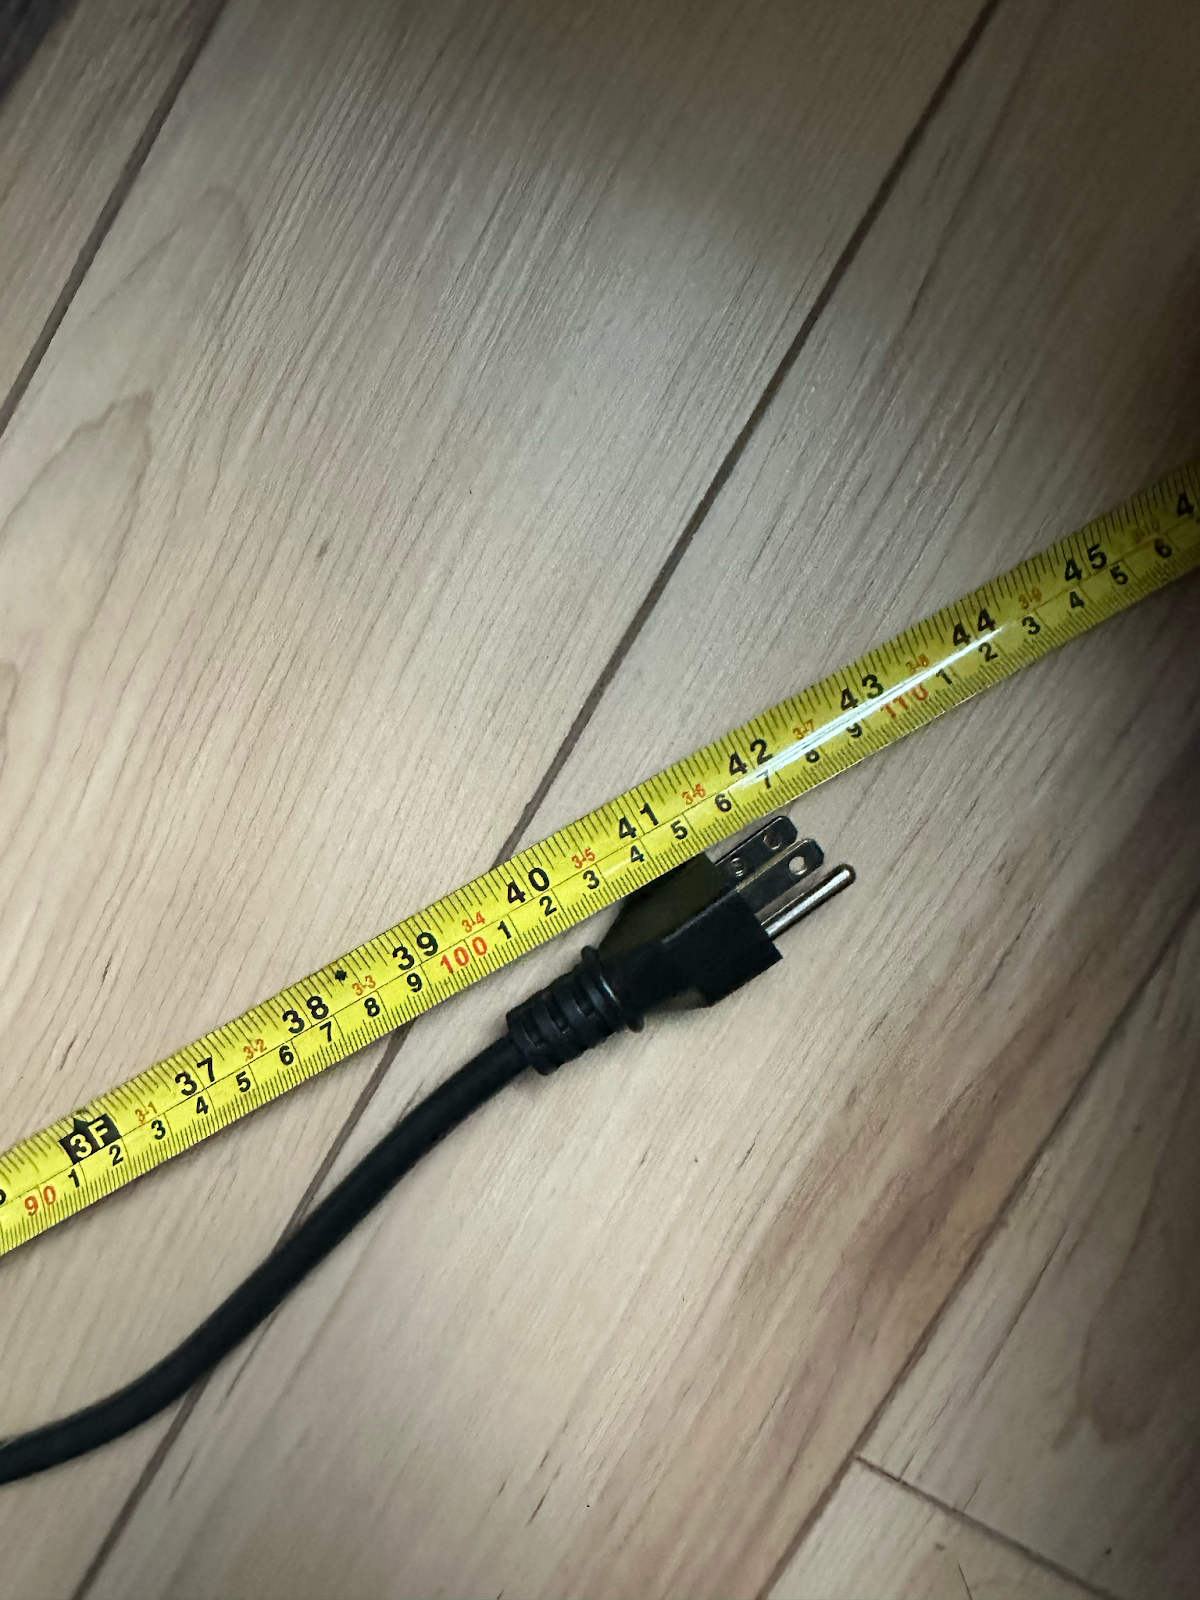
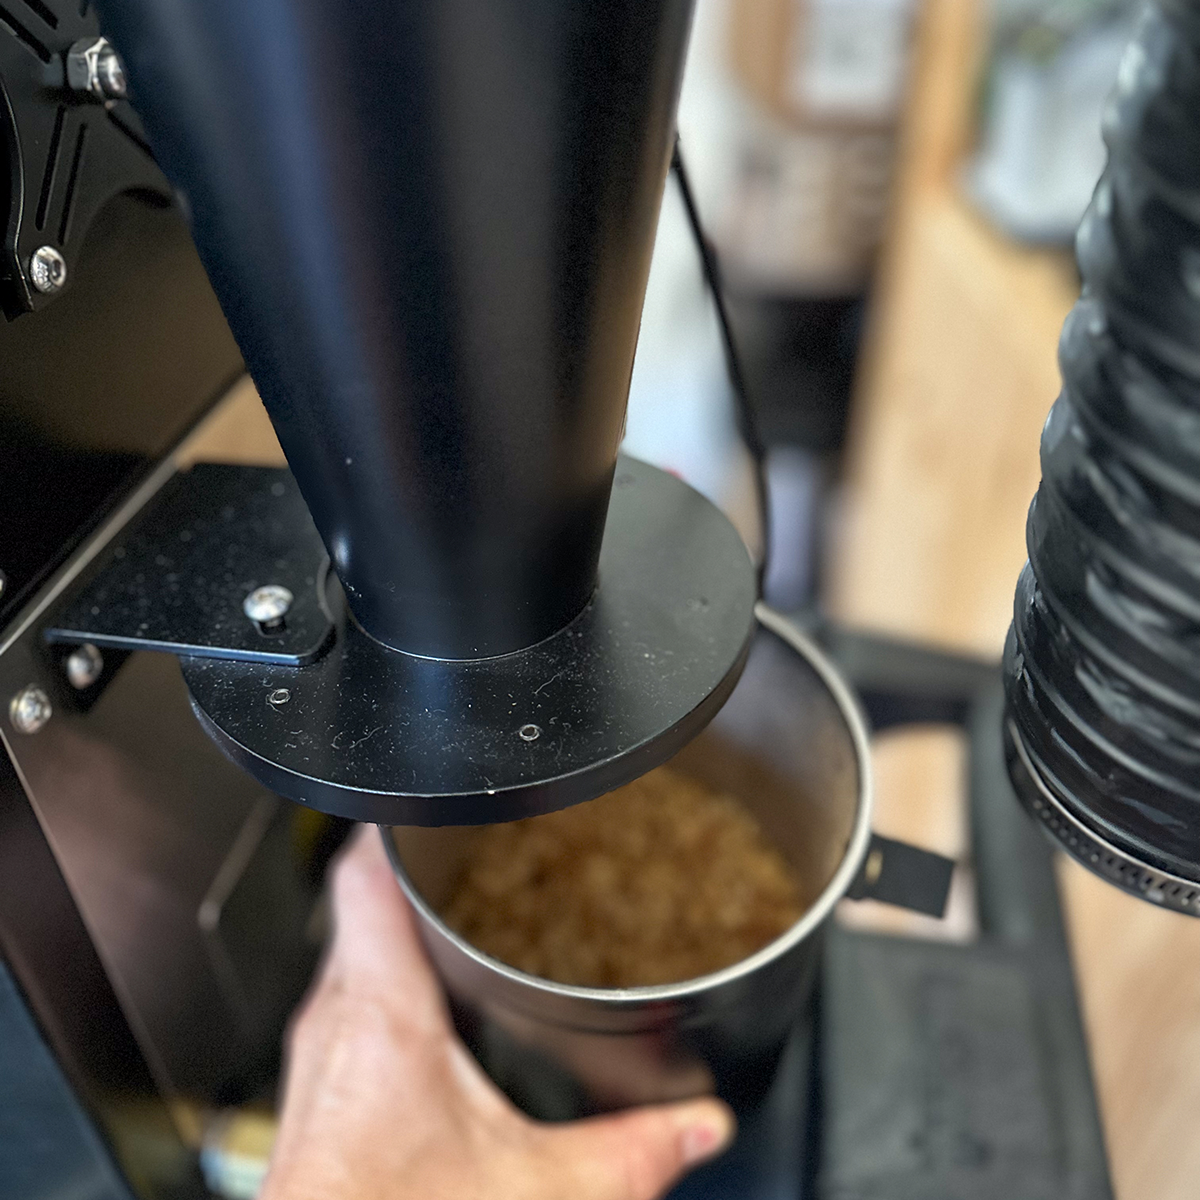
The machine lacks a bean ejection or collection system like the Ikawa, with the coffee sitting in the roast chamber at the completion of a roast and requiring the operator to lift off the glass roasting chamber from the unit and set it aside before picking up the body of the roaster and inverting it to dump the roasted coffee out; meanwhile, the power cord on the back, at 42”/107cm long, is both unreasonably short (making it occasionally frustrating to locate the roaster as well as to invert it to remove your roasted coffee) and, inexplicably, not detachable. Consider that average counter height is 36-38”, that the machine isn’t meant to run on an extension cord, and from its base to the top of the roasting chamber is 11”—the design of the machine, because of this feature, requires the user to unplug the roaster to empty it if the power source is located near the floor.
Emptying the roaster requires a bit more dexterity than I possess in the morning. I detest this inelegant procedure. If I’m roasting just 4 or 5 batches in a row, it’s fine—but if I had 30 pre-ship samples to rip through in a day, I’d probably toss the thing out the window.
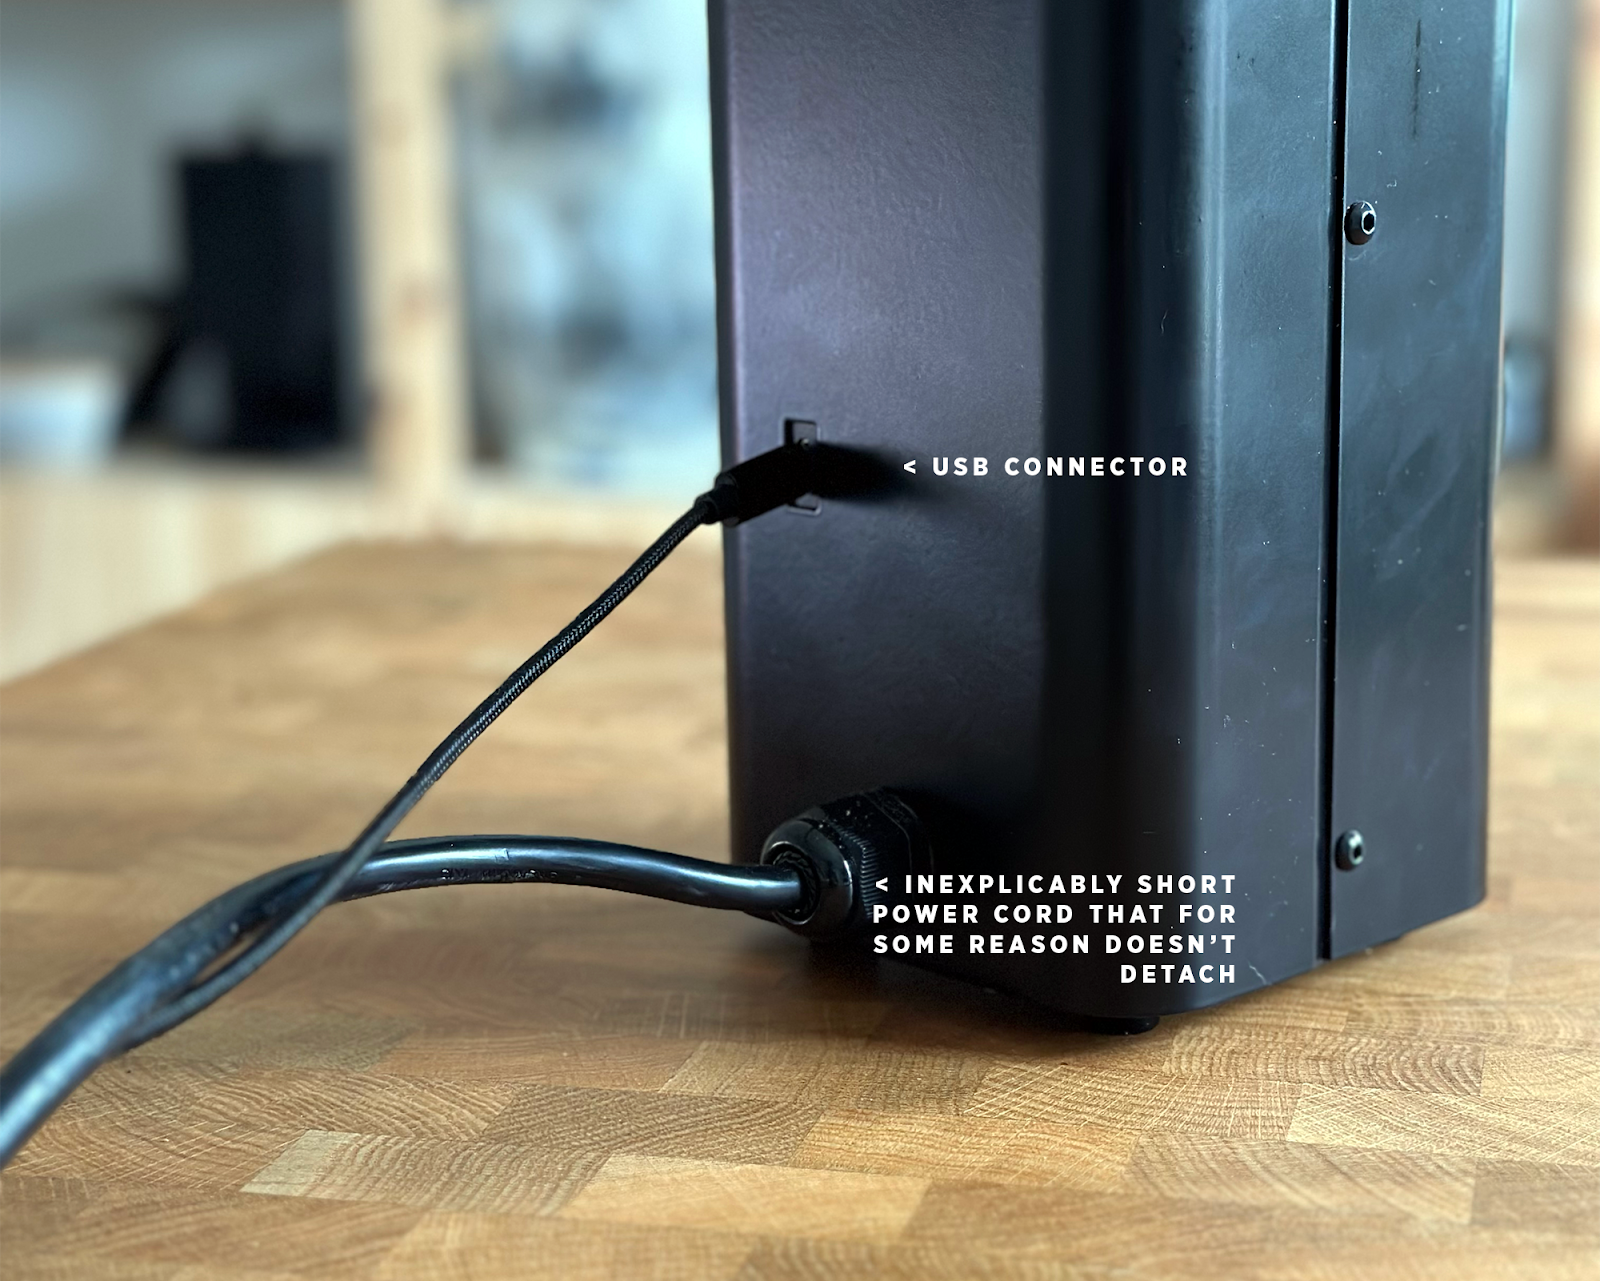
Also on the back of the roaster is a port for a wired USB connection, which enables the roaster to connect with a computer for the purposes of viewing roast logs or updating programs via the Kaffelogic Studio software. An upgrade module is planned allowing the roaster to connect to Kaffelogic Studio using Bluetooth, which would enable real-time roast monitoring—something the software currently can’t do.
Like the Ikawa, the machine vents into the roasting room through the top of the cap, and to deal with the same issues as on the Ikawa—smoke, carcinogenic VOCs, aromas and heat—I use the same 10cm silicone duct and AC Infinity Cloudline duct booster to pull the exhaust out of the room.
People make choices—and in the name of keeping the machine simple and affordable, Kaffelogic made some choices. But: fortunately, what the machine lacks in industrial design prowess or safety features, it makes up for in its roasting capability.
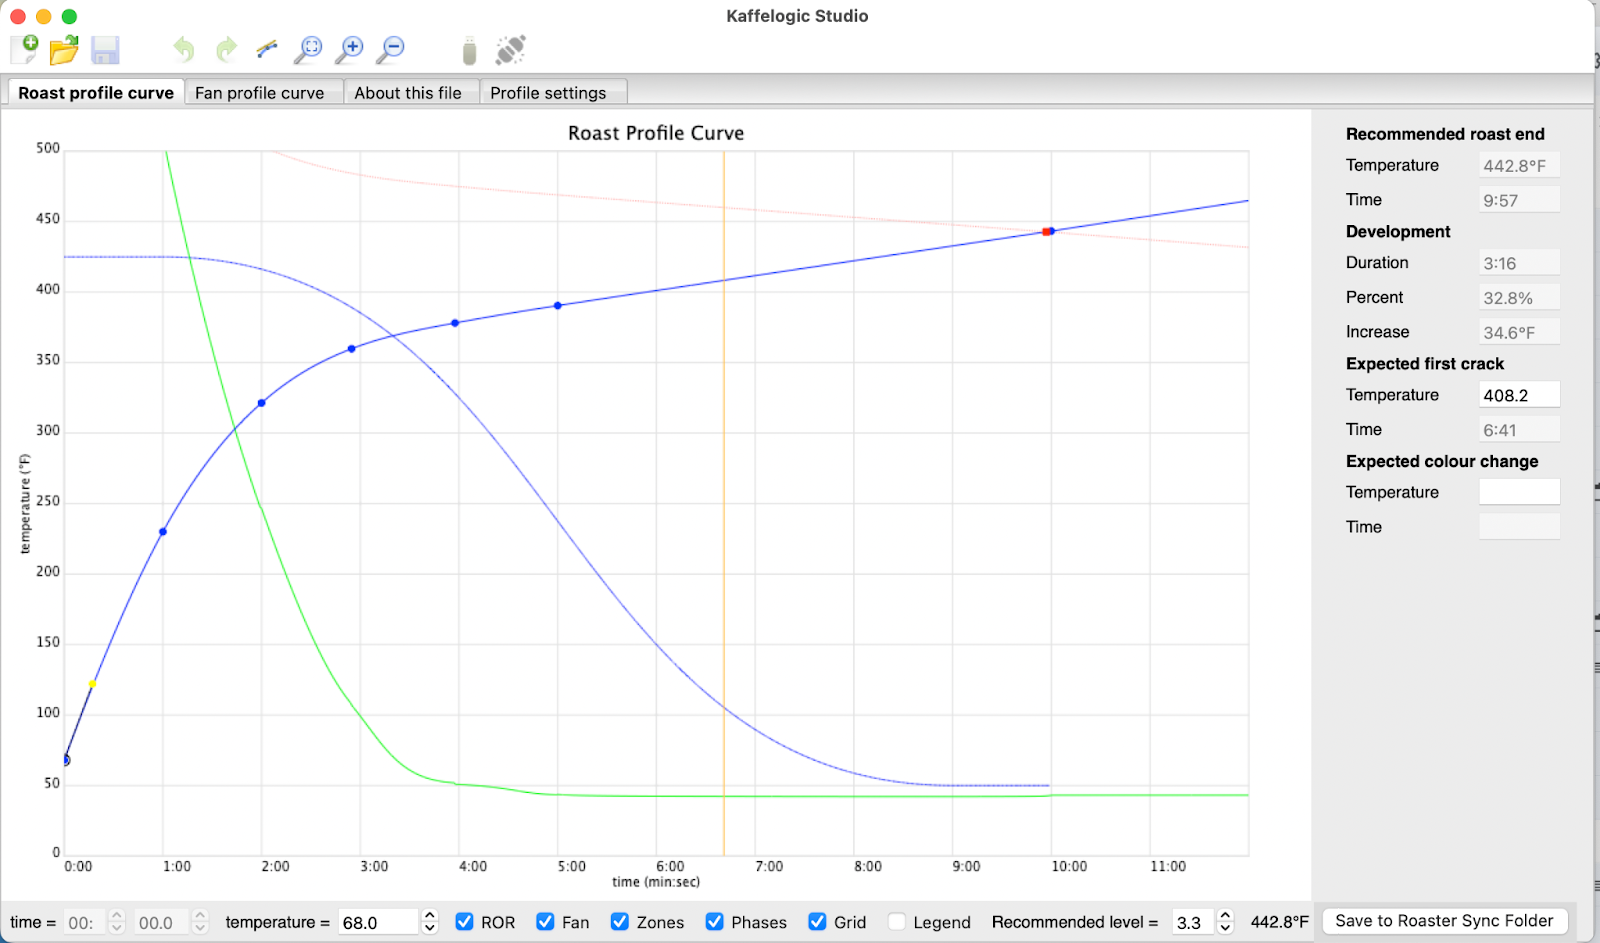
Though it is perhaps initially a bit complicated for a novice, the Kaffelogic Studio software comes with thorough documentation, enabling a user to take advantage of its features after a brief familiarization. I found iteration quick and easy since input with a mouse and keyboard is much more precise than working on a smartphone screen (KL Studio is built for both Windows and Mac OS). While the Ikawa software is designed to be very prescriptive—allowing you to input setpoints for inlet or exhaust temp as well as final temp and fan speed, which the machine will do its best using its PID to follow—the software powering KL is quite a bit more flexible and sophisticated. Its most advanced mode (“Engineer”) allows you to program the wattage delivered to the machine during preheat, set target minimum rates of rise (which overrides the set profile to prevent stalling), PID settings, and “boost zones,” areas where you can instruct the software to provide tighter or stricter tolerances for deviation from a target process curve to allow for variation between different types of coffee as well as key moments during a roast such as ahead of and during crack. The software also allows you to program multiple endpoints for the roast based on final temperature, allowing an operator to quickly change their desired endpoint during a roast to hit their desired level of development.
Within around 30 batches, I was achieving quality, repeatable sample roasts across a range of coffees using a profile I’d designed in the Studio software. Kaffelogic suffers from the same roasting approach as the Ikawa—forcing all coffees to fit into a time/temp target curve regardless of their resistance to heat—and while it isn’t exactly sound from a theoretical perspective, provided you’ve planned your roast well, it does the job.
I found myself preferring the sample roasts I got from the Kaffelogic versus those from the Ikawa, which presented with a touch more astringency and didn’t hold up as well over 3 or 4 days of cupping. Because of the improved shelf life of coffees roasted on the Kaffelogic, I could confidently roast coffee on Tuesday for a Saturday class; if this is validated over time, this fact alone would make the Kaffelogic a superior roaster for home users versus the Ikawa.
My frustrations with the unit’s physical operation aside, I enjoyed the roasts the machine produced and even started to embrace the quick but rudimentary workflow. After three weeks of roasting with the Kaffelogic, the Ikawa on my bench—returned from repair and with a working profile dialed in—sat idle, unless for whatever reason I needed to roast 50g batches.
I can’t comment on the customer service from Kaffelogic as I haven’t experienced any issues; I note that online I’ve seen isolated reports of users suffering failures of the heating element or the bare probe, all of which Kaffelogic was able to resolve by shipping the user new parts with a repair guide. The time to respond took perhaps a bit longer than expected due to ongoing and behind-schedule fulfillment from KL’s successful Indiegogo launch of the Nano 7, but with U.S. and North American distribution announcements coming imminently, I expect that support will continue to improve. I do like that the Kaffelogic is designed to be mostly user-reparable; by keeping a spare probe and heating element on hand, I can theoretically prevent downtime should these fail. I have also seen reports of chaff fires in the roaster—even when users were emptying the chaff collector—but this was apparently caused by a manufacturing defect that Kaffelogic has since corrected by resetting their factory tolerances.
Like the Ikawa, the Kaffelogic Nano is designed to be virtually maintenance-free; aside from the chaff collection cup (which, again: must be emptied and should be wiped out between batches), no cleaning is required. However, the roasting chamber is easy to clean with a quick rinse and wipe with a lint-free cloth.
It’s not a perfect roaster, nor is it my my favorite roaster; but in spite of its quirks, it’s difficult for me to recommend the Ikawa over the Kaffelogic to small roasteries or coffee growers simply because of the affordability of the Kaffelogic versus the Ikawa, as well as the power and flexibility of its software. Ikawa’s build and much, much more refined workflow does make it a more attractive choice for high volume operations such as in the labs of importers or larger roasteries relative to the entry-level priced Kaffelogic Nano.
A similar-looking machine sold for 50% markup as Link by Nucleus Coffee Tools is, in fact, a rebadged Kaffelogic; it’s manufactured at the same factory from the same components save a different chassis color, included travel case and mobile app which helps a user to select a profile based on the density of the coffee as well as the air density; this is a useful feature for those roasting at elevation (like many in coffee growing countries) but is not strictly necessary—you can do the work yourself.
Arc S
Around the same time that I received the Kaffelogic, another sample roaster, the Arc S, arrived at my lab. I received an Arc as part of my work for Crop to Cup where I offered suggestions for improving future versions of the roaster, calibrated with their Arc-based labs in New York and Chicago, and helped to establish and refine a robust and reliable sample roasting protocol for the company. Crop to Cup’s home roaster and small commercial subsidiary, Showroom, exclusively imports and distributes the Arc roaster in the Western hemisphere.
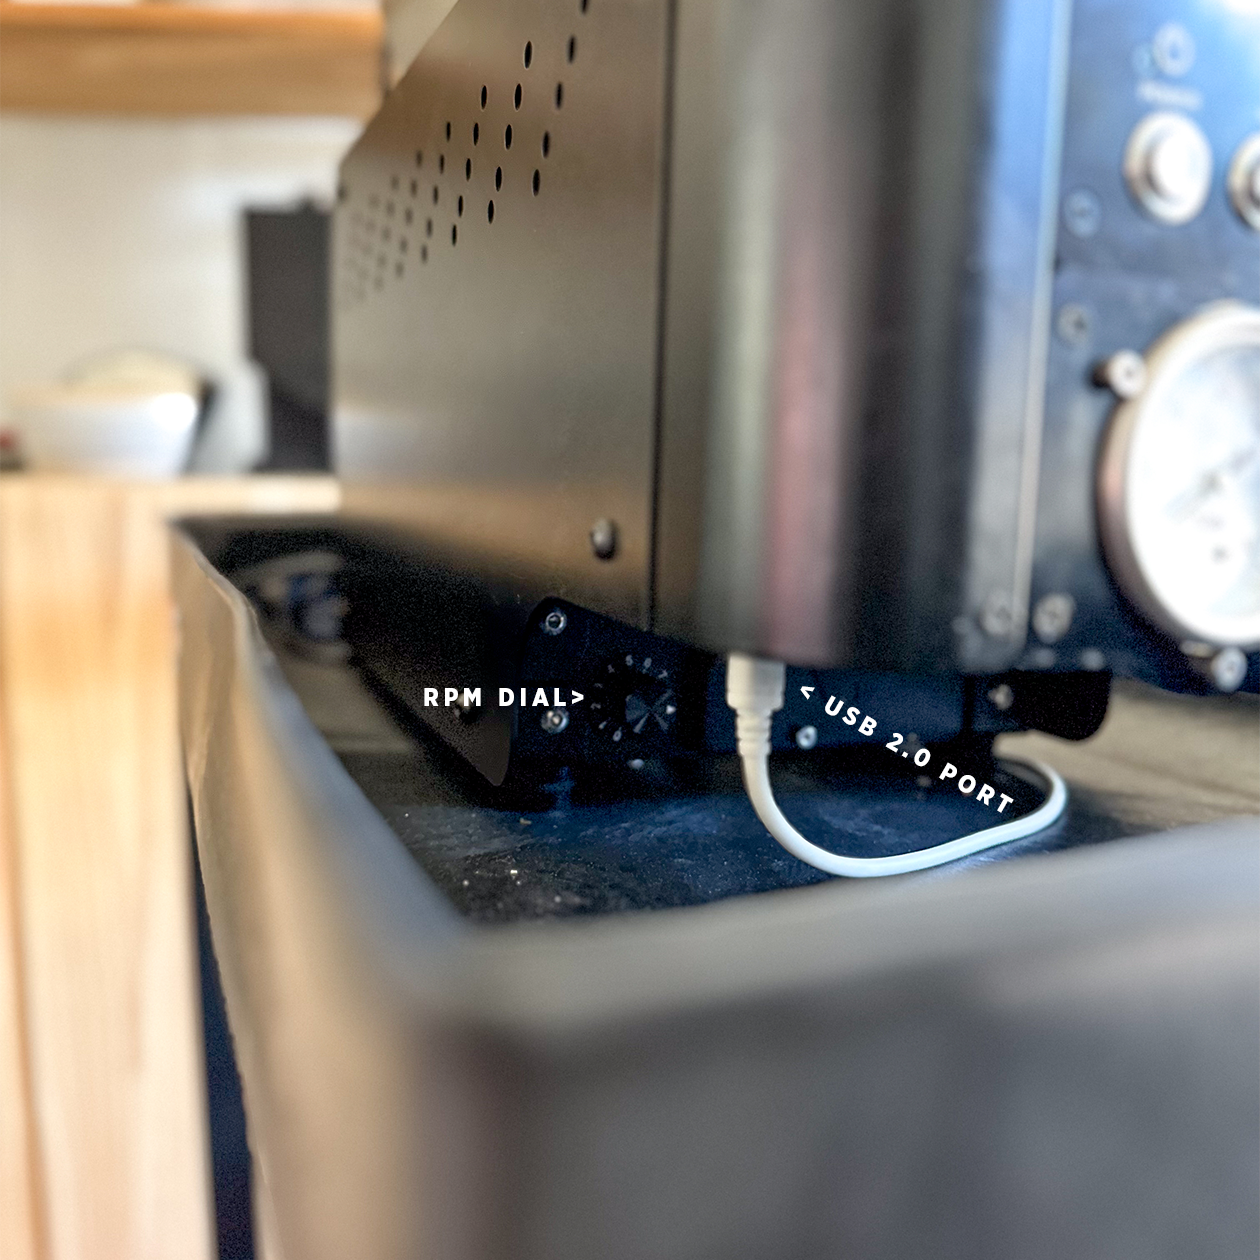
The Arc is an evolution of and improvement on the HB line of roasters tailored specifically to the needs of and direction from Crop to Cup, who use a three-barrel version of the Arc for all of the sample roasting duties in their Brooklyn lab. Functionally, the Arc S is very similar to the Buckeye and Mill City roasters I’d roasted on in the past: a propane, indirect fired, single-pass drum roaster featuring a carbon steel drum and a rated 200g capacity. The Arc offers control over drum speed (via a potentiometer), airflow (using a damper), and gas (using a valve with pressure gauge). In the last couple of years, Arc switched out the formerly finger-diameter probes in the machine for 3mm RTD probes and upgraded the motherboard, allowing 1s sampling times. The stock probes—which measure bean, inlet and exhaust temps—all connect to the integrated MODBUS controller connectable to Artisan or Cropster via USB 2.0.
I was excited to have a drum roaster in my lab again—if only to remind myself that I actually do know how to roast, rather than just run endless cycles of automated air roasts. The hands-on experience of roasting manually, I figured, would get me a little closer to coffee again, and having a manual roaster available would give me the flexibility of training new roasters at my future roasting space.
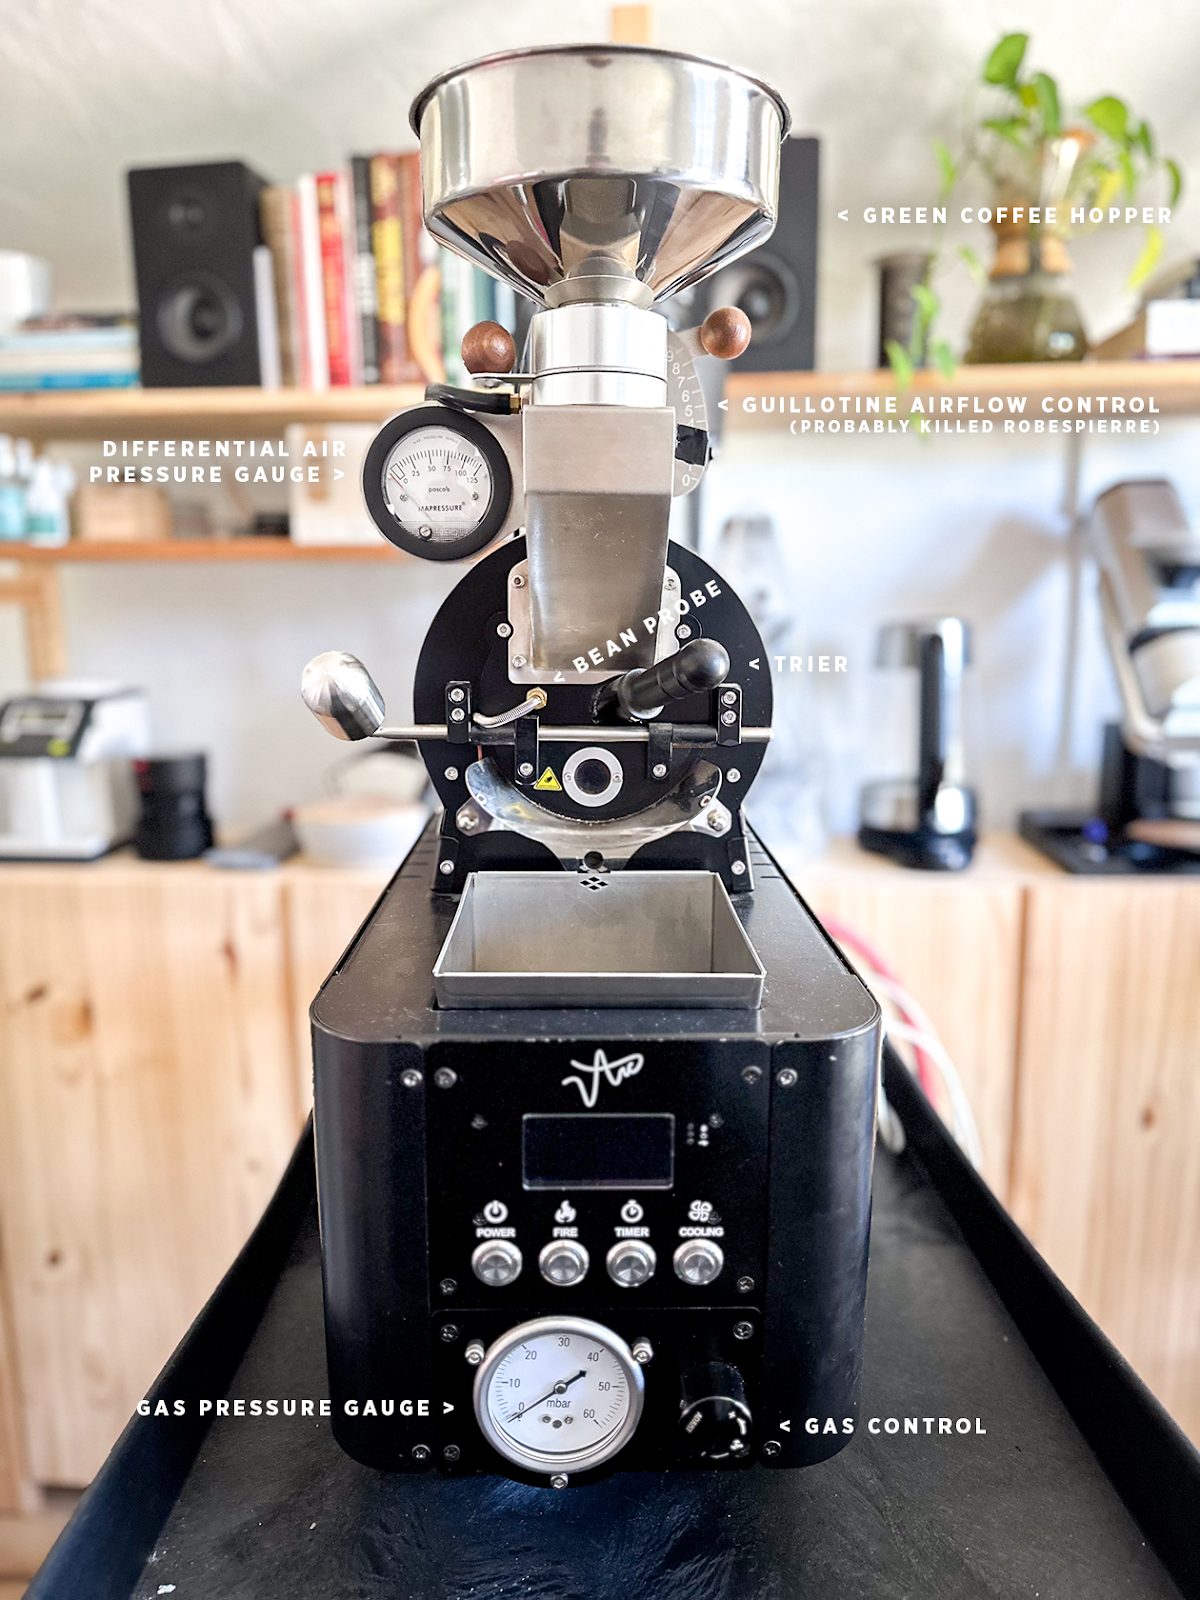
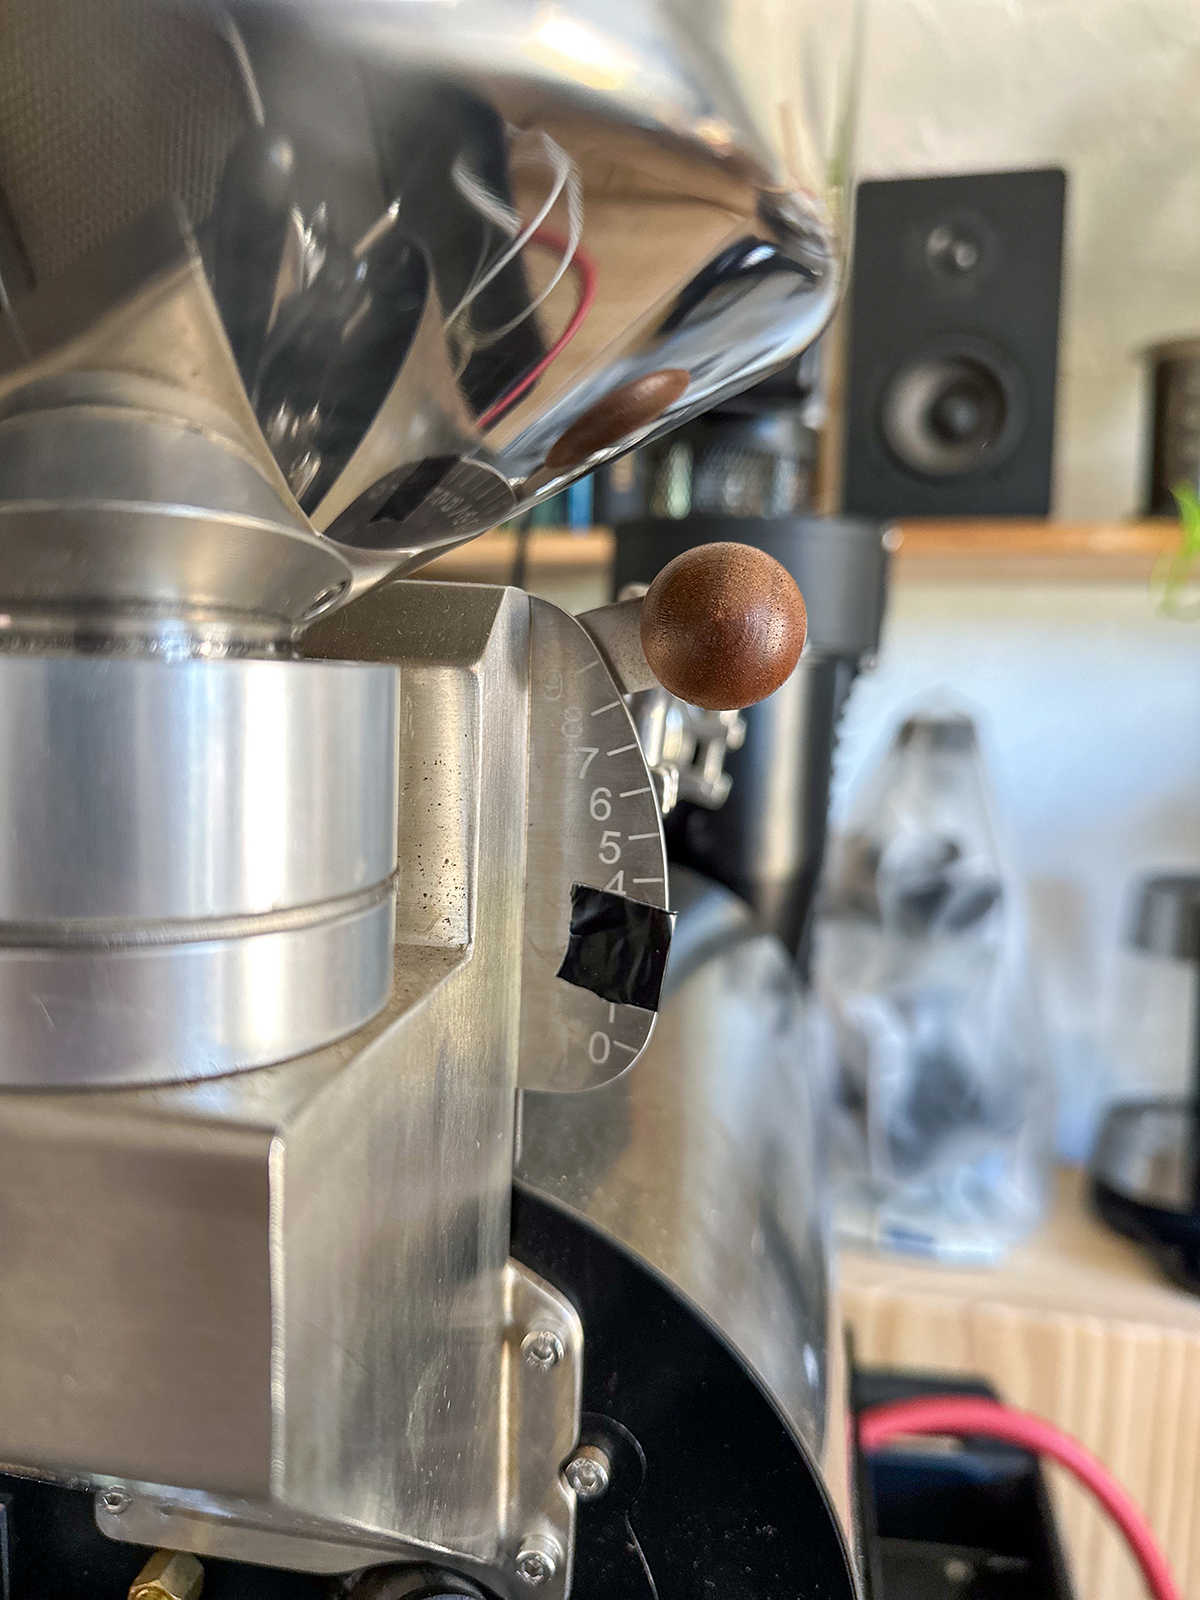
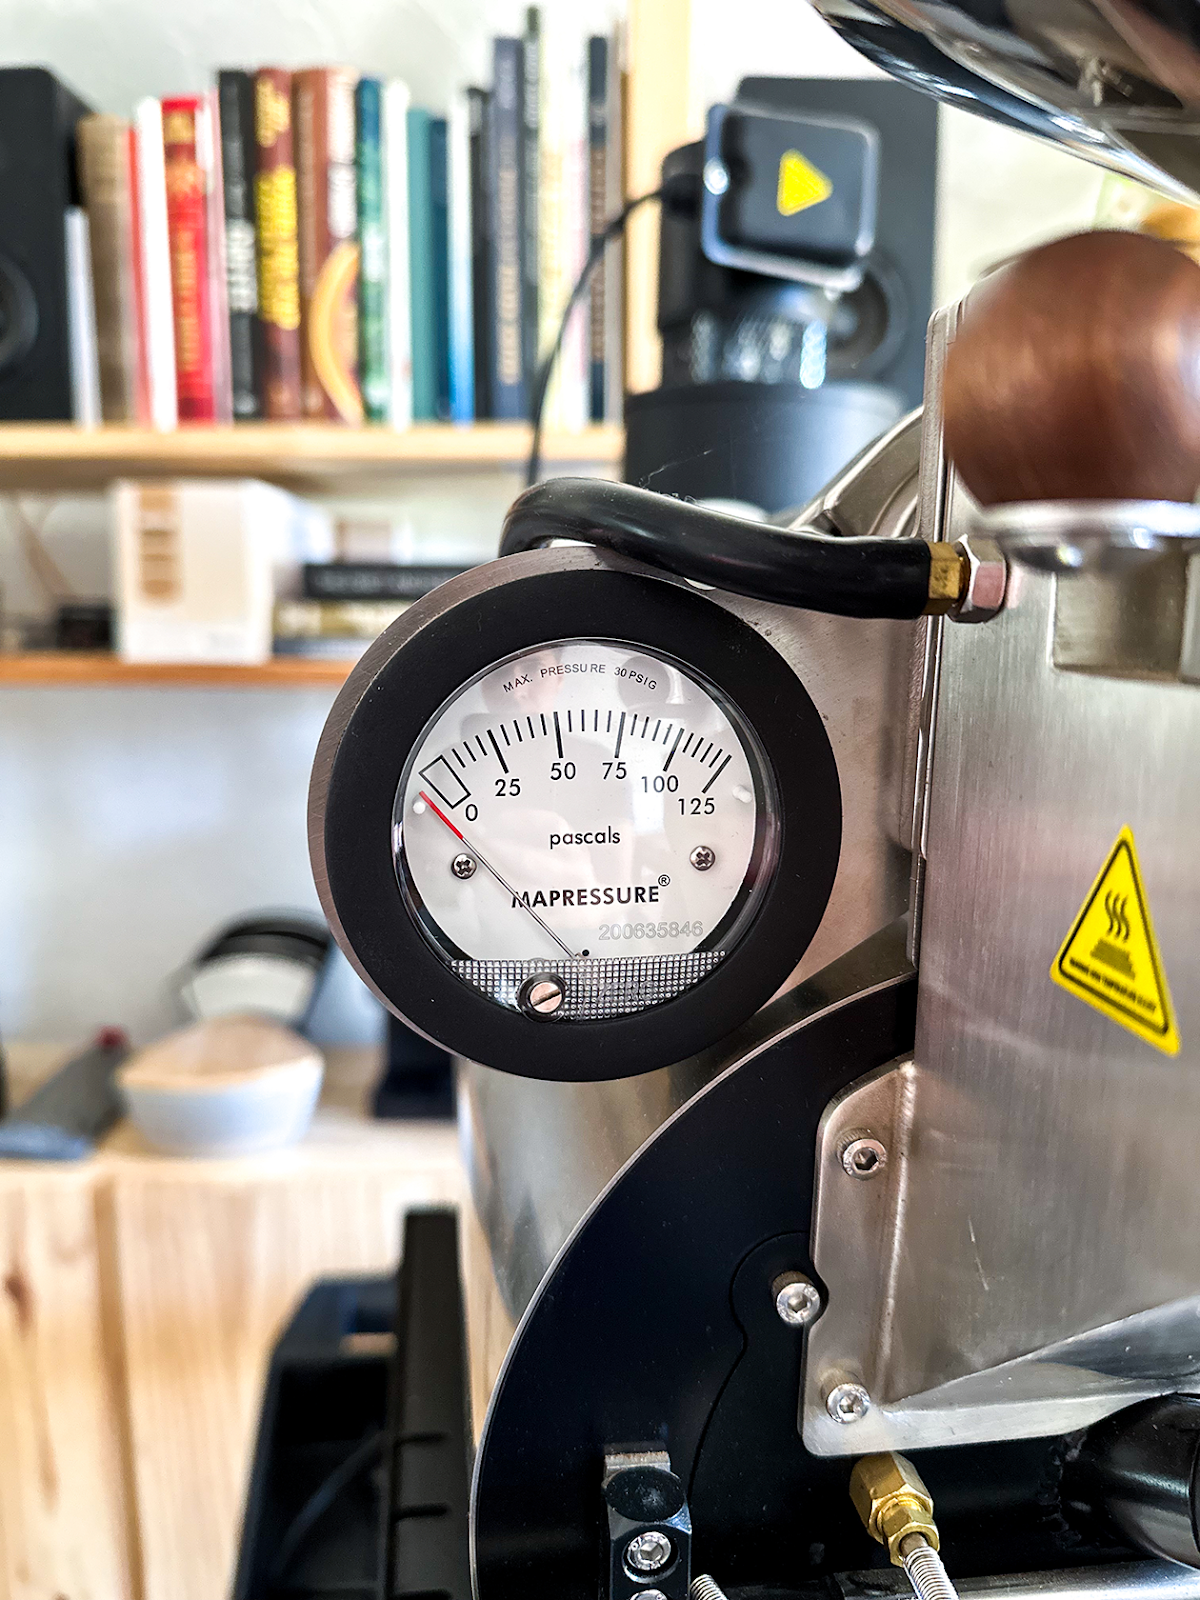
Aesthetically, the Arc is a nice-looking machine. It presents like a miniaturized production-style drum roaster—because that’s what it is. At 37kg, it’s solidly constructed from steel and arrived crated via LTL carrier rather than in a small 13kg box via a DHL van like the Kaffelogic. The machine’s controls are intuitive and easy to use, provided that you’re not adjusting all three variables (air, RPM, gas) simultaneously. For some reason, the controls are not clustered in one group—the RPM dial is on the lower front portion of the roaster, below the cooling tray that juts out like the bow of an aircraft carrier—while the air and gas controls are located in different places. The location of the RPM control below the bow means that if you have the roaster set up on a cart with a lip (like I do), it can be cumbersome and awkward to reach the dial. The airflow—which offers a wildly generous volume of air for a machine this size—is adjustable via a guillotine-like mechanism in the exhaust duct—a mechanism which is my greatest complaint and source of frustration with the Arc—and is readable by a differential pressure gauge. The gas is adjustable via a round dial on the face of the roaster and includes a gauge that reads in kPa and mbar. The 50 mbar regulator included in my machine is extremely overpowered for standard use (I’ve never used higher than 20mbar gas in standard roast times of 7-9 minutes) and offers ample headroom for whatever batch size and roast speed you desire.
The machine lacks any automation features whatsoever; it is a fully manual machine. This means that your skill as a roaster entirely determines the quality of your roasts, but also means that you’re not limited by the machine itself. It also means, however, that if you’re using it as a sample roaster, you really can’t do much else other than roast while you’re sample roasting—severely limiting my multitasking ability and thus my overall capacity. The machine is a fully capable sample roaster, but because it functions like a production roaster and integrates with roast logging software can be used as well for sample roasting as exploring profiles for production roasts.
Because it’s manual and offers control over air, drum speed and gas—and because it uses a small batch size and thus burns less coffee—I believe the Arc is virtually an ideal training or learning roaster. If I were to hire someone to roast for me who came in with no previous experience, I’d use the Arc as my teaching tool until my student could learn to replicate roasts reliably, follow a between batch protocol sufficiently, and maintain the machine. If you have never roasted before and want a machine to learn on—especially if you have aspirations of roasting professionally in the future—I’d consider a machine like the Arc. Like full-size production roasters (and unlike the Ikawa or Kaffelogic) the Arc has a trier, allowing a roaster to examine the roast process visually or collect a sample mid-roast.
I like roasting on the Arc: it’s stable, responsive, and allows me to transfer my experience roasting on other machines, making it an easy machine to pick up and play. After a few sessions with it, I was getting production-quality coffee from the machine. Once I had the machine set to my preferred drum speed and airflow settings (I don’t adjust either over the course of the roast on this style of roaster), it was as simple as adjusting gas as needed to trace the reference profile in Artisan and achieve good roasts. I used a between-batch protocol of: (1) killing the gas at the end of the roast, (2) allowing the temperature to fall to 40ºF below my charge temp, and (3) using a lower gas setting to bring the roaster back up to temp within 60-75 seconds at which point I charged the roaster. Using this protocol, I could reliably replicate my roasts.
I do wish that Showroom included a roasting lamp for the roaster to illuminate the sight glass, trier and cooling tray, but this is a minor complaint—battery-operated and USB-powered LED clip lamps are available affordably elsewhere and would do the job perfectly well.
The cooling tray lacks an agitation system, but since batch sizes generally run 100-200g, the bed depth is shallow enough and fan powerful enough that coffee cools rapidly, within 2-3 minutes. Because it has a dedicated fan for the cooling tray and a separate fan for the cyclone (both of which are vented separately), simultaneous roasting and cooling is possible. This means an organized, efficient operator with a solid between-batch protocol could roast 5-6 batches an hour—just shy of the 7-8 possible on an Ikawa, but accounting for a larger throughput, a reasonable tradeoff.
I adore the chaff collection system on the roaster—a barrel that magnetically floats from the bottom of the cyclone (no awkward groping or aligning of clamps to remove or replace it) and easily accommodates enough chaff from around 2kg of green, or around 10-20 roasts, depending on your batch size.
The roaster is capable of being daisy-chained with up to three other Arc S roasters, making it a “multi-barrel” sample roaster and expanding the throughput to meet the needs of importers like Crop to Cup. Cleverly, the multi-barrel configuration is designed such that it can operate with just one 110v or 220v plug and one exhaust system, but I do suspect that without a booster, there will be differences in airflow between each roaster, just as in a traditional open barrel sample roaster.
But while it’s a fun roaster to drive, the machine isn’t without its quirks and flaws.
The machine’s guillotine-style airflow adjustment mechanism may very well be the death of me: more than once during a roast, I noticed that the exhaust temperature had mysteriously drifted up. Upon investigation, I discovered that the friction-fit damper had begun to slide down, closing the exhaust vent incrementally, leading to a build-up in heat. I resorted to using duct tape to set the “minimum” aperture for the adjustment device so that if the gate should slip during a roast, I would at least maintain negative pressure through the drum, evacuating smoke and chaff—at least in theory.
The other issue with the guillotine is that it works by physically obstructing the opening for the exhaust; as a result, if the air is not set to fully open (which it really shouldn’t be since the fan is so overpowered), chaff will build up in the tube. If you monitor the differential pressure regulator during a roast, the pressure drifts down; to overcome this, I’d gradually open the damper over the course of a roast to maintain my desired air pressure. At the end of a roast, to clear any chaff built up against the guillotine’s blade, I’d purge the vent after I dropped the coffee, quickly fully opening the airflow to 100% before resetting it to my desired position.
To be honest, I’m not sure why Arc wasn’t built with a variable speed fan controllable with a potentiometer like Buckeye or Mill City roasters, but I delivered my criticism of this to the team at Crop to Cup during their factory visit to China. As I wrote this piece, I received a call that Crop to Cup had received a prototype of a variable speed fan from the factory to evaluate; the part is being forwarded to my lab for testing and I will update this piece once I have had a chance to roast with it. If it performs satisfactorily, the plan is that the retrofit kit will be made available for previous generations of Arcs like the one in my lab.
As on many roasters, the placement of the Arc’s bean probe is suboptimal—just slightly too high in the faceplate rather than well-placed in the door. Because of this, for data logging purposes the Arc S performs best with 150+ gram batches, though you can get away with lower if you’re less strict in your reliance on the data. I found 150 grams to be optimal, too, for controlling the system because of its overpowered nature. There does appear to be a bit of noise in the data logging, likely a ground loop from the motherboard. While I am sure I could fix this using rubber washers or shielding, I have not yet explored it as, in practice, it’s a minor inconvenience. While the new motherboard is capable of 1 reading per second, I did notice approximately a 2 second delay between actual roast events (say, charge, which has a distinct visual indicator) and when they registered in logging software. In practice, this isn’t a huge concern. To accommodate this slow registration I did change my delta ROR span to 30s from my preferred 10-15s window, and also needed to be much more anticipatory at key moments in the roast because of the short lag time in reading.
When I first unpacked my roaster and powered it on for the first time, I was greeted with a horrific metal scraping noise; it turns out that during transit, something had shifted, requiring an adjustment of the distance between the faceplate and drum. After a 3 minute chat with Showroom customer service, I had a PDF instruction guide for making the adjustment and was up and running within 20 minutes.
I expect the machine will hold up to the rigors of daily use, as it was explicitly designed for commercial environments and seems overbuilt for the task. Maintenance is no more onerous than any other small roaster, requiring only routine cleaning and lubrication, as outlined clearly in the user manual.
For its features and build quality, Arc S is well-priced. Because of its long warmup time relative to my other roasters (30-45 minutes), longer cooldown (~20-30 minutes), large size, reliance on gas and the manual nature of the machine, it doesn’t fit as neatly in my workflow and sees less use than the other roasters in my collection—but it’s a versatile tool capable of delivering excellent sample roasts from virtually any coffee that I’m thrilled to have in my lab.
Roest L100 Plus
At SCA Expo in Portland earlier this year, I spent a couple hours lurking in a corner near the Roest booth, watching the tiny, cube-shaped machine turn over batch after batch. I knew about the roaster—having seen in passing that Tim Wendelboe and Red Fox had switched to Roest from Ikawa or other sample roasters. When Scott Rao began to use one for his own sample roasting for Prodigal, my interest was piqued—and a hands-on demonstration with Scott at KW Collective in Ontario made me even more keen to add one to my lab. Though I was mostly happy with my sample roasting workflow on the Ikawa or Kaffelogic, I was looking for a more flexible automated and electric machine that would offer me a bit better versatility and data collection in addition to a fast, efficient workflow. With a rated capacity of up to 200g, I figured that I could use the roaster not only for 100g samples but, in a pinch, for putting together tasting kits for clients when sample material was limited to just a couple of kilos. After talking to the team at Roest, they generously offered to send me a machine for an evaluation period, after which time I could make a decision about whether I wanted to purchase the machine or send it back. I accepted, and the machine arrived quickly and efficiently-packed in a single box a week later.

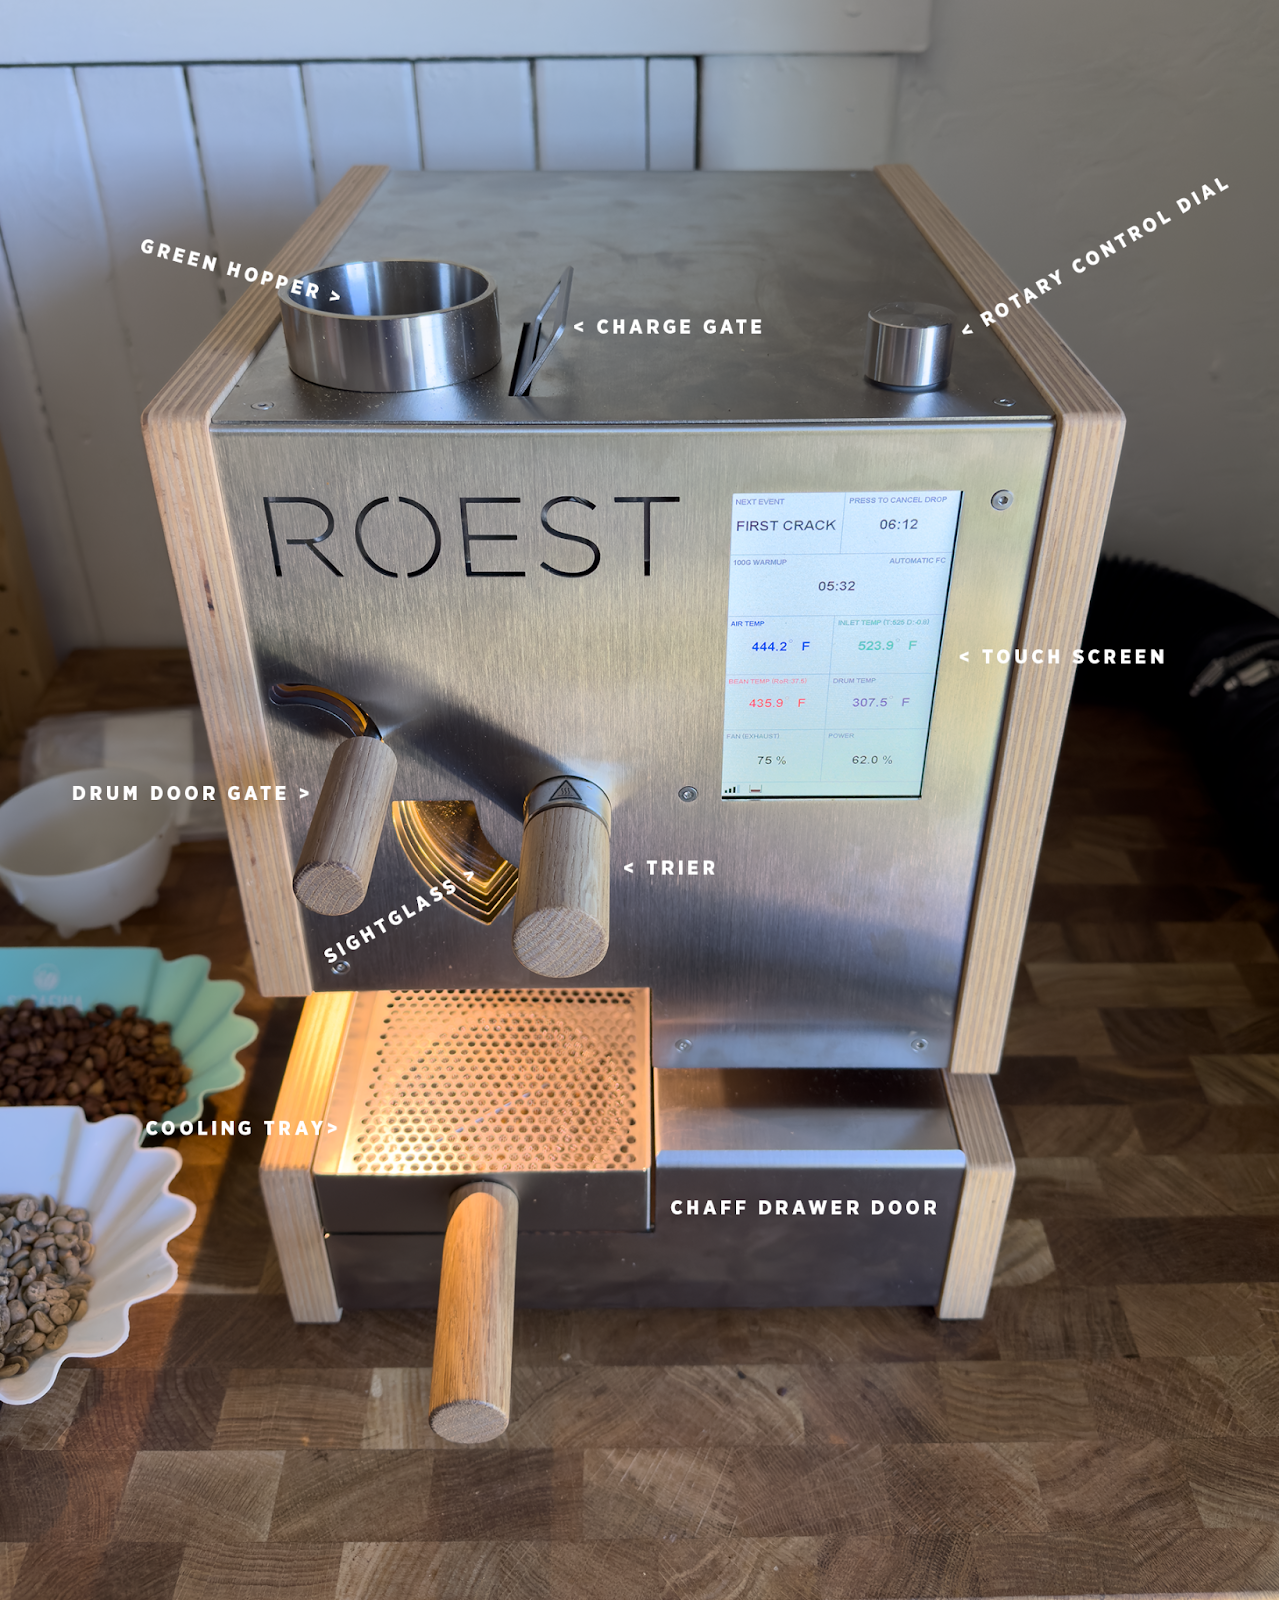
The plywood side panels and stacked CNC-machined steel front give the machine a distinctly Scandinavian look—unsurprising given the Nordic origin of the machine and its team. It fits in well in my IKEA-adorned, minimalist lab. Built with a Particle Core as its brain (a chip I’d used once upon a time to hack the door buzzer at my apartment in Brooklyn so that I could open the front door to the building via text message), the roaster is a Wifi-connected device, offering the team at Roest the ability to push software and firmware updates, diagnose issues remotely as well as pipe data from the roaster’s probes to an online dashboard, where users can monitor their roasts and update programs.
The L100 Plus model, the highest-end version of the Roest sample roaster, comes fitted with five probes—for bean pile, inlet, exhaust, drum, and environmental temperatures—as well as first crack detection (via sound). It seems as though nearly everything that can be measured in a roaster is measured; it’s almost as if the engineers weren’t sure what was relevant and decided to add probes everywhere. I’m not complaining; it allows for a number of different types of roast schemas using different data points as reference or controls.
Roest’s machines are universal voltage and, like the Ikawa (and unlike the Kaffelogic) include a removable IEC cord. Running the machine through a Furman surge suppressor rated at 15 amps on a circuit feeding roughly 115v, I never had power issues or tripped a breaker even on roasts that ran for minutes at 100% power (which, according to the Roest’s cut sheet, should draw 1600W).
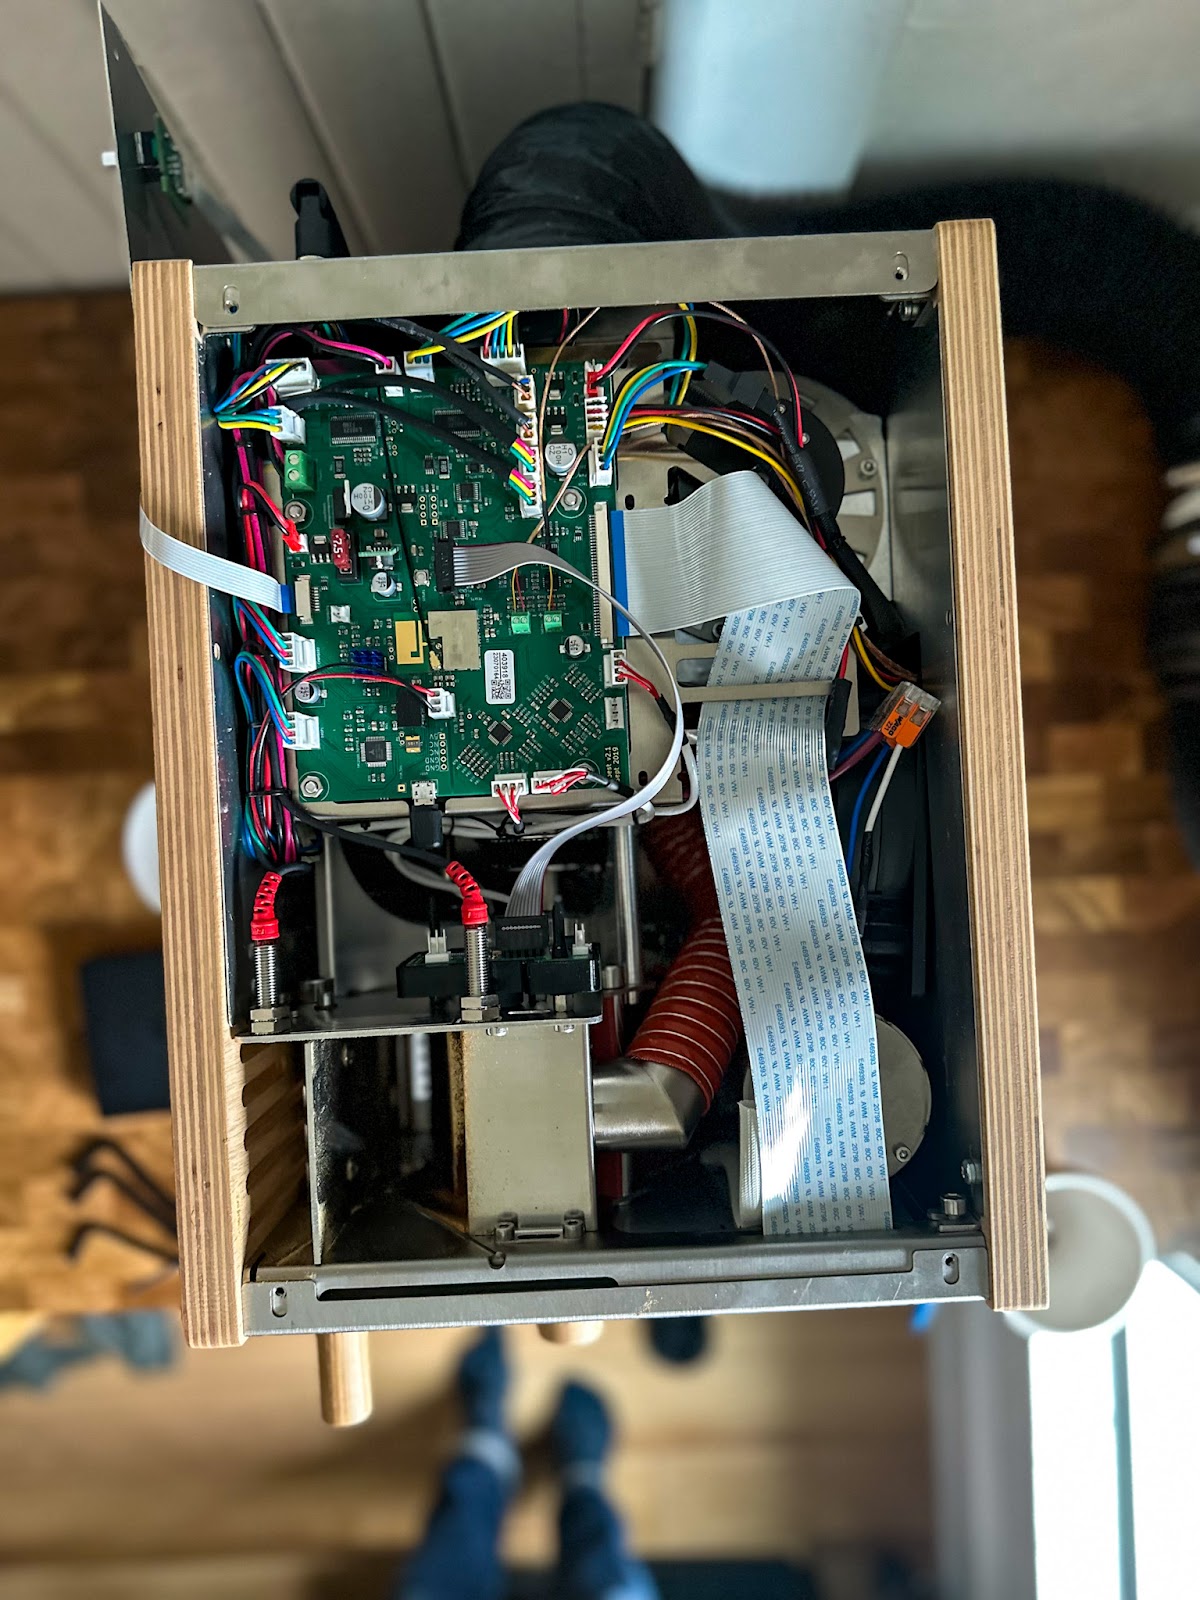
Relative to the other machines in my lab, the Roest is complex; removing the top panel reveals that the machine is packed with more silicon and wires in its small footprint than the Ikawa, Kaffelogic and Arc combined. If the Kaffelogic carried the Apollo crew to the moon, I’d expect the Roest to take me to Mars. The machine is designed to be user-maintainable, however, and the Roest team has compiled videos and explainers for how to clean or replace nearly every single component in the machine—from the heating element to the exhaust fan (as well as adding an inlet probe, if the machine didn’t include one at assembly). The machine vents through a single duct in the back—an elegant and enjoyable setup relative to Arc’s requirement of two ducts—which can vent into a room using a friction-fit elbow or vent to the outside using the included silicone vent tube.
Part of my reason for preferring electric roasters is that I have asthma—so in an effort to avoid breathing emissions or vapors from roasting, I opted to vent the machine through the window.
The software behind the machine is powerful and flexible, offering the ability to program roast profiles, monitor the roaster in real-time, and review and compare previous roasts. The machine is, for the most part, automated. Adjustment of profiles, loading of profiles onto the machine, and real-time logging and roast monitoring happens via the online dashboard, rather than through the machine itself. This, of course, also means that for the machine to function with full capabilities, it must be connected to the internet. While you can roast without Wifi or internet access, you will not be able to modify profiles or log roasts. This is not a problem in my fiber-optic wired lab, but would be an obstacle in many parts of the world (though you can get around much of this if you have a cellular device capable of tethering to the machine to serve as its internet connection).
The newest firmware version (which I had beta access for) allows for creation or execution of six kinds of profiles:
- air temperature profiles (which control the roast based on air temperature setpoints at a certain fixed time, like the original Ikawa or Kaffelogic), which are well suited to batches of 50-150g;
- bean temperature profile (which controls the roast by targeting bean temp set points at a given fixed time), which are well-suited to batches of ~100ish to 200g;
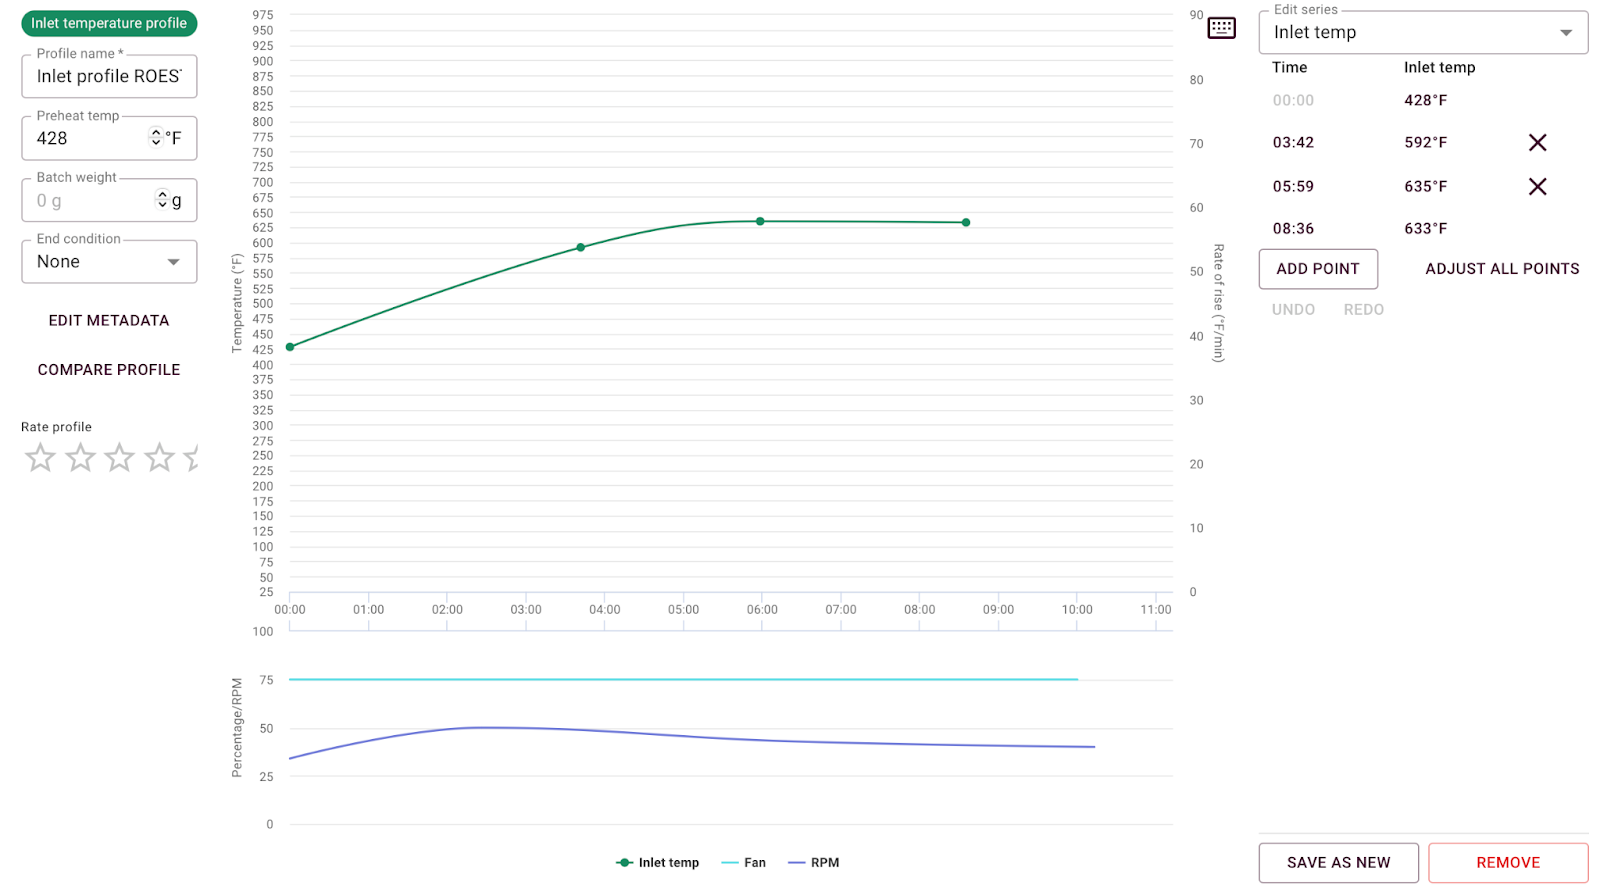
- Inlet temperature profiles (which, like the newer Ikawas, instructs the machine to use certain inlet temps at certain fixed times) which are well-suited to batches of 50-200g;
- Power profiles (which allows you to instruct the machine to run at a certain power setting at a given fixed time), which are well-suited to batches of 50-200g;
- Bean Temp/Power Profiles (which allow you to program power setpoints using bean temp as the trigger rather than time), which because they rely on the bean probe are more reliable when BT is accurate and thus suited for 100-200g; and
- Bean/Inlet Temp Profiles (which set inlet temps against bean temps) which like BT/Power profiles rely on BT and are suited for 100-200g.
Any inlet profiles require the inlet probe, which comes standard on the L100 and S100 Plus model roaster. Each profile allows for setting the speed of the exhaust fan and changing RPM dynamically as well, stepping through each of the drum drive gears. Each profile also allows the user to select a preheat temperature, specify a batch starting weight, and program pre-defined exit conditions based on total time, final temperature, development time, or development percentage.
Users of the L100 Plus have the ability to program an automated Between Batch Protocol which will initiate when a batch is dropped. The BBP does increase the consistency of the machine; running it between batches ensures that each programmed roast runs within seconds of previous batches. This is far better than the performance I’ve seen from Ikawa or Kaffelogic.
The firmware of the machine currently only can accommodate one BBP, which is something I’ve offered feedback on, as there are occasions when I change the charge temperature between batches and would love the option to select a transitional BBP or a BBP with a higher temperature. This is necessary because when the machine completes its programmed BBP, it will hold the final setpoint of that BBP program; if your charge temperature differs, it will not climb or fall to that intended charge temperature (to overcome this you can manually open and then close the drum door, which will then allow the machine to move on to the programmed charge temperature).
For users of the S100 models, it’s possible to still have a BBP—but you will sacrifice one slot of your machine’s 5 available programs and will have to manually select then begin that BBP program between two roasts. In other words, if you have a roast program called “SAMPLE ROAST” you can also have a two minute program called “BBP.” Once you complete a roast using SAMPLE ROAST, you can select BBP, charge the roaster, and when that program completes, switch back to SAMPLE ROAST and charge again. Clunky; but it works.
In a similar fashion, I’ve programmed a 12-minute warm up protocol based on Scott Rao’s advice which will slowly increase the air temperature inside the roaster—and the drum temperature with it—and bring the machine to a stable point for roasting.
Before Ikawa implemented their much-marketed humidity-based first crack detection, Roest included first crack detection on their sample roaster (which is available as a user-upgradable retrofit on earlier models). The crack detection works fairly well once you calibrate it based on your preferences and profile—it’s temperature-gated to ignore values before a certain BT threshold, and is adjustable based on the number of cracks at which to mark as well as the sensitivity of the sensor. The coffee you use and how you apply heat to it will, of course, impact the promptness or vigor of crack. But—it’s a nice feature to have, particularly if your desire is to build a fully automatic yet dynamic sample roast workflow.
The machine is controlled primarily through the touch-screen display on the front of the unit, and a rotary dial on top serves as a way to navigate through menus or adjust individual parameters. During a roast, the screen enables an operator to, at a glance, ascertain the roast progress, remaining time, and temperatures of key probes as well as the power and speed of the exhaust fan. While running a “power profile” (more on that in a minute) the rotary dial also enables a user the ability to control the power of the unit mid-roast, offering a manual roasting experience.
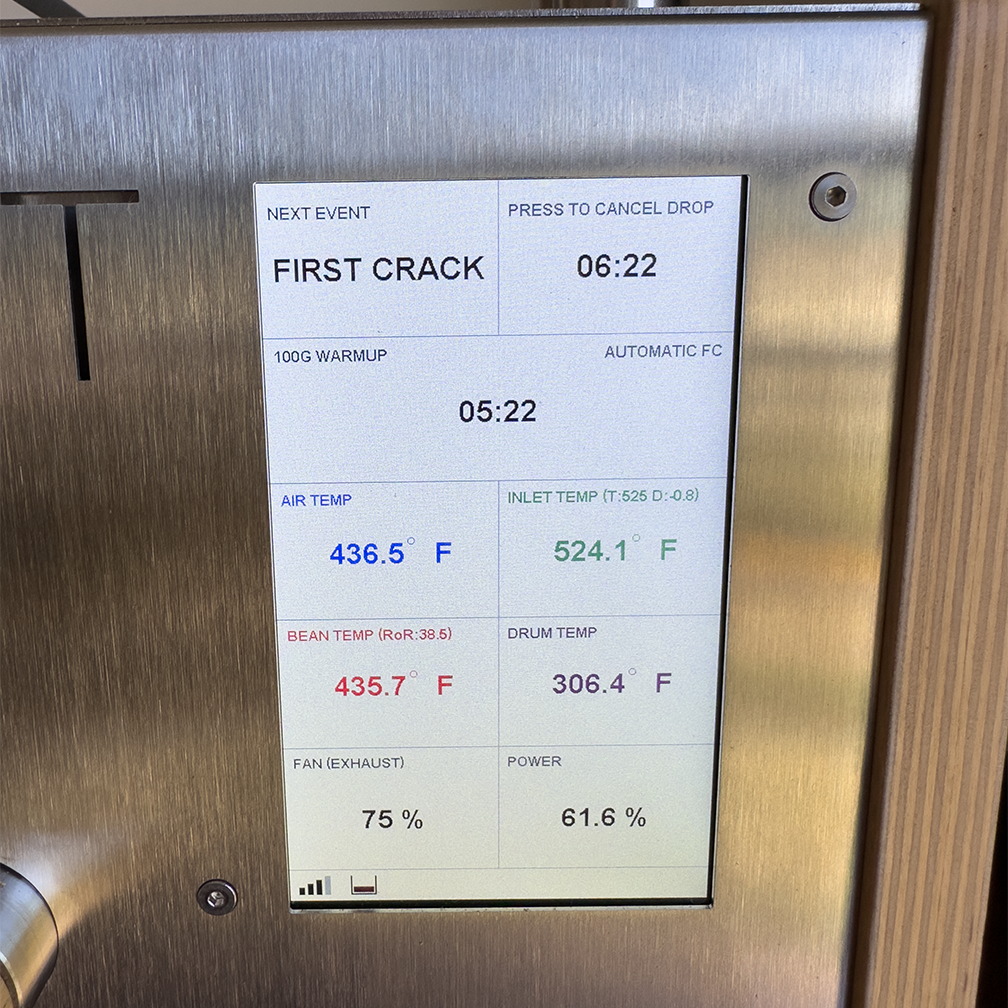
I often joke that the reason I like to roast fast is because I am only capable of maintaining focus on a single task for 8 or 9 minutes at a time; I’d be doomed roasting full capacity batches manually on a Diedrich. Some of the workflow-enhancing features of the Roest seem to have been designed with someone with my attention span in mind. The machine can be programmed to automatically mark the transition of green to yellow; a buzzer can be toggled and set to a certain threshold, reminding the operator mid-roast when the bean temperature has reached a certain temperature to attend to the roast, intervene if necessary, or adjust the post-crack development target; a buzzer also can engage to remind you when your BBP is ending or to remove your coffee from the cooling tray; and the machine can be enabled to automatically detect and mark first crack. I’ve suggested to the team at Roest that it would be nice to include a buzzer or other reminder for maintenance intervals on the machine—a request they have indicated they are building.
When I powered on the Roest for the first time, it felt in some ways familiar; the whirring of the motors, the slow spin of the agitation paddles and the overall feel of the machine reminded me of a miniature, electric Loring—a machine I’ve roasted thousands of batches on and one I love very much. Because of this feeling of familiarity, I think, I expected I’d be getting great results quickly.
I’d gotten a profile from Scott Rao that he said was his go-to for roasting 100g batches on the machine as an entry point and to help get me started more quickly. Scott was running an IT/BT profile—Roest’s parlance for a profile that adjusts the inlet setting based on the progress of the roast relative to the bean probe—one of the new profile modes that a future firmware update would make available to all Roest users. Scott and I went back and forth exchanging pictures of roasts and roast logs, but no matter what minor adjustments I made to the profile, I wasn’t getting good results. Nearly every batch was either severely under-developed or else exhibited massive signs of tipping. Scott’s roasts weren’t like this; I saw them, I tasted them.
I inferred that something had to be different about his machine or mine, and perhaps that profiles on Roest were not perfectly translatable between machines—a phenomenon I’d experienced with both Ikawa and Kaffelogic.
Over the course of two weeks, I burned or under-burned batch after batch of coffee, tweaking settings as I went, hoping to land in a usable place. I discovered that RPM settings were gear-based and that its setting severely changed the reading of the bean thermocouple (and thus all related roast events), as well as how well the coffee mixed (and thus how evenly it roasted). I discovered that the exhaust fan setting would drastically change the amount of post-crack development a coffee needed, as well as the intensity of the onset of crack and the amount of power required to achieve a certain burner setting. I discovered that even though the machine was originally designed for 100g batches, it was, at least with inlet or BT-based profiles, least optimized for them due to probe placement, and with most recommended profiles for 100g, the ROR would crash to below zero even if the coffee didn’t actually taste baked. But I didn’t stop the tipping or underdevelopment problems with my own IT/BT profiles derived from Scott’s profile, and I never got a good roast.
After burning a few kilos of green without a successful roast, I was flummoxed. Was it a skill issue?
Was it the machine, or was it me?
One of the fundamental best features of the Roest versus the Ikawa or Kaffelogic is that, during a roast, an operator can take control and roast fully manually. This meant that I could run a roast using my skill and experience as a coffee roaster and observe the values in the machine—inlet and power settings, in particular—after the fact, and set up a profile to replicate those shapes and trends accordingly.
So I went back to basics, roasting manually using my desired 100g batch size, keeping all variables in the roaster fixed with the exception of power.
This changed everything: roasting manually using power profiles, I was getting stable, repeatable roasts free of tipping and with levels of development that were predictable. Once I had observed the general values that were acceptable—inlet at certain stages of the roast, the way I built momentum—I could work backwards and program automated versions of the curves I’d been roasting manually. My biggest failure in approaching this new type of system was trying to treat it like any other: I should have explored it on my own, rather than hoping for a shortcut.
I’d caution new or prospective users of the Roest that this machine isn’t quite plug-and-play; you won’t be getting good roasts out of the box using profiles you find on Roest’s (fairly extensive and otherwise excellent) Profile Library. On Discord, we’ve tried replicating each other’s roasts through shared profiles only to discover that they are beyond the limitations of our machine, voltage, or otherwise require reconfiguration.
Thus: for new users of the Roest, I would discourage using profiles made by others until you’ve had the opportunity to roast manually with fixed air and drum settings. Roasting manually will teach you the limits of your machine in terms of inlet readings, response to changes in power, and how they interact with the software.
But even though I was getting good roasts, my curiosity didn’t wane—and in fact, my obsession over a few parts of the roasting process grew. With access to this much control and this much data I could find myself overwhelmed by possibility; to work through the possibilities available, I fixated on my early problem with the roaster: tipping.
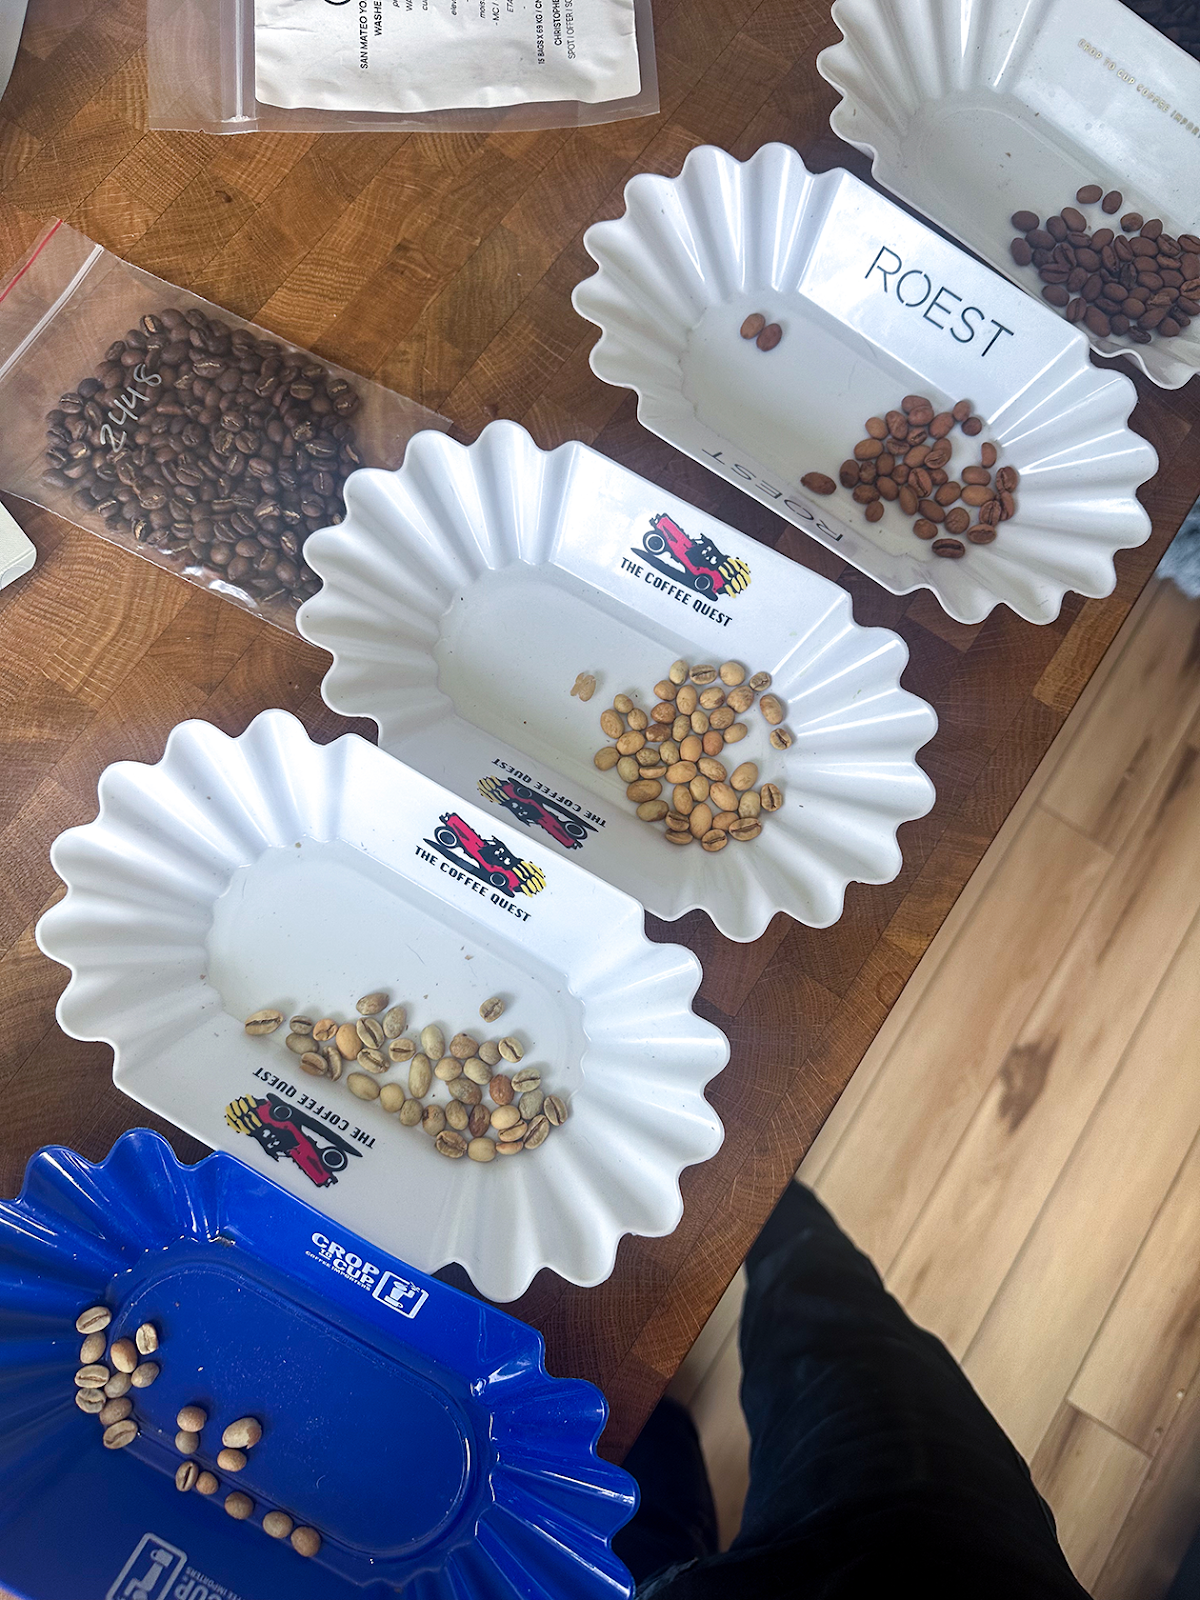
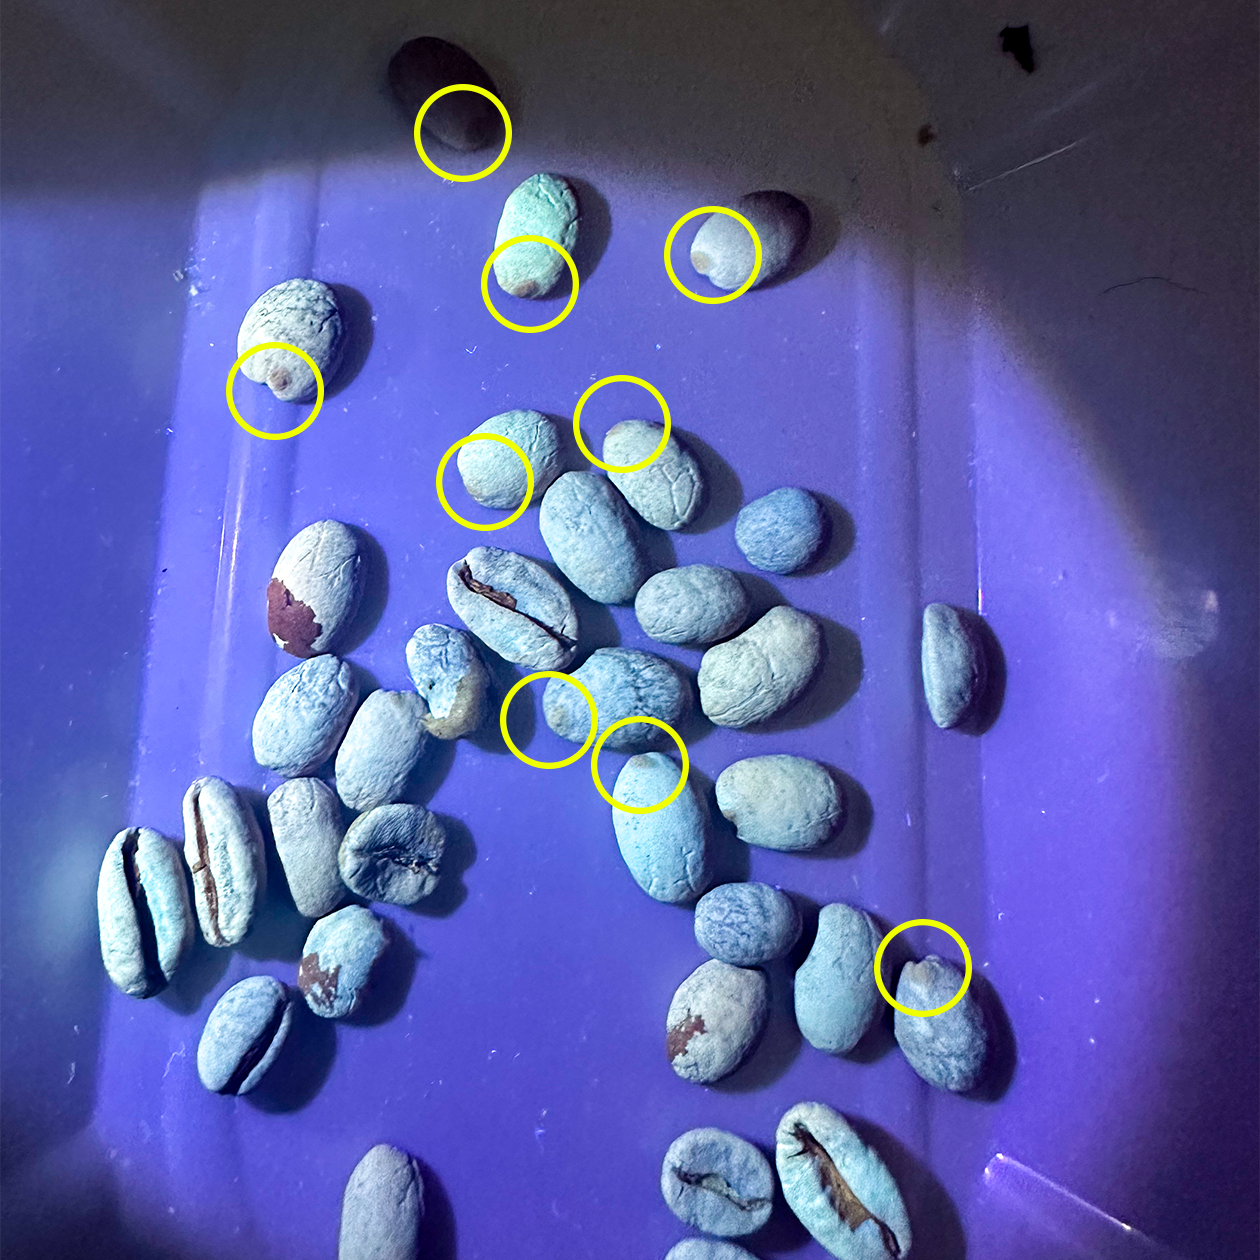
Because the machine allows for using inlet temperatures—which are normally a dependent variable derived from the burner power mixed with ambient air temperatures—to steer a roast, I could explore how and when tipping occurred in an air roaster like Roest. I ran cycle after cycle, reviewing each batch using the same 365nm UV flashlight that I use to examine green coffee, looking for signs of tipping that might elude the naked eye. I set up automated profiles with inlet temperatures at different levels at different stages of the roast and ran them, using the machine’s trier (the only time I’ve used it, to be honest) to extract samples every 30 seconds or so, marking the time of the extraction in the dashboard with a comment, and then reviewed them under UV. I verified Rob Hoos’ findings that: (a) tipping can occur at any part of the roast, (b) that it is directly related to the inlet temperatures that the coffee is exposed to at different stages, and (c) that not all coffees have the same tendency to tip.
It turned out that the pyramid method I’d stumbled upon years earlier worked pretty well at avoiding tipping in the Roest—and the stability and granularity of observation offered by Roest helped me understand that, apparently, coffee is most susceptible to tipping just before color change and again just before crack, when coffee is rapidly absorbing energy. Roasting is always complicated, and in a roaster like the Roest, things are a little more complicated. This complexity is where I got lost: every variable in the system impacts at least one other variable.
Two months later, it’s not a mystery to me why Scott’s profile didn’t work on my roaster.
Heat transfer in the Roest occurs virtually entirely through convection. The machine works by blowing air drawn from the back of the roaster over a heating element, heating the air in the process, then pushing it into the roasting chamber where agitation paddles spin at a set drum speed, lofting the coffee through the hot air—before it exhausts through the top of the drum. Though the drum probe does register that it holds some heat, it tends to be lower than the temperature of the coffee, and well below the temperature of the exhaust—in other words, contributing little if any thermal energy to the system. Airflow—and the heat it carries—drives the roasting process.
My lab in Ohio sits at an elevation of 200 meters above sea level. Here, the density of air is around 1.175 kg/m3; Scott and Mark are roasting in Boulder, Colorado at an altitude of 1,650 meters. There, the density of of air is just 0.975 kg/m3, or 17% less than the air in my lab. Density of air, of course, impacts convection—and the Roest turns coffee brown nearly exclusively using convection. My lab with its denser air has a much greater coefficient of convective heat transfer than Scott’s roastery, perhaps by as much as 5%. To compensate, Scott needed to use higher inlet temperatures—higher inlet temperatures at every stage of the roast that, for me, caused tipping (at every stage of the roast).
The engineering of the machine adds an additional layer of complexity. The inlet fan—the fan responsible for blowing air over the heating element into the roaster—serves a second purpose beyond providing heat to the system: protecting the heating element itself from overheating. If the fan did not exist, the heating element would burn out quickly. After extensive testing over its development history, the team at Roest bumped the speed of the fan—which, when the machine was marketed as a 100g sample roaster, was originally programmed to run at a constant 3200 RPM—to 3400 RPM [EDIT 5 Sep 23: After speaking with the team at Roest, it seems this part of the mythology is apocryphal and the inlet fan has always run at 3400 RPM; regardless, the false history led me down an interesting path]. As I understand it, this change coincided with increasing the machine’s marketed capacity to 200g, which, owing to the larger mass of coffee, would require more power and thus tax the heating element and lead to accelerated burnout relative to 100g batches. By increasing the inlet fan to 3400 RPM, the rate at which heat is pushed from the element into the roaster increases, helping to keep the heating element cool. This increase in airflow at a fixed inlet setting also increases the rate of convective heat transfer—a fact which benefitted Scott and other roasteries at altitude.
For me: it meant more tipping.
In Ohio, I wanted to reduce the force of the air so as to eliminate tipping. So instead of decreasing the exhaust fan (which pulled air through coffee), I started by reducing the velocity of air entering the roaster by going to the service menu and decreasing my inlet fan to 3200 RPM. As a result, I saw a decrease in power consumption—as well as my desired elimination of tipping.
But, since every variable in a roaster is connected, when I decreased the speed of the inlet fan, something else changed: the pressure in the drum.
Because the Roest has two fans—one blowing air in (the inlet fan), and one drawing air out (the exhaust fan), changing the speed of one of the fans relative to other will change the amount of pressure in the roaster. Pressure, like density of the air, impacts the rate of convective heat transfer—as well as dehydration of the coffee, rate of browning, and intensity of crack. If the lighter test is any indication, on my venting system and with my Roest, with coffee in the roaster and the inlet fan set to the default 3400 RPM and exhaust programmed at 75% (the default and suggested setting), the roaster is, in fact, a positive pressure environment; this means that rather than pulling exhaust exclusively through the vent in the back of the roaster, hot air is also pushed out of the drum through the ports in the sides and bottom of the drum (also helping to keep the delicate electronics inside of the roaster cool). This offers the possibility of pressure profiling in the Roest, if you choose—and I was, in fact, able to get excellent results by beginning with a high airflow through the machine (negative pressure) and then increasing the pressure toward crack.
I recommend checking your machine before diving too deep into roasting so as to ensure you maintain a negative pressurization in the drum. With the machine loaded with your target batch size, remove the trier. Hold up either (a) a lighter, or (b) a small square of paper to the trier hole and adjust the exhaust fan until either the paper falls after a few seconds or the lighter is no longer pulled into the drum. That’s your neutral—I wouldn’t recommend using an exhaust setting there or below. You can also purchase a handheld anemometer to quantify the air speed, if you choose.
Observations of drum pressure at my lab with 100g charge using lighter test, paper square test, and digital anemometer
| EXHAUST SETTING | 3200 RPM inlet | 3400 RPM inlet |
| 60% | Positive pressure FLAME: blown out PAPER: falls ANEMOMETER: 0.0 m/s | Positive pressure FLAME: blown out PAPER: falls ANEMOMETER: 0.0 m/s |
| 70% | Neutral/positive pressure FLAME: dances PAPER: falls after a second ANEMOMETER: 0.0 m/s | Positive pressure FLAME: blown out PAPER: falls ANEMOMETER: 0.0 m/s |
| 75% | Negative pressure FLAME: tips into drum slightly PAPER: falls after a few seconds ANEMOMETER: 0.4 m/s | Positive pressure FLAME: dances, blows out PAPER: falls ANEMOMETER: 0.0-0.4 m/s |
| 80% | Negative pressure FLAME: bends into drum PAPER: remains stuck to trier hole ANEMOMETER: 0.8 m/s | Neutral/positive pressure FLAME: dances PAPER: falls after a second ANEMOMETER: 0.4 m/s |
| 90% | Negative pressure FLAME: pulled into drum strongly PAPER: remains stuck ANEMOMETER: 1.2 m/s | Negative pressure FLAME: bends into drum PAPER: remains stuck to trier hole ANEMOMETER: 1.1 m/s |
(Your values will vary based on your altitude, venting configuration, and machine—you’ll need to test your own)
Using the lighter test, with the default inlet setting and my exhaust fan set at 90%, I was drawing air through the drum and had a negative pressure environment. With that as a static setting, the reliability of the probe at 100g batch size is higher and the machine performs much more like a single-pass roaster or traditional fluid bed roaster; with higher exhaust and negative pressure, you can use higher inlet settings without risk of tipping and, if you choose, fairly easily translate between inlet settings of other machines (including the Arc). Expansion of the coffee as well as chaff ejection was superior under this environment.
My venting situation is quirky; I’m in an attic with limited space (my lab is around 100 square feet in total) and limited electrical and window possibilities. As a result, I have two 90-degree turns in my venting before the roaster exhausts; this creates quite a bit of restriction that the machine had to battle against. With the AC Infinity booster on, the airflow is too high—even at the lowest settings—so I opted to leave it off and adjust my inlet fan speed to reduce pressure accordingly.
I also noticed that at 3400 RPM, light roasts that were roasted using a less negative-pressure environment (closer to neutral) or positive-pressure such as with the default fan setting at 75% (or roasts that used higher pressure toward crack), I tended to behave like Loring light roasts—they’d cup fairly well a few hours after roasting, then become “quiet” and muted for days, opening back up progressively over the course of 2, 3 or 4 weeks. This makes my “baby Loring” analogy fairly apt, and makes the Roest well-suited to exploration of roast profiles for production machines like the Loring. According to Scott, at 200g, the settings from his Roest translate very well to Prodigal’s production IMF.
Roasts run using a more conventional negative pressure profile cupped well the next day and day after, making them, in my opinion, a better choice for green evaluation—in addition to offering more stable BT readings. When examining the quality of green coffee for potential purpose, timeliness is of the essence—as is seeing the coffee in technicolor and full resolution rapidly. When I’m evaluating coffee for purchase, I don’t care what my roast will taste like in a month; I care about the inherent potential quality of the green, today—so that I can make a decision. If I must wait weeks to get a full picture of quality, in all likelihood, that lot attached to that sample will be sold. For green buying purposes, I’ll take a destructive, fast-decaying roast over a durable one.
But the fact that this tiny square machine is capable of delivering both extremes is, to me, a positive and underscores its versatility.
For 100g batches, I’ve kept my machine at the default drum speed of 55 RPM; this seems to offer the best balance of bean temperature readings and mixing of the coffee. Lower settings will read more accurately (and correlate quite well with the readings on the Loring S35 I’d used for years) but offer less satisfactory mixing with a small batch size. As I noted previously, the drum speed mechanism is geared on fixed ratios; though the software gives the appearance of infinite granularity of control, it’s actually stepped. The following ranges of values all offer the same drum speed:
20-28
29-33
34-39
40-49
50-65
You can observe this yourself by having the roaster shift from 49 to 50 RPM mid-roast; when it makes the shift, the change in the sound of the drive is unmistakable. In general, higher values would mean greater mixing and lofting in the hot air; lower values would mean the coffee sits more toward the bottom of the drum, rests better in the thermocouple, but is mixed and lofted less. With larger batches (200g) it becomes necessary to use lower values (typically 35rpm) to avoid tossing coffee into the exhaust duct at the top of the roaster.
In the times I’ve had questions about the machine or concerns about its maintenance, I reached out directly to the customer support team at Roest either via email or the Roest forum. In all cases, I found the response time to be adequate (there’s a time difference, after all) and level of support to be excellent. I feel confident that should I have an issue with the machine such as a burned out heating element (it shipped with a spare), I would be able to undertake the repair or get the guidance required. A self-service parts shop can allow a roaster to stockpile like a prepper and ensure no downtime should any component fail—and allows for a user to get what they need, promptly, to carry out a repair. The online store also offers upgraded parts to allow for easier roasting of 200g batches such as a taller cooling tray and hopper—but I’ve seen that many Roest users will simply use the ever-versatile Aeropress funnel as a hopper extender for the stock green hopper ring.
The maintenance lift for the Roest is a bit higher than any other roaster in my lab. At 1,000 roasts, the machine requires disassembly to clean the exhaust fan impellers and exhaust stack. In all cases, Roest provides detailed written and video guides. As this machine is intended for professional roasters rather than home users, I don’t find this to be cumbersome; the weekly- and monthly- preventative maintenance and cleaning schedule for shop roasters is more time-consuming and laborious.
Roest delivers on roast quality and repeatability—particularly with a good warmup program and BBP protocol in place—but even if it delivered coffee no better than the Ikawa, I’d still prefer to use it simply due to the workflow. With simultaneous roast and cool and the efficiencies in place, roasting batch after batch is effortless—even enjoyable. With 12-minute warmup times and less-than-five-minutes to room temperature cooldown times, it’s a machine that fits well in the context of a workday, even if there are just a few samples to roast. Once tuned to your roasting style, the first-crack detection does make automated roasting with pre-determined endpoints possible; I did found that unless I was using time-based inlet or air profiles (like on the Ikawa or Kaffelogic) I would need to adjust the amount of development depending on the coffee I was roasting—much like a production roaster.
Chaff is collected in a tray that slides out behind a magnetic plate on the front of the machine, holding chaff from up to 2kg of coffee; the machine tracks the number of batches since the chaff counter was reset and warns you if it believes the tray is getting full. This helps to mitigate the risk of chaff fires as well as keep air flowing through the roaster to ensure it works optimally.
At almost $8,500, the Roest L100 Plus is more expensive than some production roasters I have used; it’s the most expensive roaster in my lab, but also the most fully-featured. The entry-level S100 is available for a few thousand less, but I’d encourage anyone looking to purchase a Roest to invest in, at the very least, the S100 Plus due to its included inlet sensor.
Wrapping up
When I started writing this piece, I’d imagined that I would build a locker for my roasters, or display them on a shelf with attractive spotlights like trophies or classic cars. I imagined my lab would be a gallery of roasters, giving me the option to choose a roaster based on my need or the day.
The truth is, though, after two months with the Roest, both the Ikawa and Kaffelogic sit in the corner on the floor. I’ve arranged for a buyer for the Kaffelogic, even before its boost kit is finally delivered as part of the original Indiegogo fulfillment—and while I do like the idea of keeping an Ikawa in my lab for the occasional 50g sample or simply to calibrate with other labs (since many do roast on Ikawas), it’s likely I’ll sell that one too.
But I’ll keep the Arc: I think it’s an ideal machine to learn or train on, and I think there’s substantial value in roasters understanding how to achieve good coffee on a traditional drum roaster. It’s a workhorse and, in a pinch, could roast connected to a small solar array or backup battery (you just need enough power to run the exhaust fan) and propane tank.
And I’ll keep the Roest. Simply put: I love it. I find it a joy to roast on and its efficient workflow, built-in logging, and BBP helped me clear out a backlog of samples while keeping my mind free for other tasks—even in the midst of Ethiopia arrival season. Using the Roest has challenged me to become a better and more attentive roaster in ways I wouldn’t have anticipated through the amount of data it makes available. I’ll be happy to use it for sample roasting and green evaluation for my consulting work and can foresee a role for it in a production environment as well.
In the end, these are all capable roasters—all with strengths, and all with flaws—and all, with sufficient time, attention and understanding, capable of delivering excellent, repeatable sample roasts for the purposes of green coffee evaluation. Ultimately, we sample roast to help us choose green coffee to purchase; these roasters, when used correctly, all can help you do that.
But first and foremost, becoming a better roaster requires becoming a better cupper—and knowing when a sample roast has failed is part of that process and part of getting the most out of whatever machine you have in your lab.
| Ikawa Pro 50 | Kaffelogic Nano7 | Arc S | Roest L100 Plus | |
| Batch size (g) | 50 | 90-120; 50-200 with the Boost kit | 80-200 (130-200 for best performance) | 50-200 (best around 150) |
| Heat source | Electric | Electric | Gas LPG | Electric |
| Price (excl. tax, import, shipping) | $3,970 (up to $6,670 for the Pro100x models) | $1,200 | $3,510 | $7705 (other models begin at ~$5500) |
| Sensors | Exhaust, inlet (sheathed) | Exhaust (bare) | Bean, Exhaust (3mm RTD), Inlet (5mm) | Environmental, bean, inlet, exhaust, drum (3mm RTD) |
| App | Y | Desktop app | N | Web app |
| Data Logging | Ikawa app or Cropster | Kaffelogic Studio | Cropster, Artisan | Roest online dashboard |
| Controls | Heat (on/off), fan speed | Heat (watts), fan speed | Gas, airflow, drum speed | RPM, exhaust Fan, control set points for: inlet, power, bean temp, air temp. |
| Automation | Fully automated | Fully automated | Manual | Fully automated or manual |
| First crack detection? | Only on Pro 100X model | N | N | on L100 Plus, yes; on S100 no |
| Style of roaster | Plan ahead/set-and-forget | Plan ahead/set-and-forget | Manual | Plan ahead/set-and-forget or manual |
| Venting | Room/ambient | Room/ambient | Vented; cooling tray and cyclone | Vented; one outlet |
| Chaff system | 1 roast | 1 roast (fire hazard) | Magnetic barrel, ~20 roasts | ~20 roasts |
| Maintenance difficulty | Low | Low | Medium | High |
| Roast and cool simultaneously? | N | N | Y | Y |
| Best use | Sample roasting | Sample roasting, personal consumption | Sample roasting, learning to roast, profile development/ discovery | Sample Roasting, personal consumption |
| Can you learn to roast on it? | No | No | Yes | Sort of |
Thanks for the deep dives in these 4 sample roasters, Christopher. I have experience with 3 of the 4, and have been considering the Arc as a training machine for new roasters.
Your hard work with the Roest will hopefully help me overcome similar challenges I have had with the Roest at the KW Coffee Collective. It’s a remarkable roaster, but to date I feel more often than not it has defearted me.
Excellent review. I’m going to have to reread and apply what you’ve learned to my Roest profiles. I’m in Houston, so pretty much at sea level. I’ve never checked pressure, but I have seen tipping. I suspect that some of this also applies to my Bullet roasts, where I have also seem scorching and tipping that I don’t get on my Coffee Crafters 3e.
The information about how you sorted out why your Roest wasn’t producing the same results as Scott Rao’s despite using the “same” profile is gold for anyone trying to dial in a roaster that has variable air flow and drum speeds. Thank you for that and all of the other insights in this piece.
Thanks for the detailed write up. I think another option for smaller roasters or less demanding cupping needs might be a used Home version of the Ikawa (although I doubt there are many out there). It does 50 gram batches and controls profiles using an inlet temp probe. Otherwise it has the build quality and ‘maintenence free’ features of the pro. Since the probe is up stream from the beans, it doesn’t build up oils etc. Also, when I’ve plugged it into a watt meter, it doesn’t appear to cycle on/off power in order to trace a profile, it actually adjusts the voltage/watts. Once it is warmed up I can do back to back roasts of same bean and it’s usually the same or within a tenth of a percent difference in weight loss (12.2 vs 12.3 for example). so it’s very consistent. However as you stated, sharing profiles, or using the Ikawa-supplied profiles, often had problems. Part of it might be technical or environment differences (voltage from the wall, altitude, humidity, duct and exhaust setup etc) but I think the subjective human factor was huge. I tried profiles that were so obviously over roasted and flat I couldn’t believe they were recommended… and a lot of times I could tell just from the time and temp set points. I think some people just don’t like acidity or high notes etc. So yes, cupping and the knowledge of what is a good sample or not is huge. Most profiles I’ve tried from Ikawa or other roasters had obvious flaws in the roast. But, the few profiles that really nail it, manage to work on a surprisingly wide range of beans.
Love your comprehensive reviews. I purchased the Nucleus Link and hopefully it’s on your review list in the future. I have done about 2 dozen roasts and so far so good. There is a learning I’ve and I am definitely there.
Great insight and appreciate your time to do so, hope we can meet you any time down in Panamá, and we can taste some coffee together.
Thank you so much for this. I’m based in the UK and looking to start a roasting business later this year, and found your review very helpful in my quest to get started up. I’m sure I’ll keep referring back to it.
AMAZING REVIEW
I really enjoyed your insights on Christopher Feran’s roasting techniques! It’s fascinating to see how his approach to sampling can elevate the coffee experience. Can’t wait to try some of his recommended brews!
Like your reviews. What has put me off the Nano 7 is the use of an aluminium rather than a steel basket. Aluminium, as I understand it, is toxic when heated and is why it is not recommended for cookware. Not sure about the roasting “basket” materials for the other roasters.
You might want to reconsider this line in the IKAWA comment:
“And because it’s an air roaster, it is purely convective; this means that in places at higher elevations, the lower density of air and lower convective heat transfer requires some adjustments (higher set points or lower airflow)”
You are confusing yourself, you really mean ‘conductive’.
Think about heating peas in a pan of hot water, Do the peas warm by mainly by convection – moving currents of warm water rising in the fluid mass or by conduction – energy passed from one material to another – hot water in contact with the peas?
Really since the heat is being transferred from one kind of material to another it can only be by conduction. Energetic molecules of water hit a and pass energy to less energetic molecules of green coffee beans.
Hi Angela, “convection” refers to the transfer of heat to a substance via the movement of a fluid (like air—or water) rather than contact with a surface (conduction). It’s perhaps easier to understand this principle by knowing if the media being heated is moving (as in conduction) or stationary. In your example, the pea seems to be sitting on the bottom of the pot. While it is heated by convective forces (the heat passing through the moving water, which is simmering), it’s also being heated by the metal of the pot (conductive transfer).
In air or so called “fluid bed” roasters, the coffee particles remain in constant motion, lofted in the air. The coffee is primarily heated by the movement of hot air—which is the definition of convection.
Edit my last line; exchange water for air.
Like your reviews. What has put me off the Nano 7 is the use of an aluminium rather than a steel basket. Aluminium, as I understand it, is toxic when heated and is why it is not recommended for cookware. Not sure about the roasting “basket” materials for the other roasters. Great!
Temperatures don’t reach high enough temperatures for degradation of aluminum— evidence about aluminum leeching from cookware shows that in typical cases, only small amounts transfer to foods, typically a result of wetter cooking environments, direct contact, longer cook times as well as higher temperatures than would be found in a small coffee roaster. Fish or chicken cooking in foil with direct contact vs. coffee lofted in a roaster and only occasionally bumping the sides. Practically speaking, less mass = less conductive transfer, which is desirable for a coffee roaster.