Driving the train doesn’t set its course. The real job is laying the track.
Ed Catmull
I don’t tend to write a lot about roasting here, partially because I think my colleagues (Anne Cooper, Scott Rao, Rob Hoos, Candice Madison, Joe Marocco, Matt Perger—to name a few) have said more interesting and helpful things than I ever could (and much more articulately), and partially because I just don’t feel I have much that new to contribute.
Also at work is the fact that I am largely a self-taught roaster. Early in my career in coffee I spent my free afternoons huffing fumes billowing from a popcorn popper (back before I knew coffee could give you “popcorn lung”—who’d have thought), turning bags of coffee from Sweet Maria’s brown and diligently reading every word I could find on the internet—a precarious endeavor, to say the least.
I started in coffee as a barista at the company where I work again now, Phoenix Coffee—which has been around for longer than many baby-baristas today have been on earth, and survived the rise and fall of many trends and market disruptions. Carl Jones, who founded Phoenix in 1990, founded Arabica Coffee before that, in 1976—back before Starbucks was called Starbucks and long before much of what we recognize as industry standard existed (in fact, Carl was on a steering committee to create the organization that would become the Specialty Coffee Association of America).
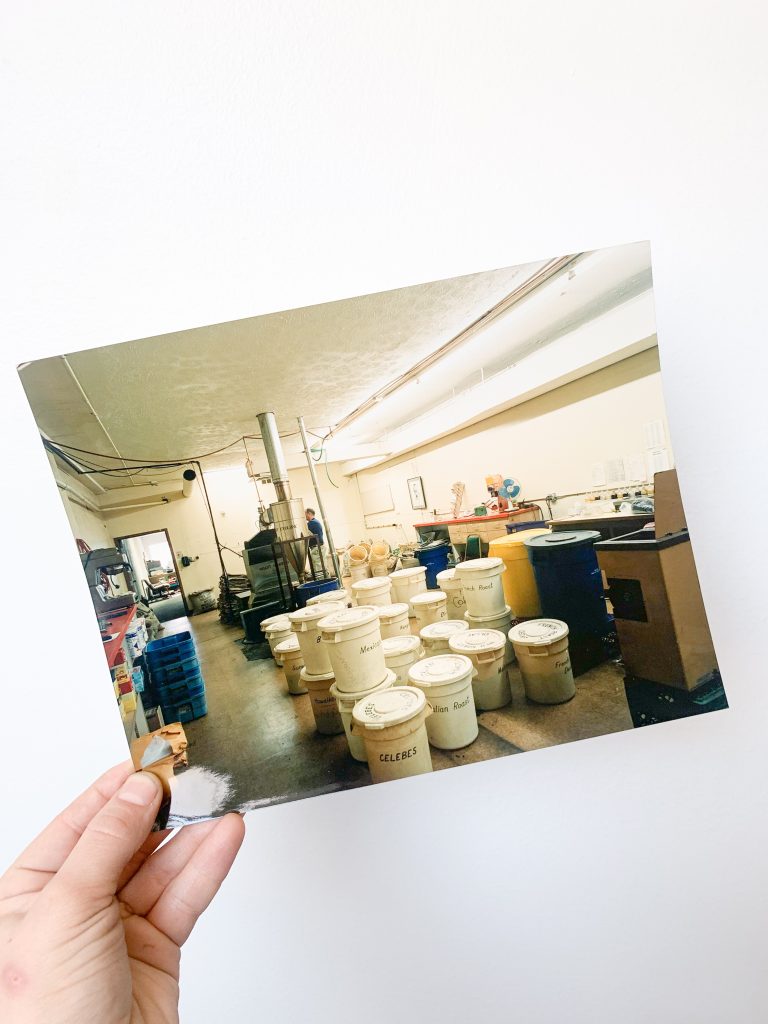
Back in 2010, we roasted on a Sivetz quarter-bag roaster, blowing coffee around much in the same way I did on my popcorn popper, with no control over the profile outside of a gas adjustment valve that would determine how hot the machine fired and consequently how quickly your roast would complete. The roaster would run according to its own PID parameters (that I didn’t learn to adjust until much, much later) and when a roast cycle completed, the burner would kick off and the coffee would continue to tumble, hot, in the roast chamber for a few minutes (like an Ikawa)—so that the machine could cool enough to lift the physical gate up and drop the coffee into a steel garbage can below that sat on a blower fan. It wasn’t the quickest way to cool coffee—but it worked.

The whole thing was rudimentary, surprisingly low-tech—and ingenious. But the thing about roasting on a Sivetz is that—much like roasting on an Ikawa, or a Bellwether—you never actually learn to roast. It does all of the “roasting” part for you up to the final temperature you set.
So I had to learn on my own time. As a result—I never really felt like an authority on the subject, even as clients hired me to address issues in their roasting programs or train new roasters.
Honestly: Who gives a shit what I have to say?
Fads and fashion come and go in coffee just as quickly as in any other business that is built upon the premiumization of something traditionally regarded as a commodity, and in my decade+ in coffee, I’ve seen fluid bed roasters come and go and come back into vogue more than once (famously, Heart in Portland switched to an air roaster in late 2019 from their much-loved and talked-about Probat. Tim Wendelboe, too, is now roasting on a Loring). Proponents of air roasting claim that the flavor is cleaner and brighter with more even roast development, while detractors claim that coffee roasted on air roasters seemed less well integrated in the cup and lacking in body (or complaining, misguidedly, about the inability to separate airflow from burner on a Loring). The re-adoption of fluid beds in commercial roasteries (including Ikawa) and new hybrid technologies such as those from Loring and Stronghold seem, though, to only be accelerating as the benefits of fluid bed roasting and its offshoots and improvements in roaster design make their way into the hands of increasingly skilled roasting companies.
But Sivetz started it all.
Michael Sivetz had a touch of flair for the dramatic (something I can appreciate) and would sell his fluid bed machine as safer for human health because, he said, the lower temperatures used to roast coffee and lack of contact with conductive surfaces meant that you would produce fewer carcinogens compared to traditional single-pass burners with their baked-on layers of seasoning coffee oils.
In that slightly exaggerated claim, he hit on one fundamental advantage of fluid bed roasters compared with drum roasters: the energy you use to heat the air is more directly correlated with the energy in the roasting environment.
I started thinking a lot about this after seeing a post from a Tumblr user I don’t know IRL and reading posts from Marshall Hance (who built a fluid bed roaster of his own design) of Mountain Air Coffee on home-barista back in 2015 or 2016. At the time, I was living and working in Brooklyn, NY and roasting out of Pulley Collective, where we had a Probat UG-22 and Loring S35.
Most of the production work I did was on the Loring, but having spent more hours doing profile roasting on traditional drum roasters, I found it easier to get the results I was looking for on the Probat—and in truth, most of the roasters I’d looked up to in my formative years in coffee roasted on drum roasters, so it wasn’t a surprise to me that the Probat helped me get coffee that tasted like what I thought coffee was supposed to taste like. But even when I was successful, I found it to be a challenge to get those results reliably (roasting in a shared space where you only have a 6 hour block to produce 1,500 pounds of coffee on machines that can only comfortably roast 40-60 pounds at a time doesn’t exactly leave much margin or room for rigorous BBP).
I spent countless hours going back and forth between the Loring and the Probat, trying to achieve the same flavors between the two. I knew it could be done—and I’d chatted with Rob Hoos about it—but I really needed a conceptual framework to get the results I wanted on the Loring, which I preferred due to its workflow and ease-of-operation as well as its lower roast loss percentage and longer shelf life (both of which meant less work for me over the long term).
But first I had to figure out how the hell to get the coffee to taste how I wanted it to.
The first car I ever bought on my own was a manual transmission, base-model Hyundai (for those of you outside of the U.S.: automatic transmission is ubiquitous and it’s fairly difficult to find new manual transmission cars here). I’d tooled around in a car with a stick before but never really learned how to drive it well until I looked at mechanical drawings of the transmission mechanism—but I bought one, moved to D.C., and decided I’d learn how to drive it in stop-and-go traffic on the beltway.
So it kind of fit a pattern when I took a job in New York, moved my life there, and started production roasting on a machine I’d never so much as touched before.
Trial by fire. Why the hell not. That’s how it felt, again—only this time, I was playing with actual fire.
Overtime, I came to understand the dynamics at play: Pulley sat on the bank of the Upper New York Bay (overlooking the Statue at Liberty), and when it was cold (like in the middle of winter) and wind whipped through, it would take a very long time for the UG-22 to heat up at the beginning of the day or recover between batches. If I didn’t have someone roasting on the machine before me, or if Brad couldn’t get things started ahead of my block, I’d have to arrive an hour early to get the roaster warmed up.
The Loring didn’t struggle with this—not nearly as much—even in the middle of January. I remembered this from the Sivetz, too: no matter the season, it would take just 25-35 minutes to preheat the roaster.
This all tracks from a physical perspective—with a traditional, single-pass drum roaster, there’s a shit ton more mass to soak up heat. In fact, the machine itself is engineered to be a giant heatsink: A UG-22 weighs, in all, about 1800kg, or nearly twice the weight of the larger-capacity Loring S35, which clocks in at 950kg.
In the UG-22, the burner sits below a carbon steel drum and cast iron faceplate, materials with a high thermal capacity (technically cast iron and mild steel have very similar thermal capacities per kilo, but because cast iron is more brittle, drums made from it are thicker and heavier than steel— meaning there’s a fuck more to heat up in drums of the same size. Steel tends to respond to changes in burner faster than cast iron).
When you turn up the gas on the roaster, you’re not just heating the coffee; you’re heating air that passes over the flame (which is pulled into the drum) but more directly, you’re heating the metal of the drum itself as well as the heavy cast iron faceplate, steel body, tubing, etc.
Thermal energy is stored in the machine itself.
Roasting on a Probat is like driving a semi truck. Or a train. It takes awhile to get going—but once it’s going, get out of the way.
On a Loring, the roasting chamber is a fixed steel cylinder with rotating steel agitation paddles. The flame isn’t under the drum, it’s in the air inlet, like in a Sivetz, so when you increase the gas, you heat the air that passes into the roaster. Airflow increases as gas increases to maintain the optimum air/fuel mixture in the flame, but the environment is always nearly purely convection (I’ve heard the company give estimates of 99+% convection). The air exiting the roaster passes into a cyclone that burns off smoke and particulates, and the cooler (very hot) air in the stack passes back into the drum, increasing the efficiency and thermal stability of the roasting environment (In that way—the fact that the air has some “latent energy”—modern Lorings can behave slightly more like a drum roaster than a Sivetz).
[The original Loring 15kg Merlin roaster was more of a traditional fluid-bed design but the company struggled to get traction in the industry until they switched to this design which appealed to more classic drum-roaster enthusiasts—even though it adds significant engineering complexity, maintenance issues, sources of mechanical failure, and so on. We roasters are often victims of our own worst, romantic notions about what “better” means.]
In that way, roasting on a Loring is much more like roasting on a Sivetz than it is like roasting on a Gothot or a Giesen or a Probat, if you look at the way heat is applied, and where it’s stored.
If a Probat is cooking with cast iron, the Loring is an air fryer.
Scott Rao’s The Coffee Roaster’s Companion depicts coffee roaster designs in very digestible illustrations on pages 25-27.
In the original patent application for his roaster from 1976, Sivetz included a diagram of a roast profile that many who follow modern roasting theory will recognize:

If you were to derive the rate-of-rise from the beat temperature, you’d see a declining rate-of-rise, followed by a flick (with varying intensities increasing from D to A in the dashed box) during first crack. In other words: the Sivetz was engineered to produced baked coffee, if you subscribe to Scott Rao’s notions of crash-and-flick at first crack causing baked flavors. [In the patent, Sivetz associates each of the four ‘pyrolitic bumps’ with different types of coffee that each possess, based on the prevailing processing practices of the time, different moisture content and water activity. A topic for another time.]
Conceptually, roasting is fairly simple: if the temperature of the roasting environment is greater than the temperature of the seed, the seed temperature will increase until it is the same as the temperature of the environment. You don’t need to read up on enthalpy and entropy to understand this stuff (but it can’t hurt)—but the basic idea is that the system will work to achieve stability.
In a roaster we’re adding new energy (via the burner) and losing it (to exhaust, to the ambient air of the roastery) all the time—so heat doesn’t always go where we want it to go (to the coffee, or to the drum). In other words—we need to understand the drum and the machine as part of the system. How well insulated a drum is as well as how quickly air is being replaced inside the roaster will impact the way that the burner interacts with the system as a whole and the way the system accumulates heat or sheds it.
If you were to graph a typical “declining ROR” style roast, a mathematician might notice the way that bean temperature asymptotically approaches its endpoint:

A mathematician or physicist (or a Matt Perger) might also observe that this sort of profile, could—in theory—be achieved by controlling one variable (environmental temp) such that it was held constant throughout the roast:
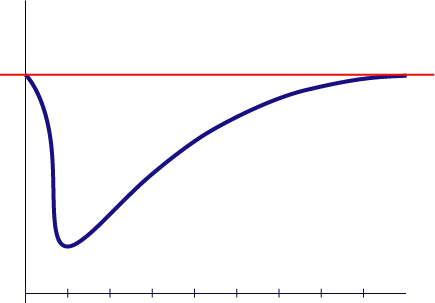
Of course, this is not a real roast—it’s just a vector drawing I did in Adobe Illustrator—but it’s representative of what a real roast might look like. And if you understand that rate-of-rise is derived from temperature readings by the bean probe, you can imagine what the rate of rise curve looks like (anywhere where the BT curve looks flatter = lower ROR. Steeper = higher ROR).
I intentionally didn’t label any temperatures because the specifics of when crack or turning point or yellow or whatever marker happen on your roaster will be different—what I want you to understand here is not a recipe for how to roast but the relationship between gas input and the resulting trajectory of your roast based on the environmental temperatures experienced by the coffee.
I want you to see the stick-shift mechanism and understand how to drive it.
Events over the course of the roast impact how much heat the roasting environment can hold as well as how much heat coffee can absorb during any given time, of course. Even if your inlet temperature is stable, the thermal energy in the roasting environment might not be.
Air roasters are better-suited for this style of roasting by virtue of their design; drum roasters, not so much. On drum roasters, there’s so much “lag” between when you add gas and when the energy in the system is stabilized that it makes it difficult to make reactive adjustments like this—by the time the drum soaks up or sheds heat, it’s too late; you’ve probably under- or over-corrected.
This one reason I find fluid bed or Loring-style hybrid recirculating roasters to be advantageous and more user-friendly. You’re not controlling the thermal mass of the drum and the air being drawn through it—you’re just controlling the heat in the air.
Gas in, heat out. Simple. It lacks conductive surfaces—like Sivetz said.
But because it has such a large thermal mass, a drum on a single-pass roaster can work like a bank or battery for thermal energy. In some ways, the latent energy in the drum works like a Gaussian blur, averaging fluctuations in energy that might otherwise occur. And I know of more than a few roasters who kill the flame at first crack and allow it to “coast” to a finish on its own momentum, propelled by the stored heat energy in the drum. They pull the trier and adjust the airflow damper with the precision of a captain piloting a sailboat as heat radiating off of the spinning steel finishes the roast.
Of course: if you don’t have enough saved up in the bank, you have a problem; and if you kick the burner back on, you have the thermal mass of the drum to contend with. [And that’s yet another way to bake, tip, or scorch your coffee]. And if you draw down your deposits early (by soaking), you have to replenish the money in the bank before you can spend at a faster rate later on—which requires high flame early in the roast.
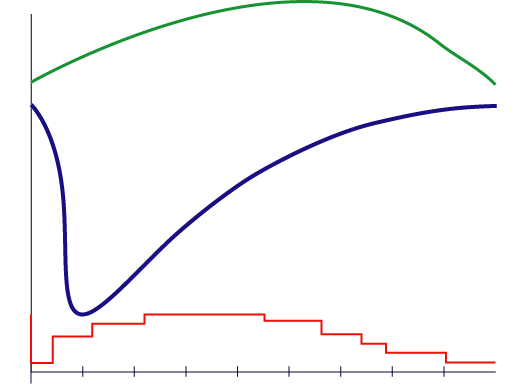
Here’s what a theoretical roast might look like on a UG-22, using a soak at the start (I typically roasted using a soak):

This is what we’re used to seeing on drum roasters—plenty of heat upfront that backs off as we head toward crack. But of course, the gas percentage doesn’t tell the whole story: some of the flame goes to the drum, and the drum either soaks up or radiates heat, changing the dynamics between the coffee and the roasting environment continually.
Let’s infer what might be happening with the drum’s thermal energy in the roast above:
- We preheat the drum and load it with energy before we roast
- We charge the roaster and use stored thermal energy from the drum to start the roast during the soak
- We turn the burner on—high—to increase the temperature of the air, the coffee, and to rebuild thermal energy in the drum
- To avoid the drum radiating heat back into the environment, we incrementally lower gas.
- We slowly taper off gas to reduce the energy in the drum as we approach crack.
- We finish the roast by applying minimal heat and only using the stored energy of the drum.
But because the drum has energy stored in it, there is an additive effect: as the roast progresses, you are adding heat to the roasting environment not only through the burner but through the radiant energy of the drum. What matters less than how much burner you apply directly is the total sum of energy across the entire system, which is an additive function of the latent energy of the drum and the added energy from the burner:
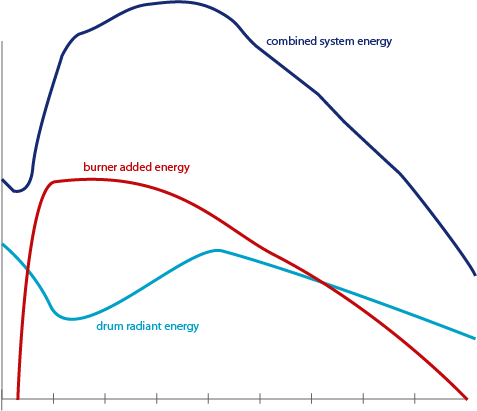
You might notice, of course—that the combined system energy looks like a declining ROR curve.
Here’s another way to visualize this hypothetical scenario of total energy in the roasting system:

There are actual ways to model this—capturing BTU of the roaster and correlating to temperature increases in the drum (and modeling the thermal capacity of the drum itself), but that’s a bit beyond my intention here.
For now, I’ve just built a toy for you to explore and understand the relationship between burner and latent energy.
So: if you want to make coffee from an air roaster taste like coffee from a drum roaster, how do you do it?
Well—simulate a drum roaster. Or more precisely, mimic the system energy of a drum roaster.
The principle is simple, really, and relies on the relationship between the environmental temperature and coffee temperature (expressed through the construct of “bean temperature”): The greater the differential between the temperature of the air and the temperature of the coffee, the faster the coffee will absorb heat. As the environmental temperature and coffee temperature move closer together, a lower rate of rise should follow that smaller delta (“the ET is the tractor for your roast,” I remember reading on home-barista‘s roaster forum. That is to say: BT will always be pulled toward ET—at least on a roaster with properly-placed probes).
Higher ET ∆ BT = higher BT ROR
Lower ET ∆ BT = lower BT ROR
Use the air temperature to mimic the differential between the steel temperature and air temperature and create high levels of sugar browning at key moments during the roast when the drum itself might be shedding heat:
- Charge hot (in an air roaster, you don’t have to worry about scorching, and this builds enough energy in the system to simulate an empty, hot drum and empty, hot air)
- Pull back on the gas when the drum is absorbing it (because the heat is going to both the coffee, air and drum)
- Punch it when the drum would be ripping hot (because the drum would be shedding heat to the coffee and air)
- Keep things steady when the thermal energy is relatively stable
- Anticipate your crack and bend your environmental temps down toward BT to finish.
- Keep your inlet temps below 520ºF.
- Adjust your batch sizes and roast times as needed.
That’s it. That’s how you make a Tesla drive like a freight train.
Here’s how we might translate that to, say, a roaster with no drum and direct control over the environmental temps (the “return air” temp on a Loring, which is approximately the ET, is illustrated in green), bearing in mind the principles above:
Increases in gas (red at the bottom, ranging from 20-100%) precipitate an increase in temperatures in the roasting environment, and decreases have the opposite effect (since heat in the environment will be absorbed by the coffee).
We charge hot, to mimic a drum loaded with heat, then cut gas at the start (Lorings automatically cut gas to minimum/20% while the hopper is open) to shed heat the way a drum would, driving the energy into the cold coffee.
We then ramp up the power leading up to when the coffee would start taking on yellow to drive inner-bean development and begin browning reactions, increasing the environmental temperatures inside the roasting environment—mimicking the way that the drum temperatures would increase and radiate back into the environment, forcing us to cut gas as the roast progresses.
We make our initial cuts slightly later since we don’t have the heat of the drum to contend with, but once the coffee is fully past tan and browning we back off; by the time the roast is 66% or more complete we set ourselves up for crack and drastically cut the throttle to shed heat in the roasting environment. This mimics the way that the drum would stabilize in temperature and then spin at lower temperatures toward crack, giving us a controlled coast toward the end and avoiding a crash.
Here’s a look at the image of the combined system energy from the previous section, but with the burner curve from the Loring curve above scaled and overlaid:
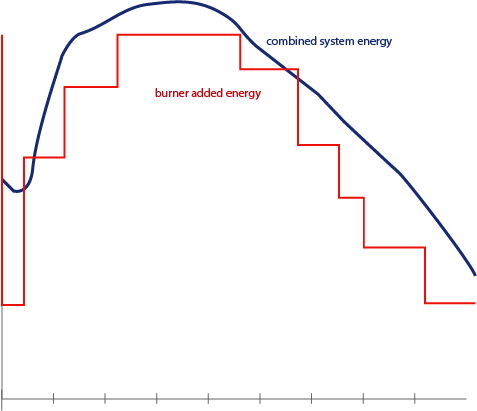
The correlation between burner and total system energy is much more direct—it’s easy to visualize how we manage the system’s total energy, versus a drum roaster. Gas in, heat out. If we want to make our Loring taste like a Gothot, understand the way that heat soaks up and sheds in a Gothot and model that total system energy.
It’s like convolution reverb, but for coffee.
Managed well, an air roaster offers the flexibility of emulating the cup profile offered by drum roasters with the ability to roast in entirely different ways.
The difference here is that we’re making a choice—we’re operating the machine with understanding and intention.
See: there’s roasting—and then there’s just blowing hot air.
Tags: loring probat roasting sivetz
As newbie roaster i appreciate the tip am to meeting you
When you say charge hot, how hot? For a fully loaded batch on a Loring is that somewhere around 600F? In order to keep the inlet temp. below 520F throughout I would think the charge would have to be quite hot, at least 600F.
Hey! It depends on your machine, batch size, etc. Generally I’m less concerned about anything that happens in the first half of the roast when the coffee is still pretty protected by a vapor barrier – but when you get towards crack, things can get dicey if you’re running too hot. At max capacity on my S35, looking through recent logs, I’m charging typically 470-500 return temp depending on profile and inlet might be north of 580 but never hits above 510-520 once I’m settled into the roast. Hope you find that helpful!
great!how high you charge yr ug22 when its fully loaded
Hey! depends what you mean by fully loaded — how fast are you roasting? how dark? what coffee? In general I never liked to roast more than 60-65% of the stated capacity on the UG22 — so rather than 22kg I’d roast with a max of about 13-15kg at a time so that I could keep roast times to around 10 minutes.
This is great thanks Christopher. My newly finished frankenroaster is a heat gun/flour sifter so the graphs above and heat application points are exactly what I was looking for – many thanks!
Muchas gracias por la maravillosa lista.
This was super helpful – I roast every day on an S70 and often struggle to reproduce some of the beautiful, controlled roast curves I see people doing with them. For as popular as Lorings are becoming, there still doesn’t seem to be much writing that really dives deep into the particulars of their usage!
Let your Return air be your guide!
This has very literally changed the way I think about curve development over the past few days. I feel like the galaxy brain meme
Think you can help me come up with a similar temp profile for my small hot air roaster? Think of a 1lb version of a Coffee Crafters Artisan roaster. Such as starting temp and increments?
A little late to the party. I’m not sure if you’ve ever seen an Artisan profile from a BC-2, but if you have, the ET curve is goofy. I believe the ET probe in the exhaust piping is exhaust temp instead of a true environment temp. I guess I need to figure out where I need to relocate this probe for numbers that don’t look……….goofy. Thanks for some interesting teaching.
Exhaust is still useful! But yes, I added another probe to the BC-2 when I had one =)